Recent Shallow Draft columns have included reader comments on wishbone tillers—not all favorable—giving me the opening I’ve been waiting for. Like it or not, we want to show you how to make one of those weird tillers that wrap around mizzen masts on small sailboats.
I know, you may not give a whit about mizzen masts, either, but bear with us as we talk about small things of marginal value. The good news: There won’t be a test at the end…if you make it that far.
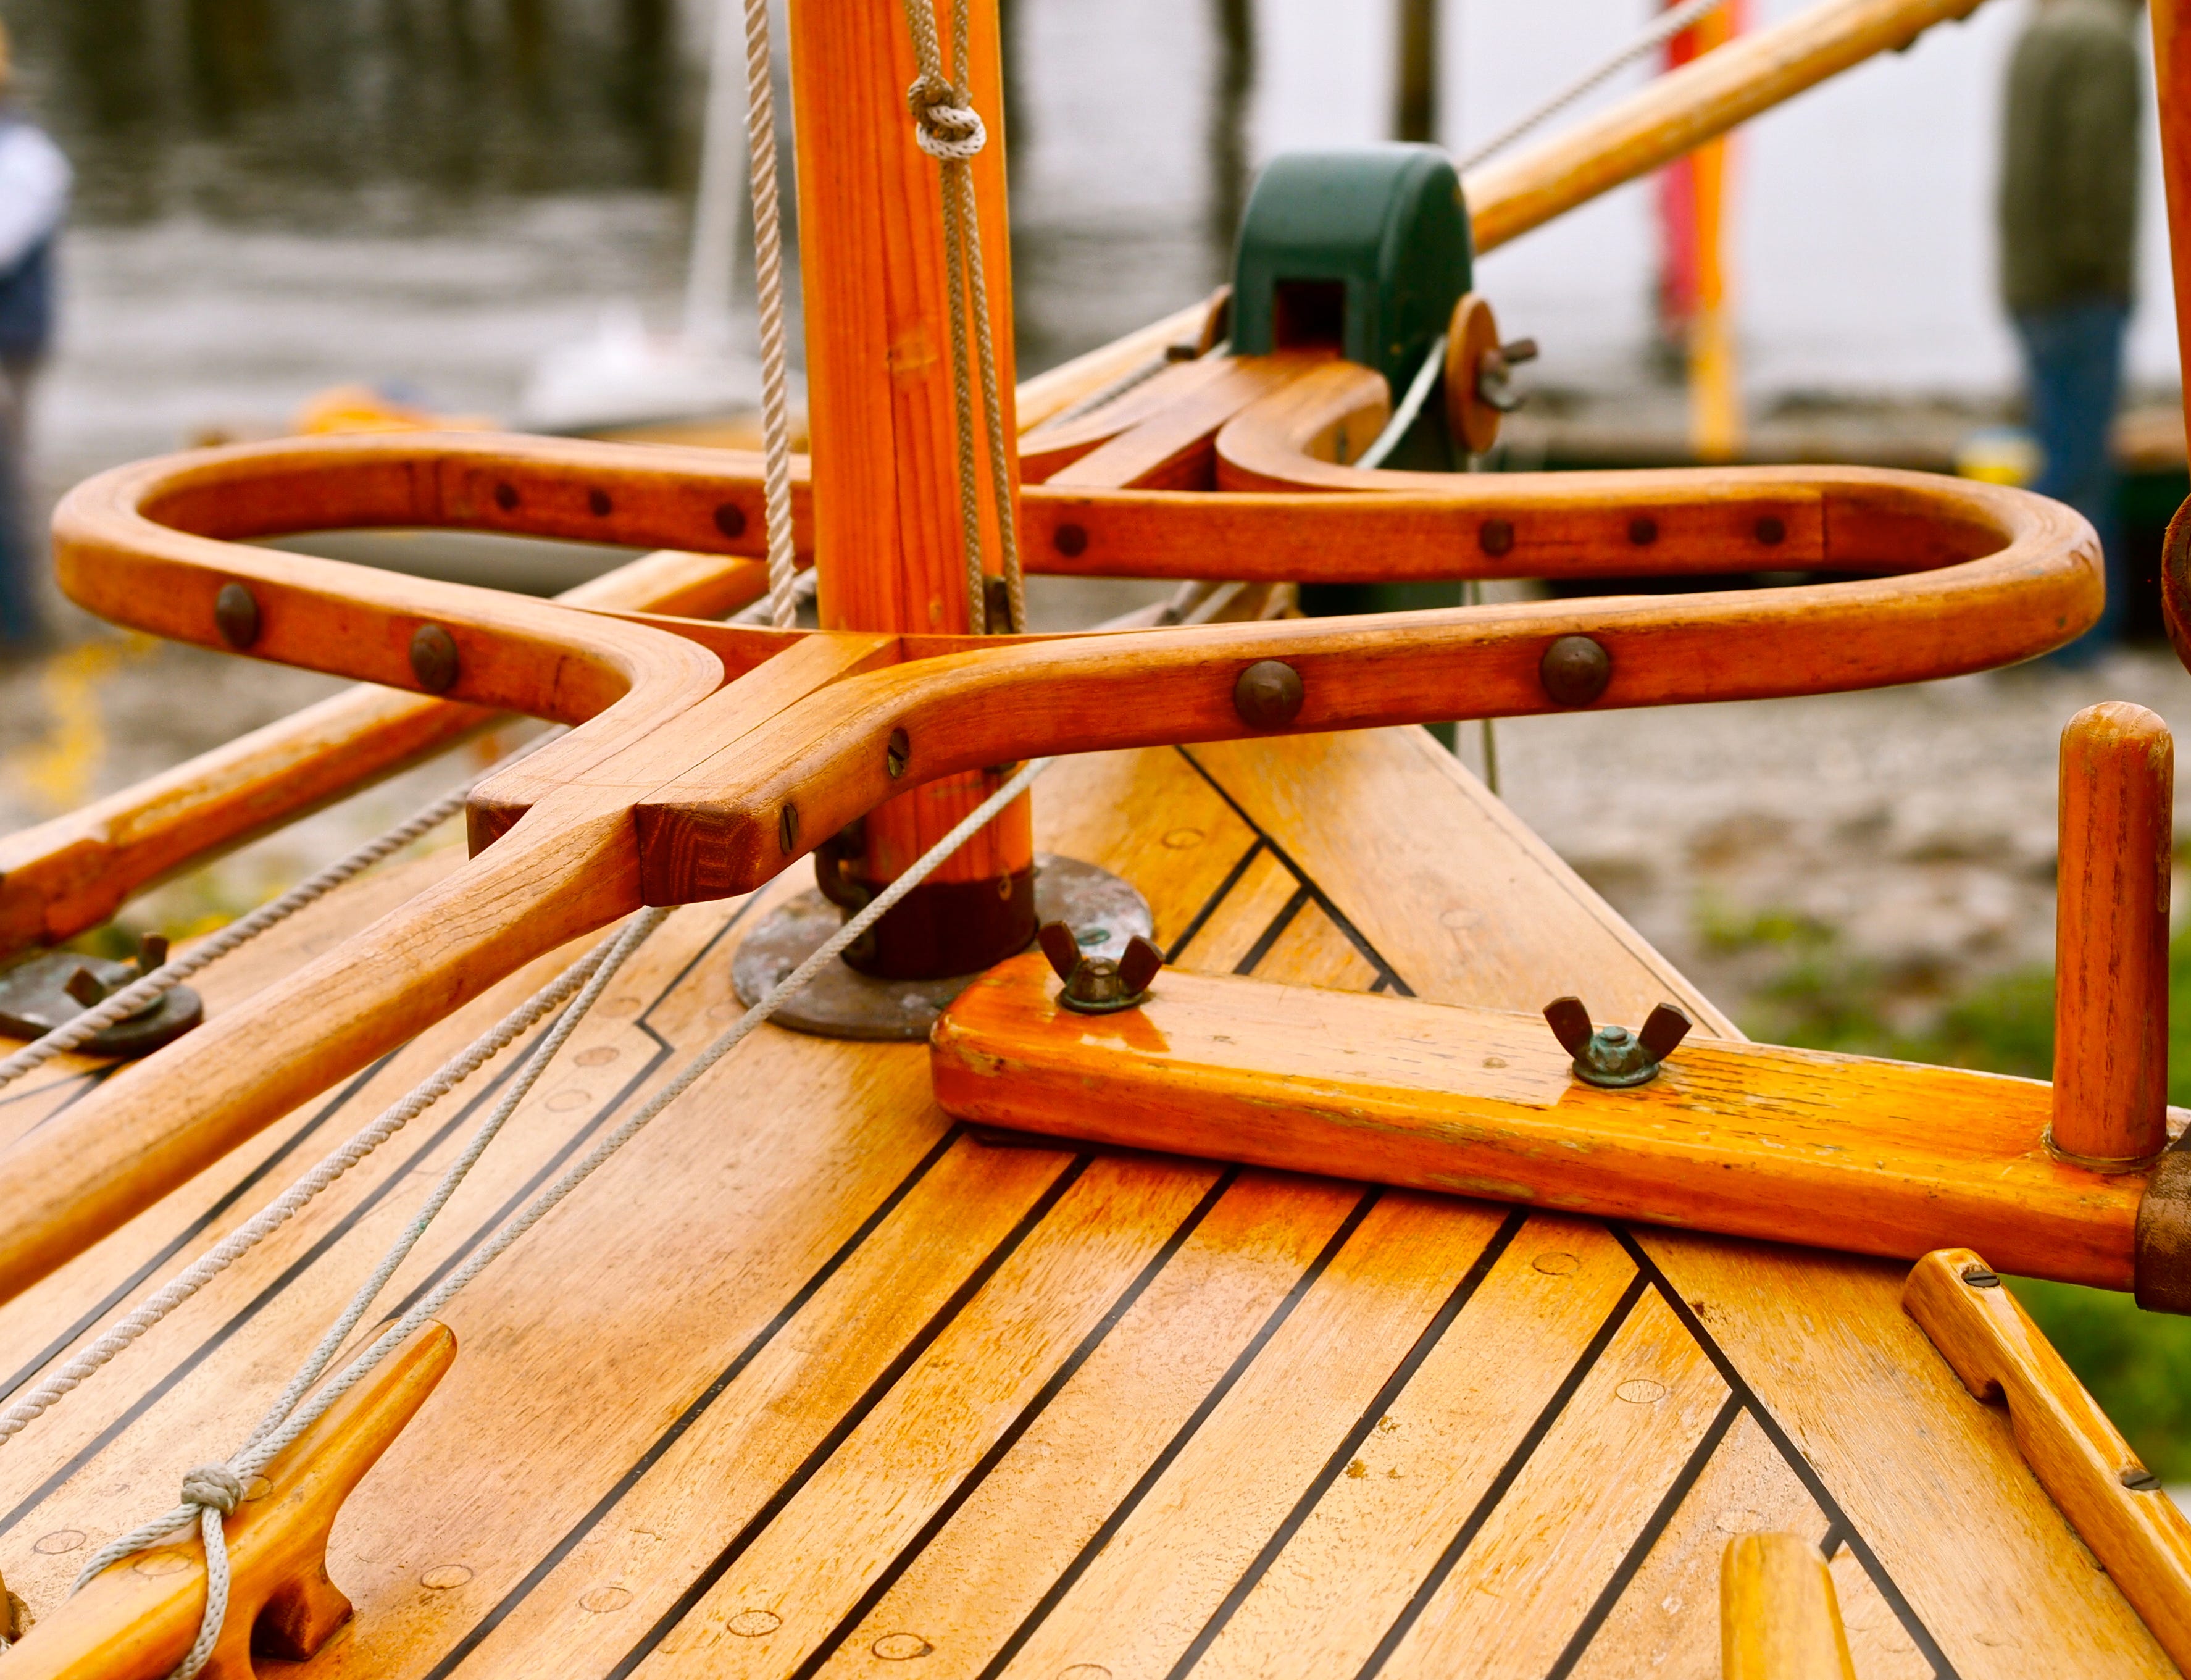
Our introduction to wishbone tillers began years ago, with a fetching 13’ canoe yawl designed in the late 1800’s by George Holmes of England’s Humber Yawl Club. This example, NORD VINDEN, was built in the 1980’s, and while we loved sailing the boat we were especially infatuated with her wishbone tiller—an elegant, artistic example of steambent oak, copper-riveted and wonderfully functional.
This was NORD VINDEN, a nimble little canoe yawl with low-slung fan centerboard. (Despite the boat’s diminutive size, I could actually sleep aboard by arranging boat cushions around the 3”-tall CB trunk). You can barely see the wishbone tiller in this distant view.
Here’s a closeup of NORD VINDEN’s wishbone tiller, made with laminations of steambent oak held together with copper rivets. The wishbone is an alternative to using an offset steering arm attached to the rudder, with a push-pull tiller running forward on one side of the mizzen mast. That approach certainly works fine if you like pushing and pulling, but my preference is to steer with a conventional tiller in hand. (Another alternative approach is to place the mizzen mast off to one side, far enough to allow use of a conventional straight tiller. While I know the boat will sail okay like that, misaligned mizzens play hell with my preference for symmetry. Marty Loken photo
Over the past year we’ve been working part-time on MOUSE, a glued-lapstrake gunter yawl. While MOUSE is only 14’ on deck, she is 20’ overall including bowsprit and boomkin, and with a beam of 6’ 6” she feels like a little ship. (As mentioned a few times, we’ll offer a series of SCA articles on MOUSE in the not-distant future, but today we’re sticking with wishbone tillers.)
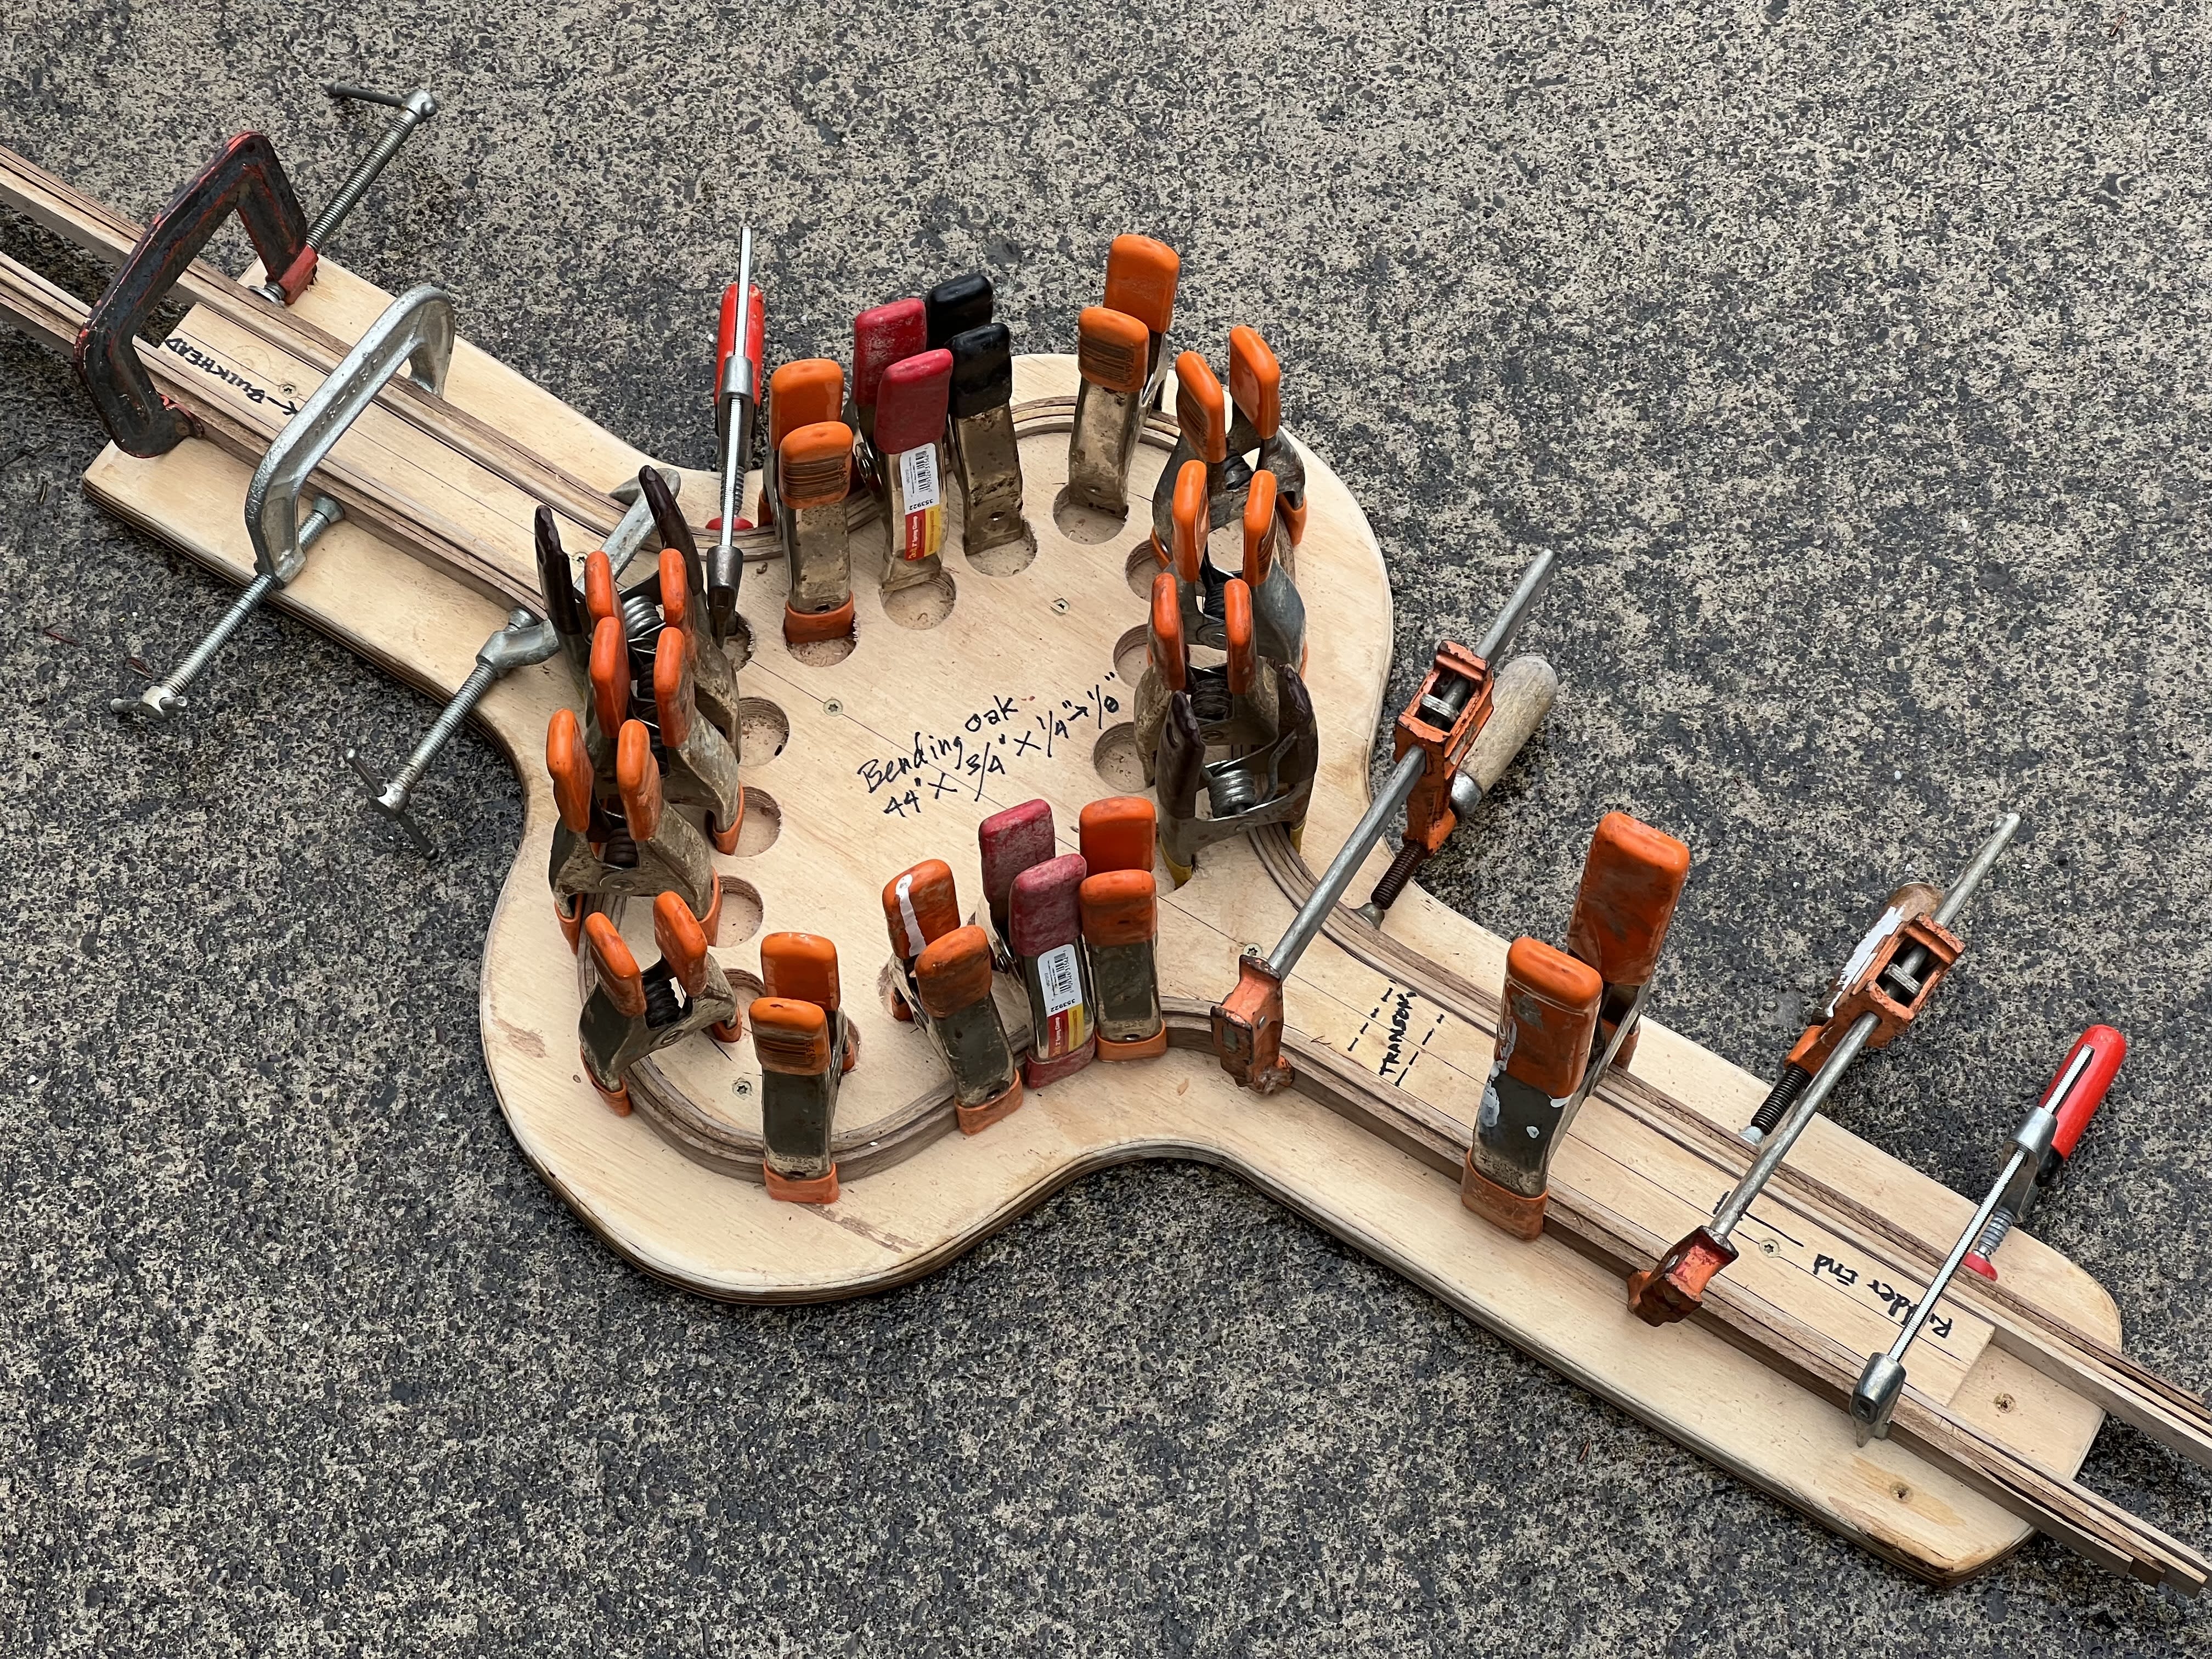
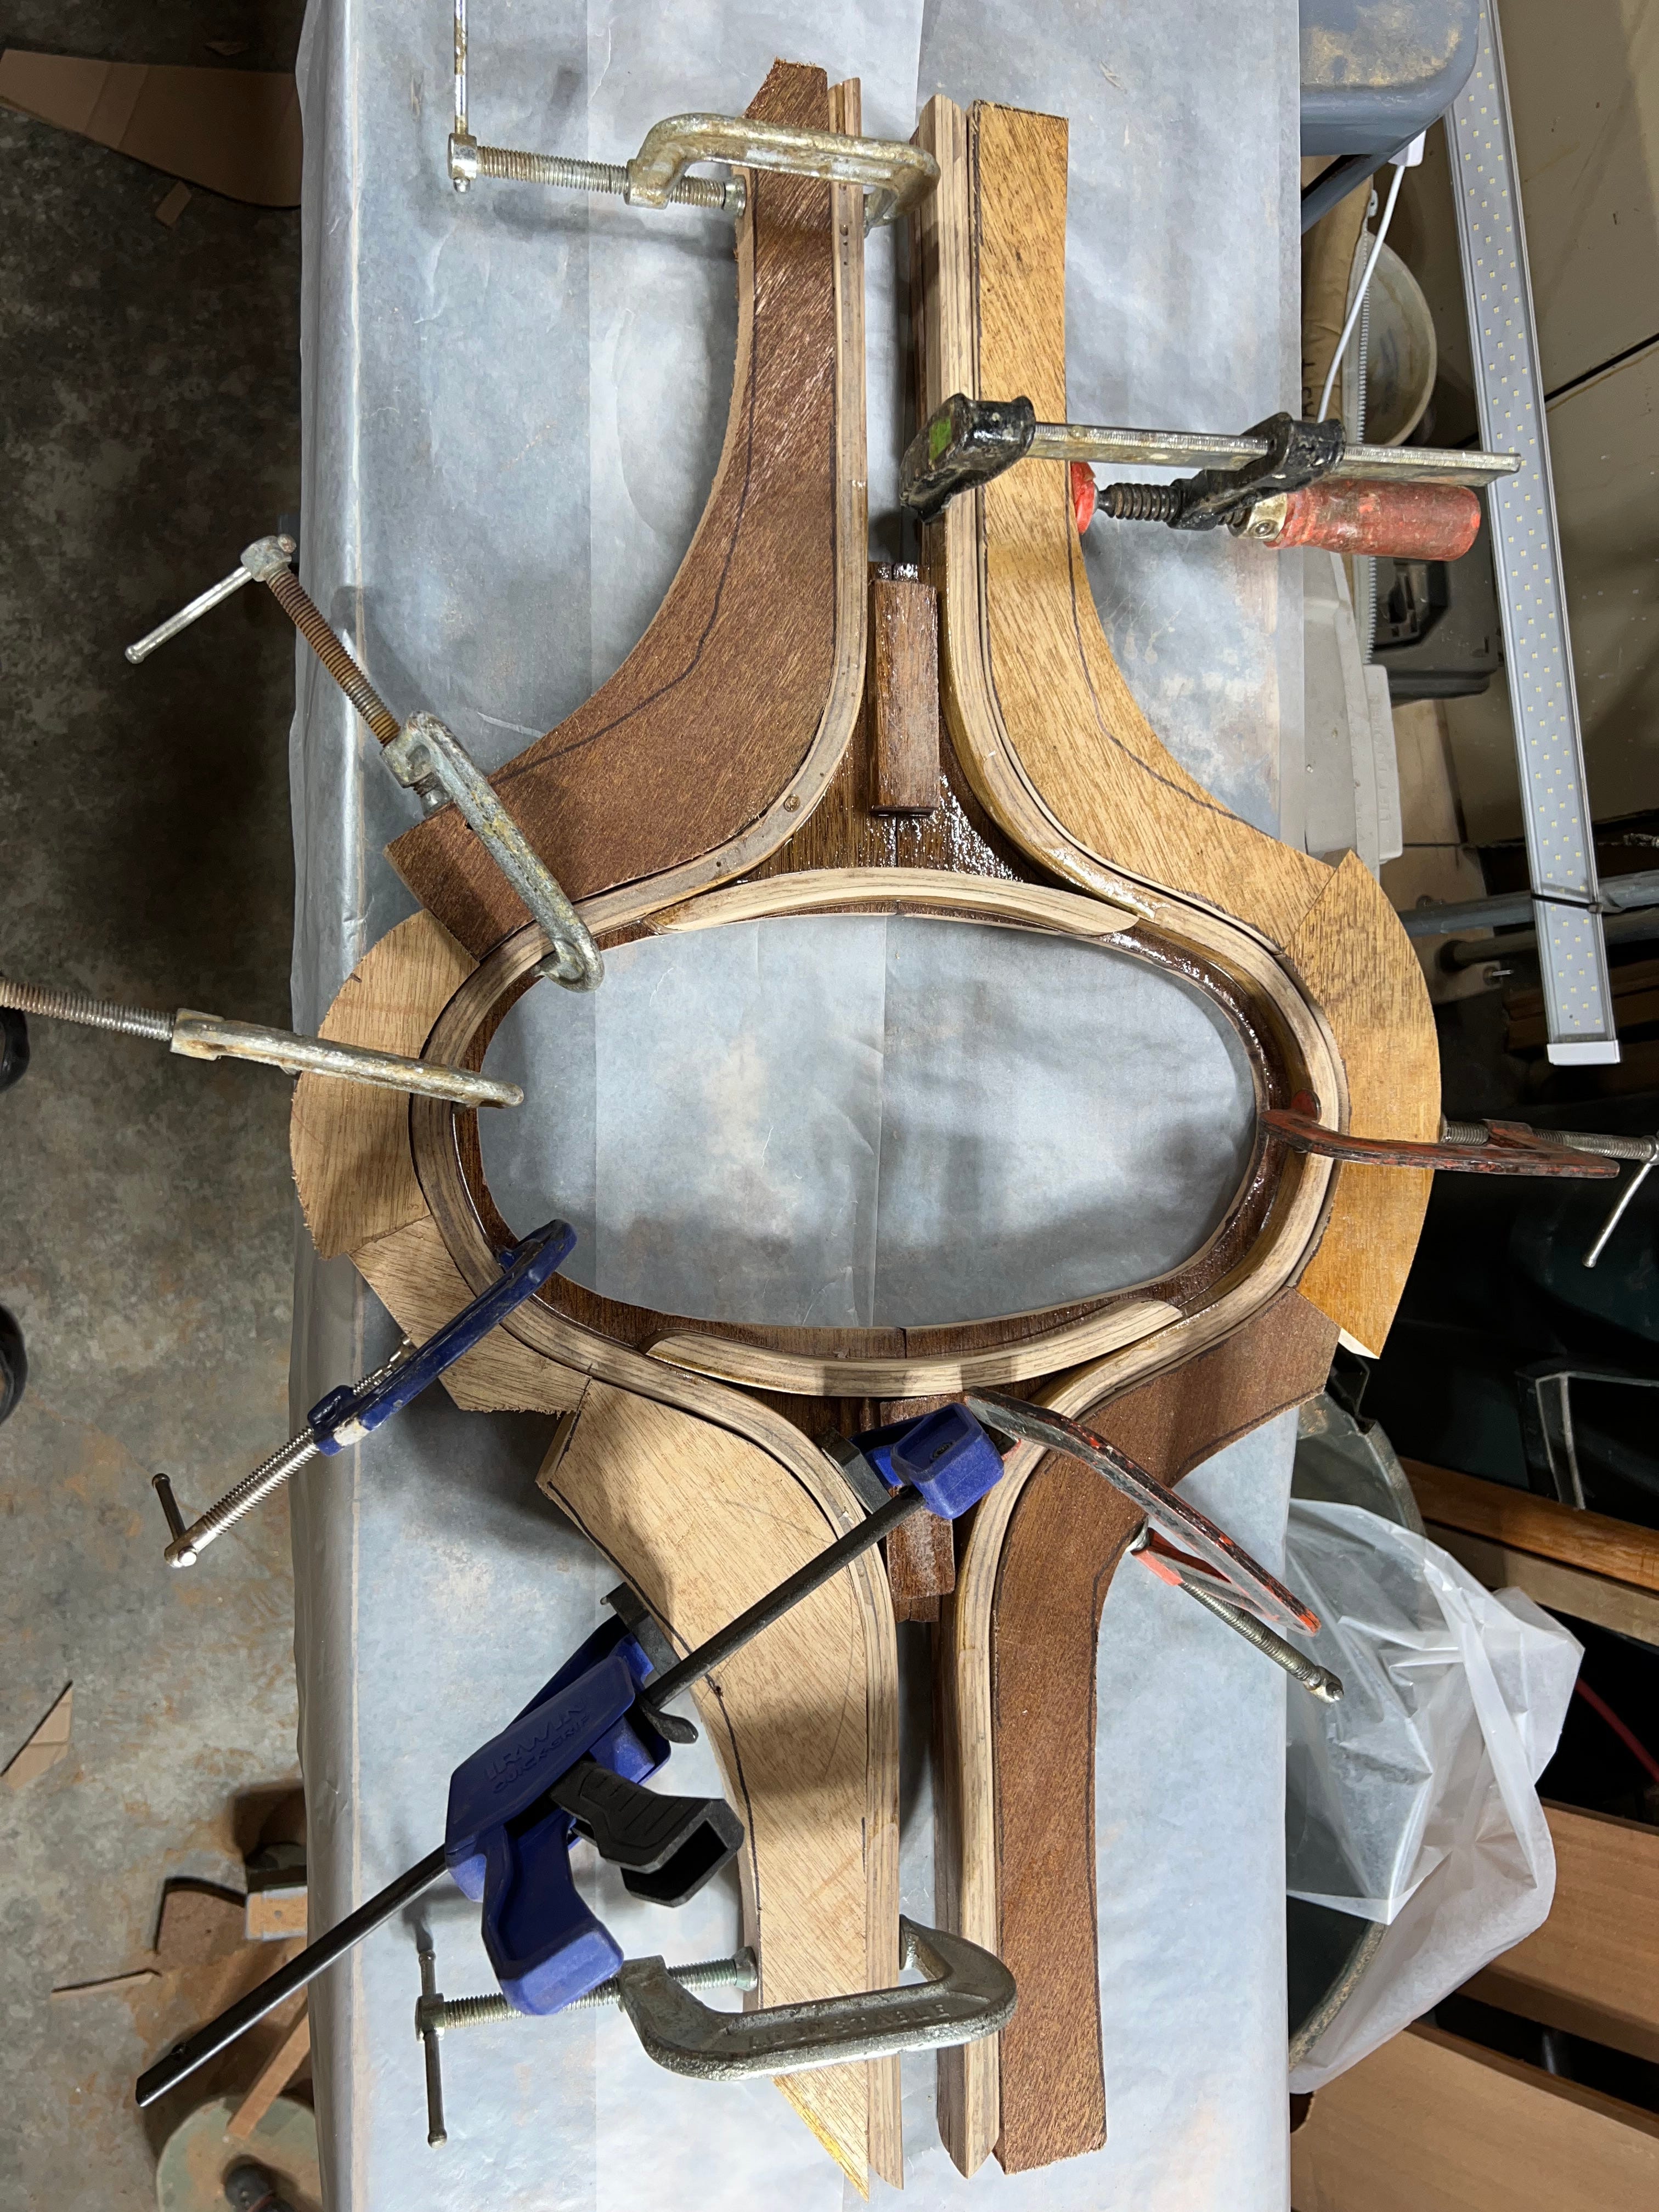
With a mizzen mast planted 9” forward of the transom on a 21”-deep aft deck, we had the right amount of room to fashion a steambent wishbone around the mizzen. The first task was to buy a pricy eight-quarter slab of green (bending) oak—enough for half a dozen wishbones, but the smallest hunk available. We then milled a 44”-long piece into 1/8”-3/16” x 3/4” strips that, once steam-bent, could survive the incredibly tight bends planned for our wishbone. (Side note: If you ever do this, make sure to orient your tablesaw cuts so that you’re bending flat grain, not vertical.)
After finishing the millwork, and taking measurements to be sure our wishbone design would allow enough port-to-starboard swing, we designed a bending form consisting of two layers of 3/4” exterior fir plywood, with holes drilled around the inside perimeter to host lots of clamps. (When bending thin layers of wood around such a form—especially if bends are small in radius—you need to avoid gaps between the laminations…so it’s one of those more-clamps-the-merrier situations.
One of the first steps, after milling the green bending oak into strips, was to draw the desired wishbone shape and put together a bending form made of two laters of 3/4” fir plywood. It’s easy to clamp the straight sections, but holes were drilled around the tight bends to accommodate a number of clamps. Finished length of the wishbone was 29,” with an inside-the-hoop width of 14.” (The upper end of the finished wishbone would host a straight, pivoting tiller arm; the lower end would extend through a slot in the transom and be bolted onto the rudder.)
Before applying heat for the final bending process, I soaked the milled strips of oak in a quickly-formed tub outside the shop—just a nailed-together frame with tarp for bottom and side walls. After two days afloat, the 1/8” to 3/16”-thick strips were ready for some hot water. (As you’ll see in the next photo, I like to boil bending oak in a 4”-ID galvanized pipe, capped at one end, rather than setting up a steam-bending operation. Boiling does the job just fine. The drilled holes are for strings tied to the end of each piece, allowing me to shove them deep into the water-filled pipe, but retrieve them without scalding fingers.
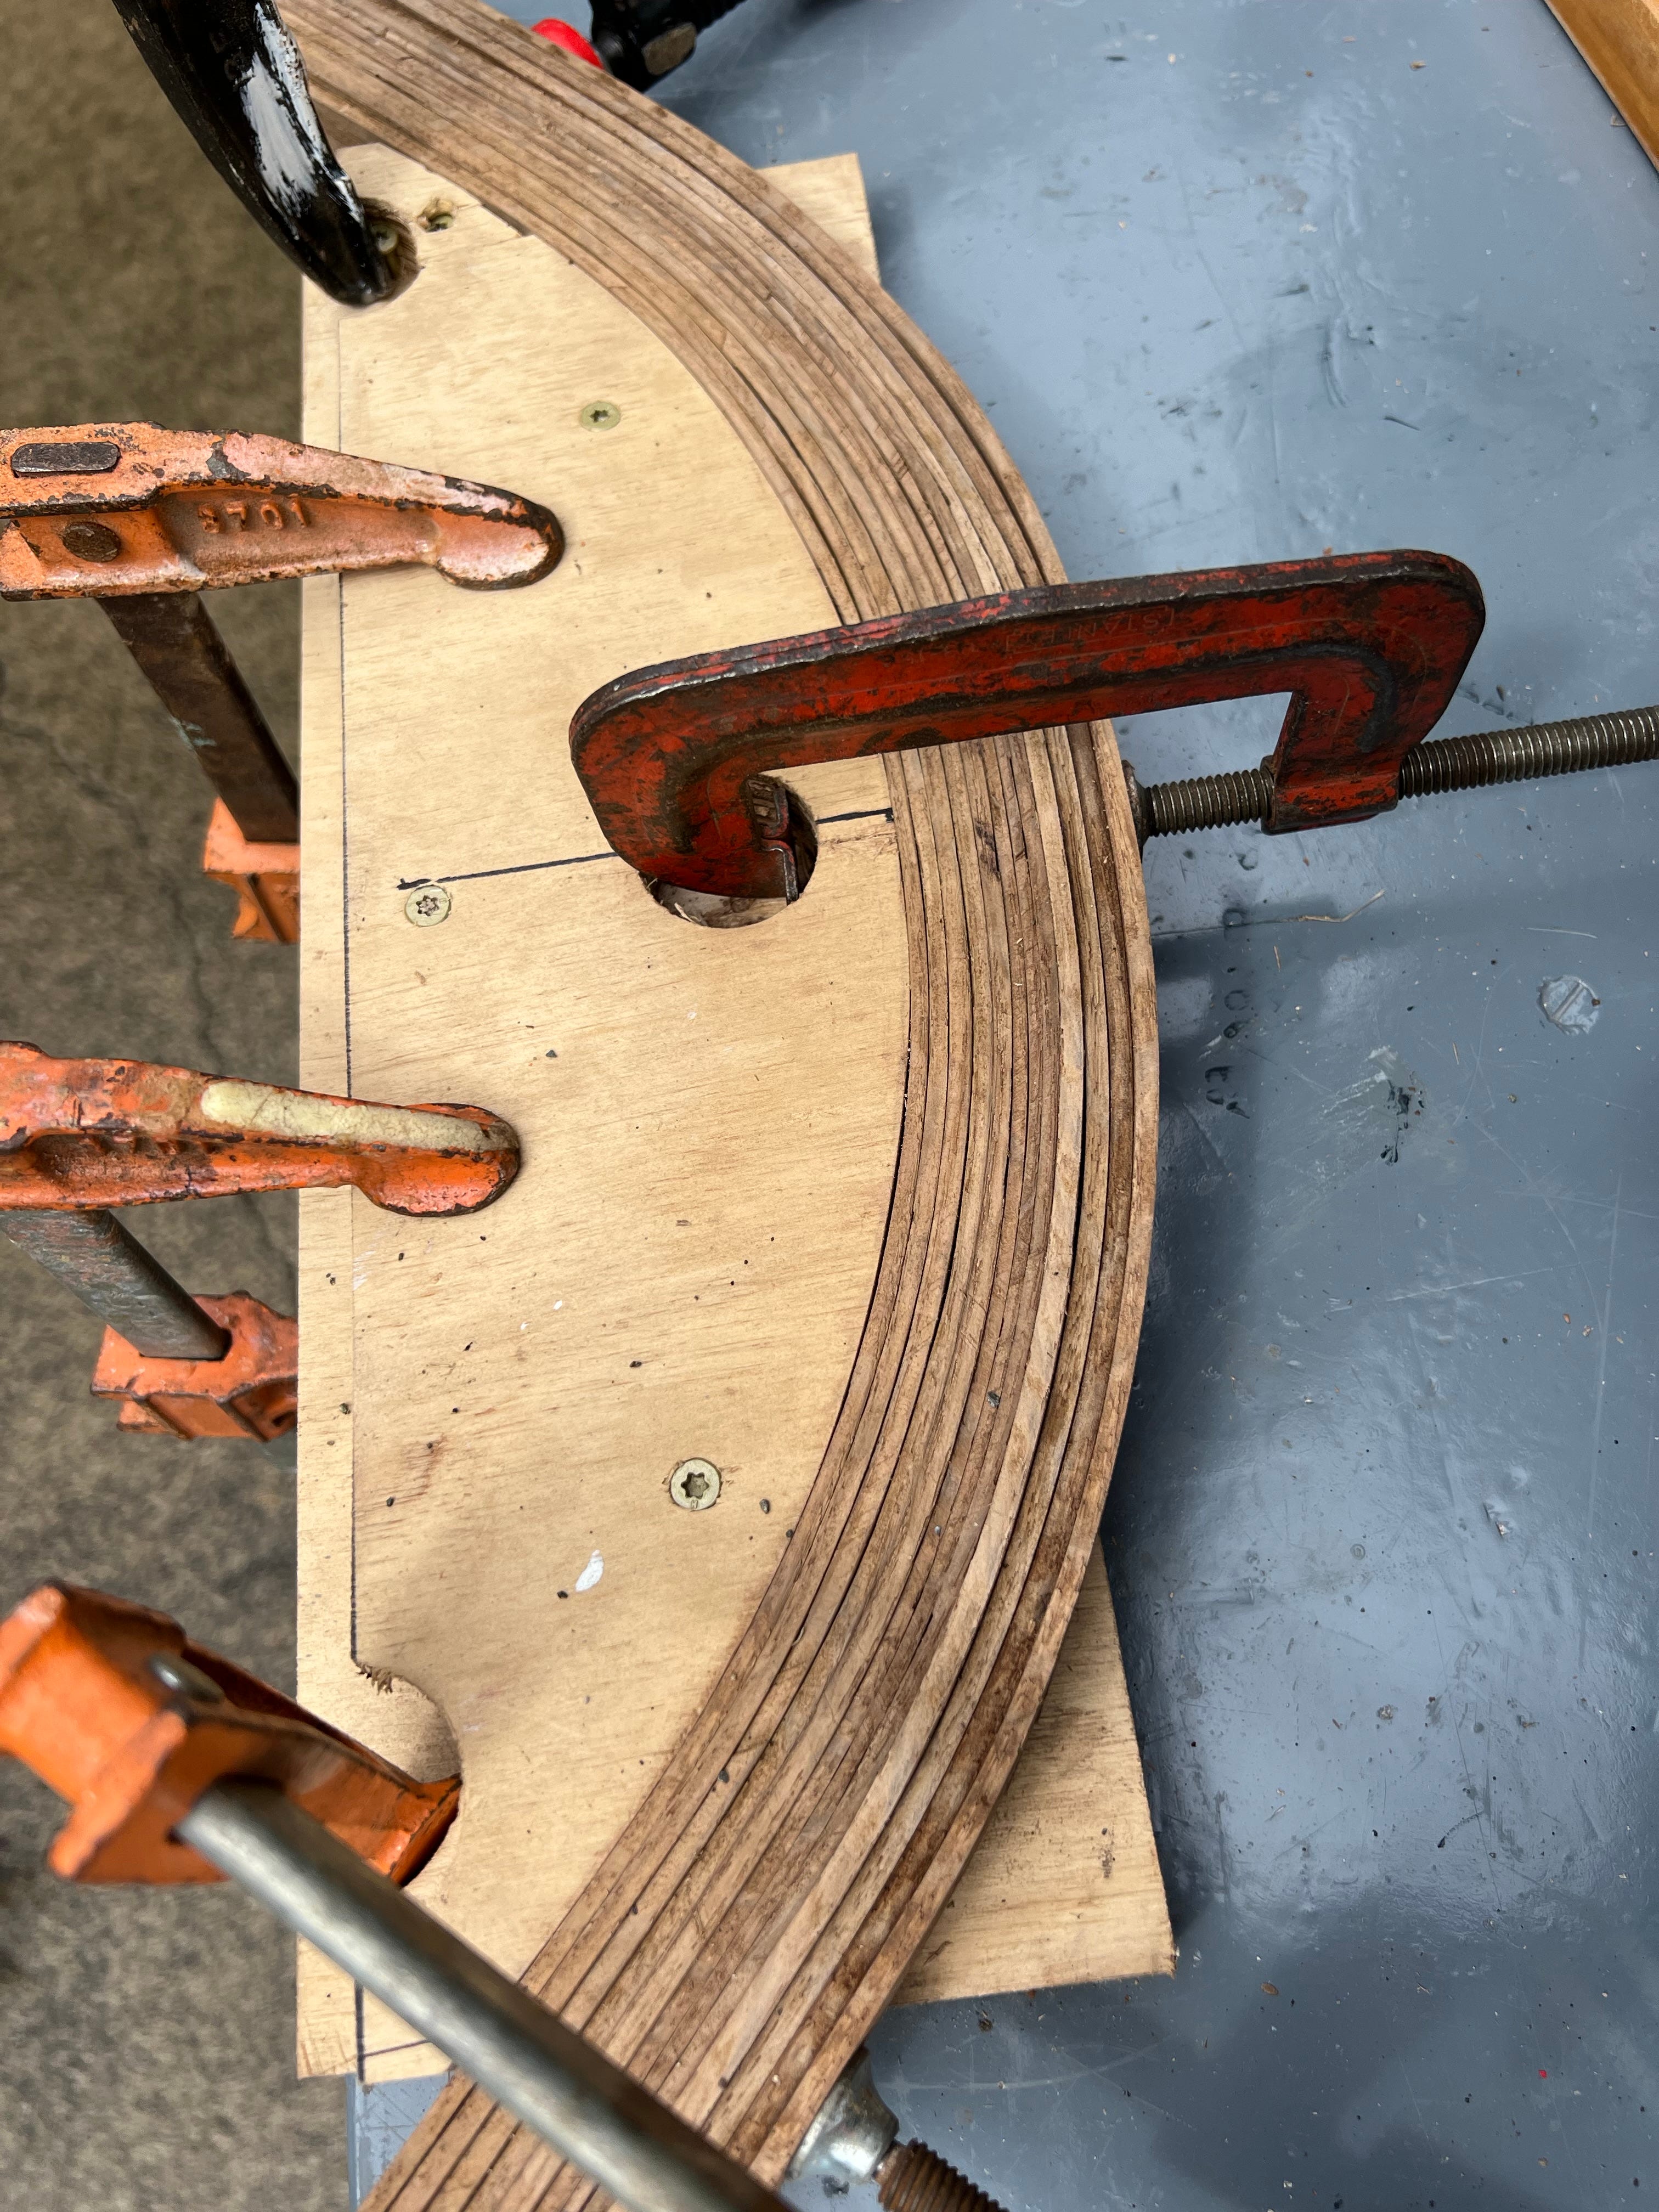
This is the lower, capped end of the steam-bending pipe, supported so that the open end is slightly elevated. Just fill the pipe with water and fire up the 200,000-btu propane crab cooker; it doesn’t take long for water in the pipe to boil. Leaving each thin strip of green oak in boiling water for about 20 minutes does the job, but you need to work quickly to secure each piece on the bending form, since once in cool air the pliable strips begin to stiffen. (This is where you might want a helper—two gloved hands to bend and hold each hot strip in place, and two more hands to quickly do the clamping. Thanks, shop mate Bob Miller, for lending those two extra hands.)
Success! Four laminated layers are clamped in place without cracking or breaking. (Every time I bend green oak, I’m amazed when we survive the process without fracturing at least a few of the laminated pieces. That’s why it’s always wise to mill extra strips, just in case.) So, after everything’s firmly clamped, we leave it to dry for several days…getting resigned to its new shape.
While we were at it, we also bent some extra shorter strips—some of which would be used to help strengthen the wishbone. (See next photo for how some of these pieces were used.)
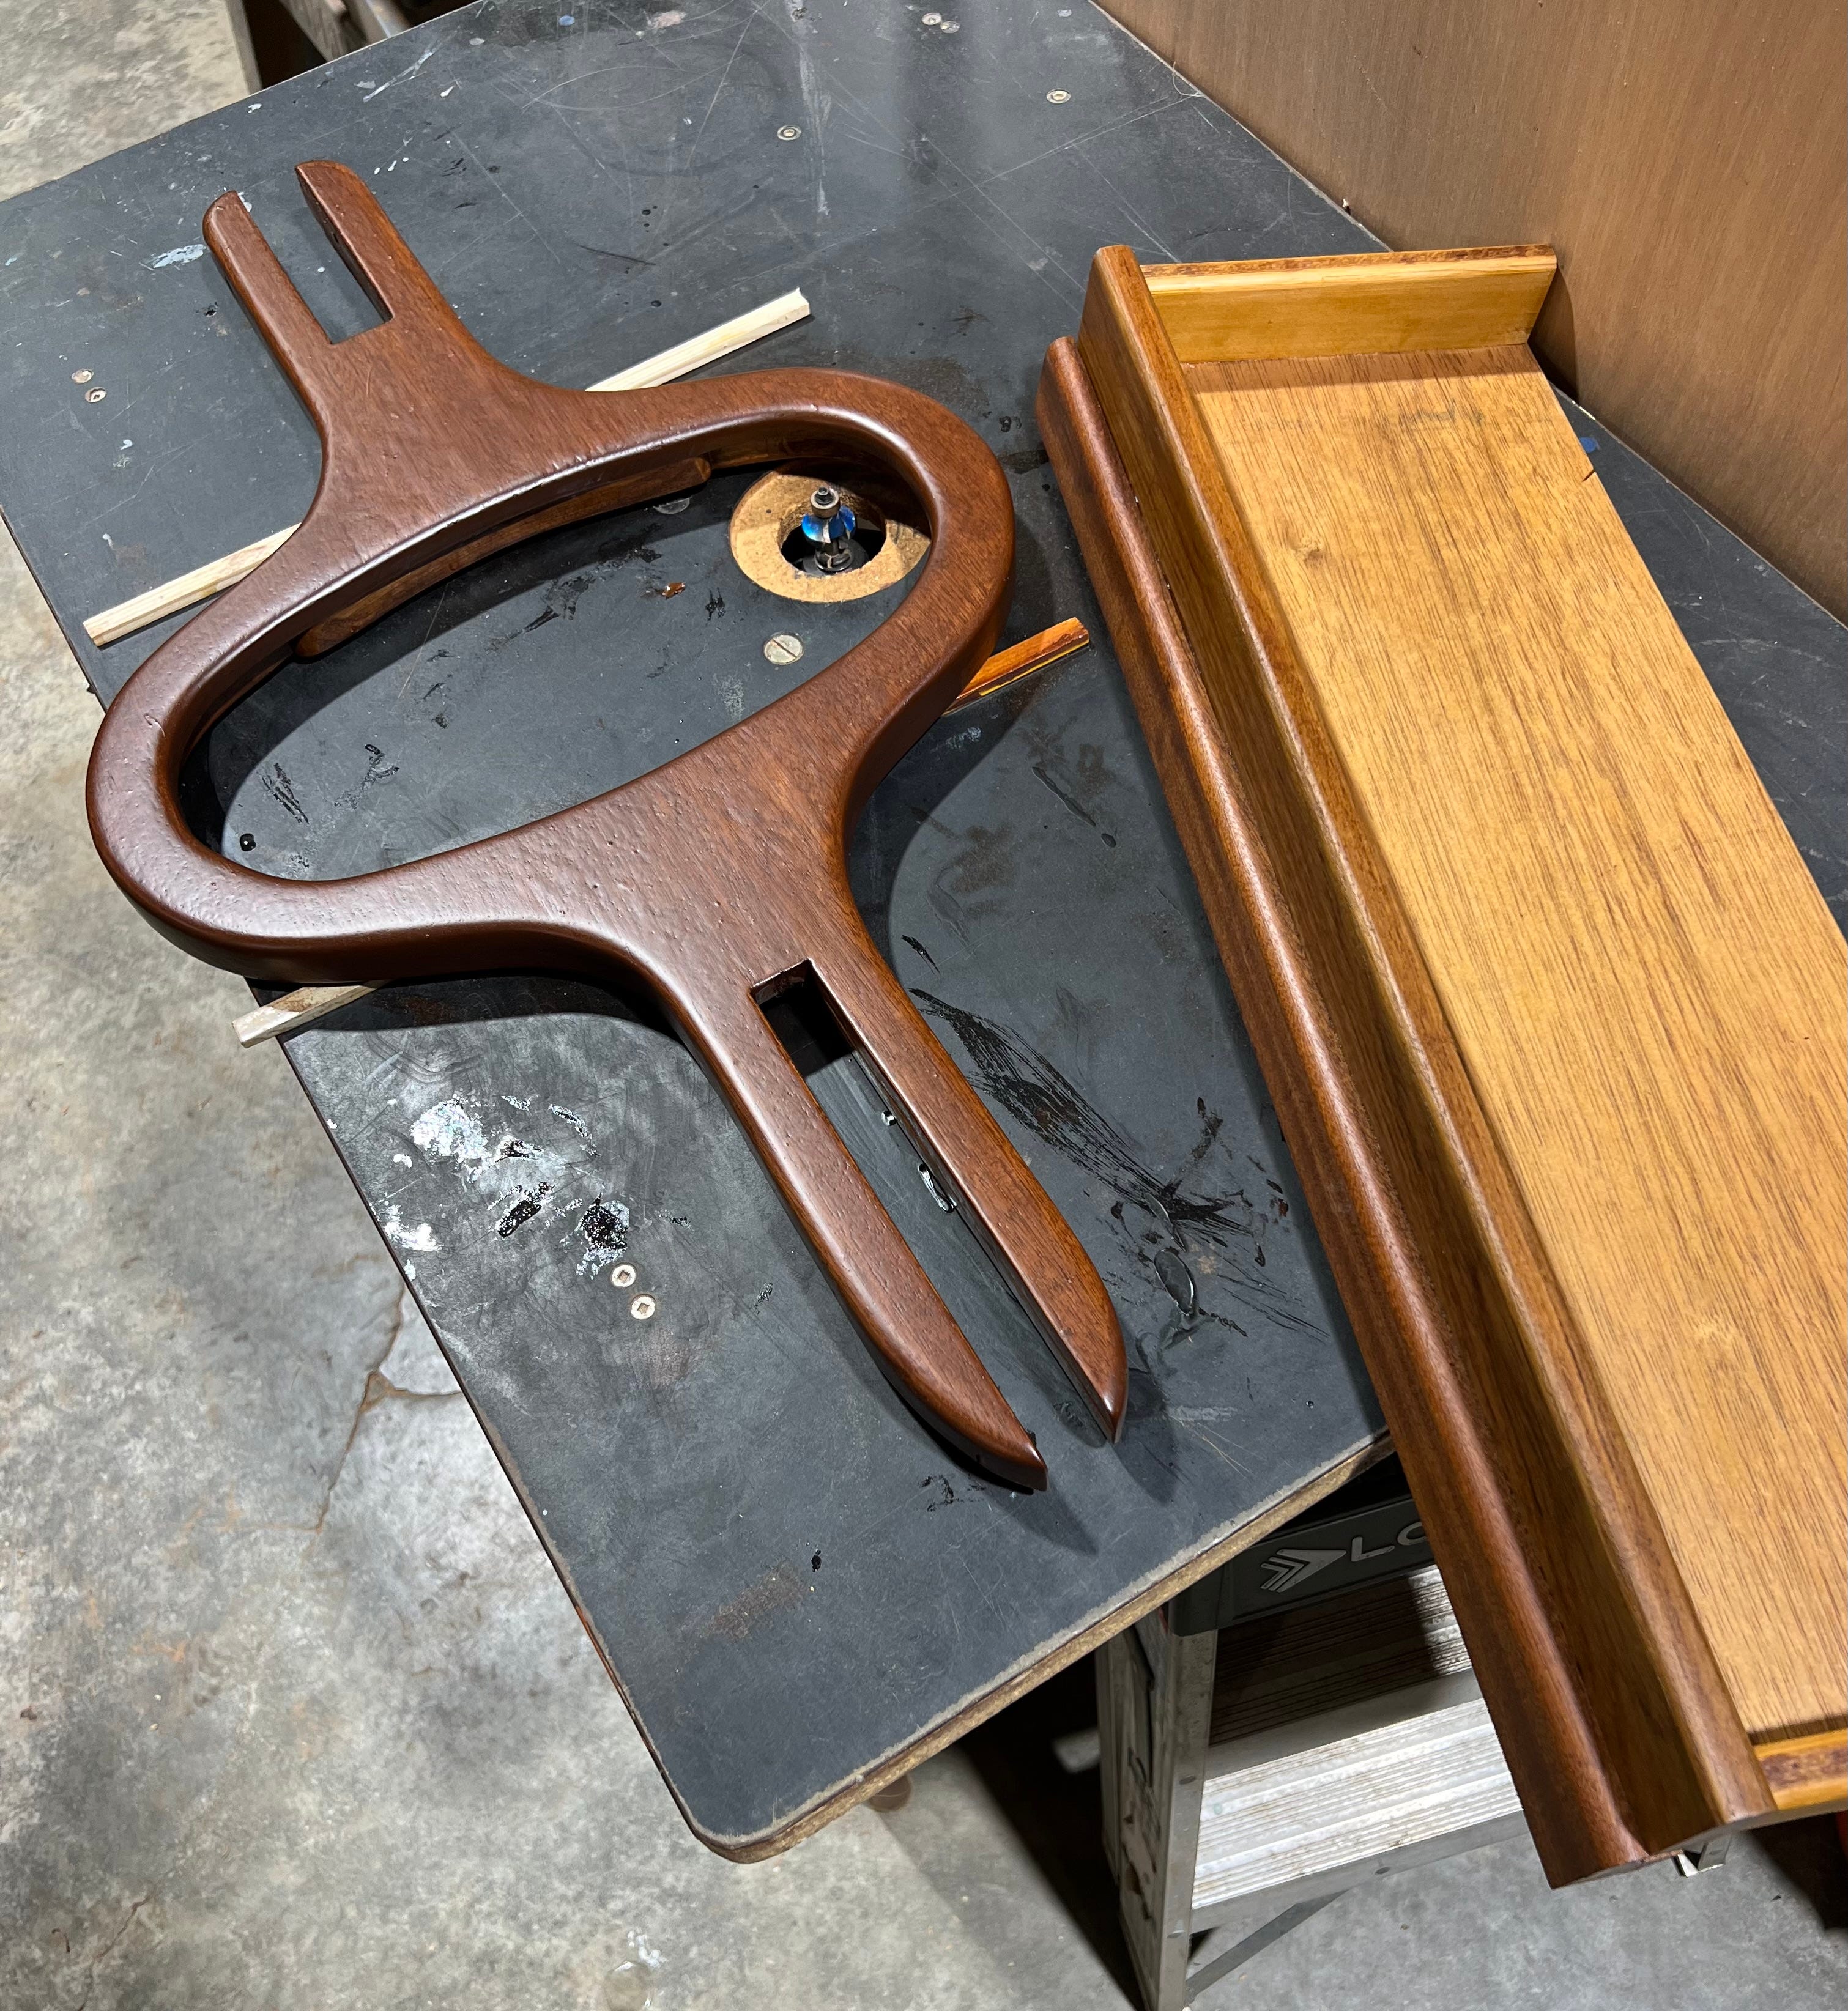
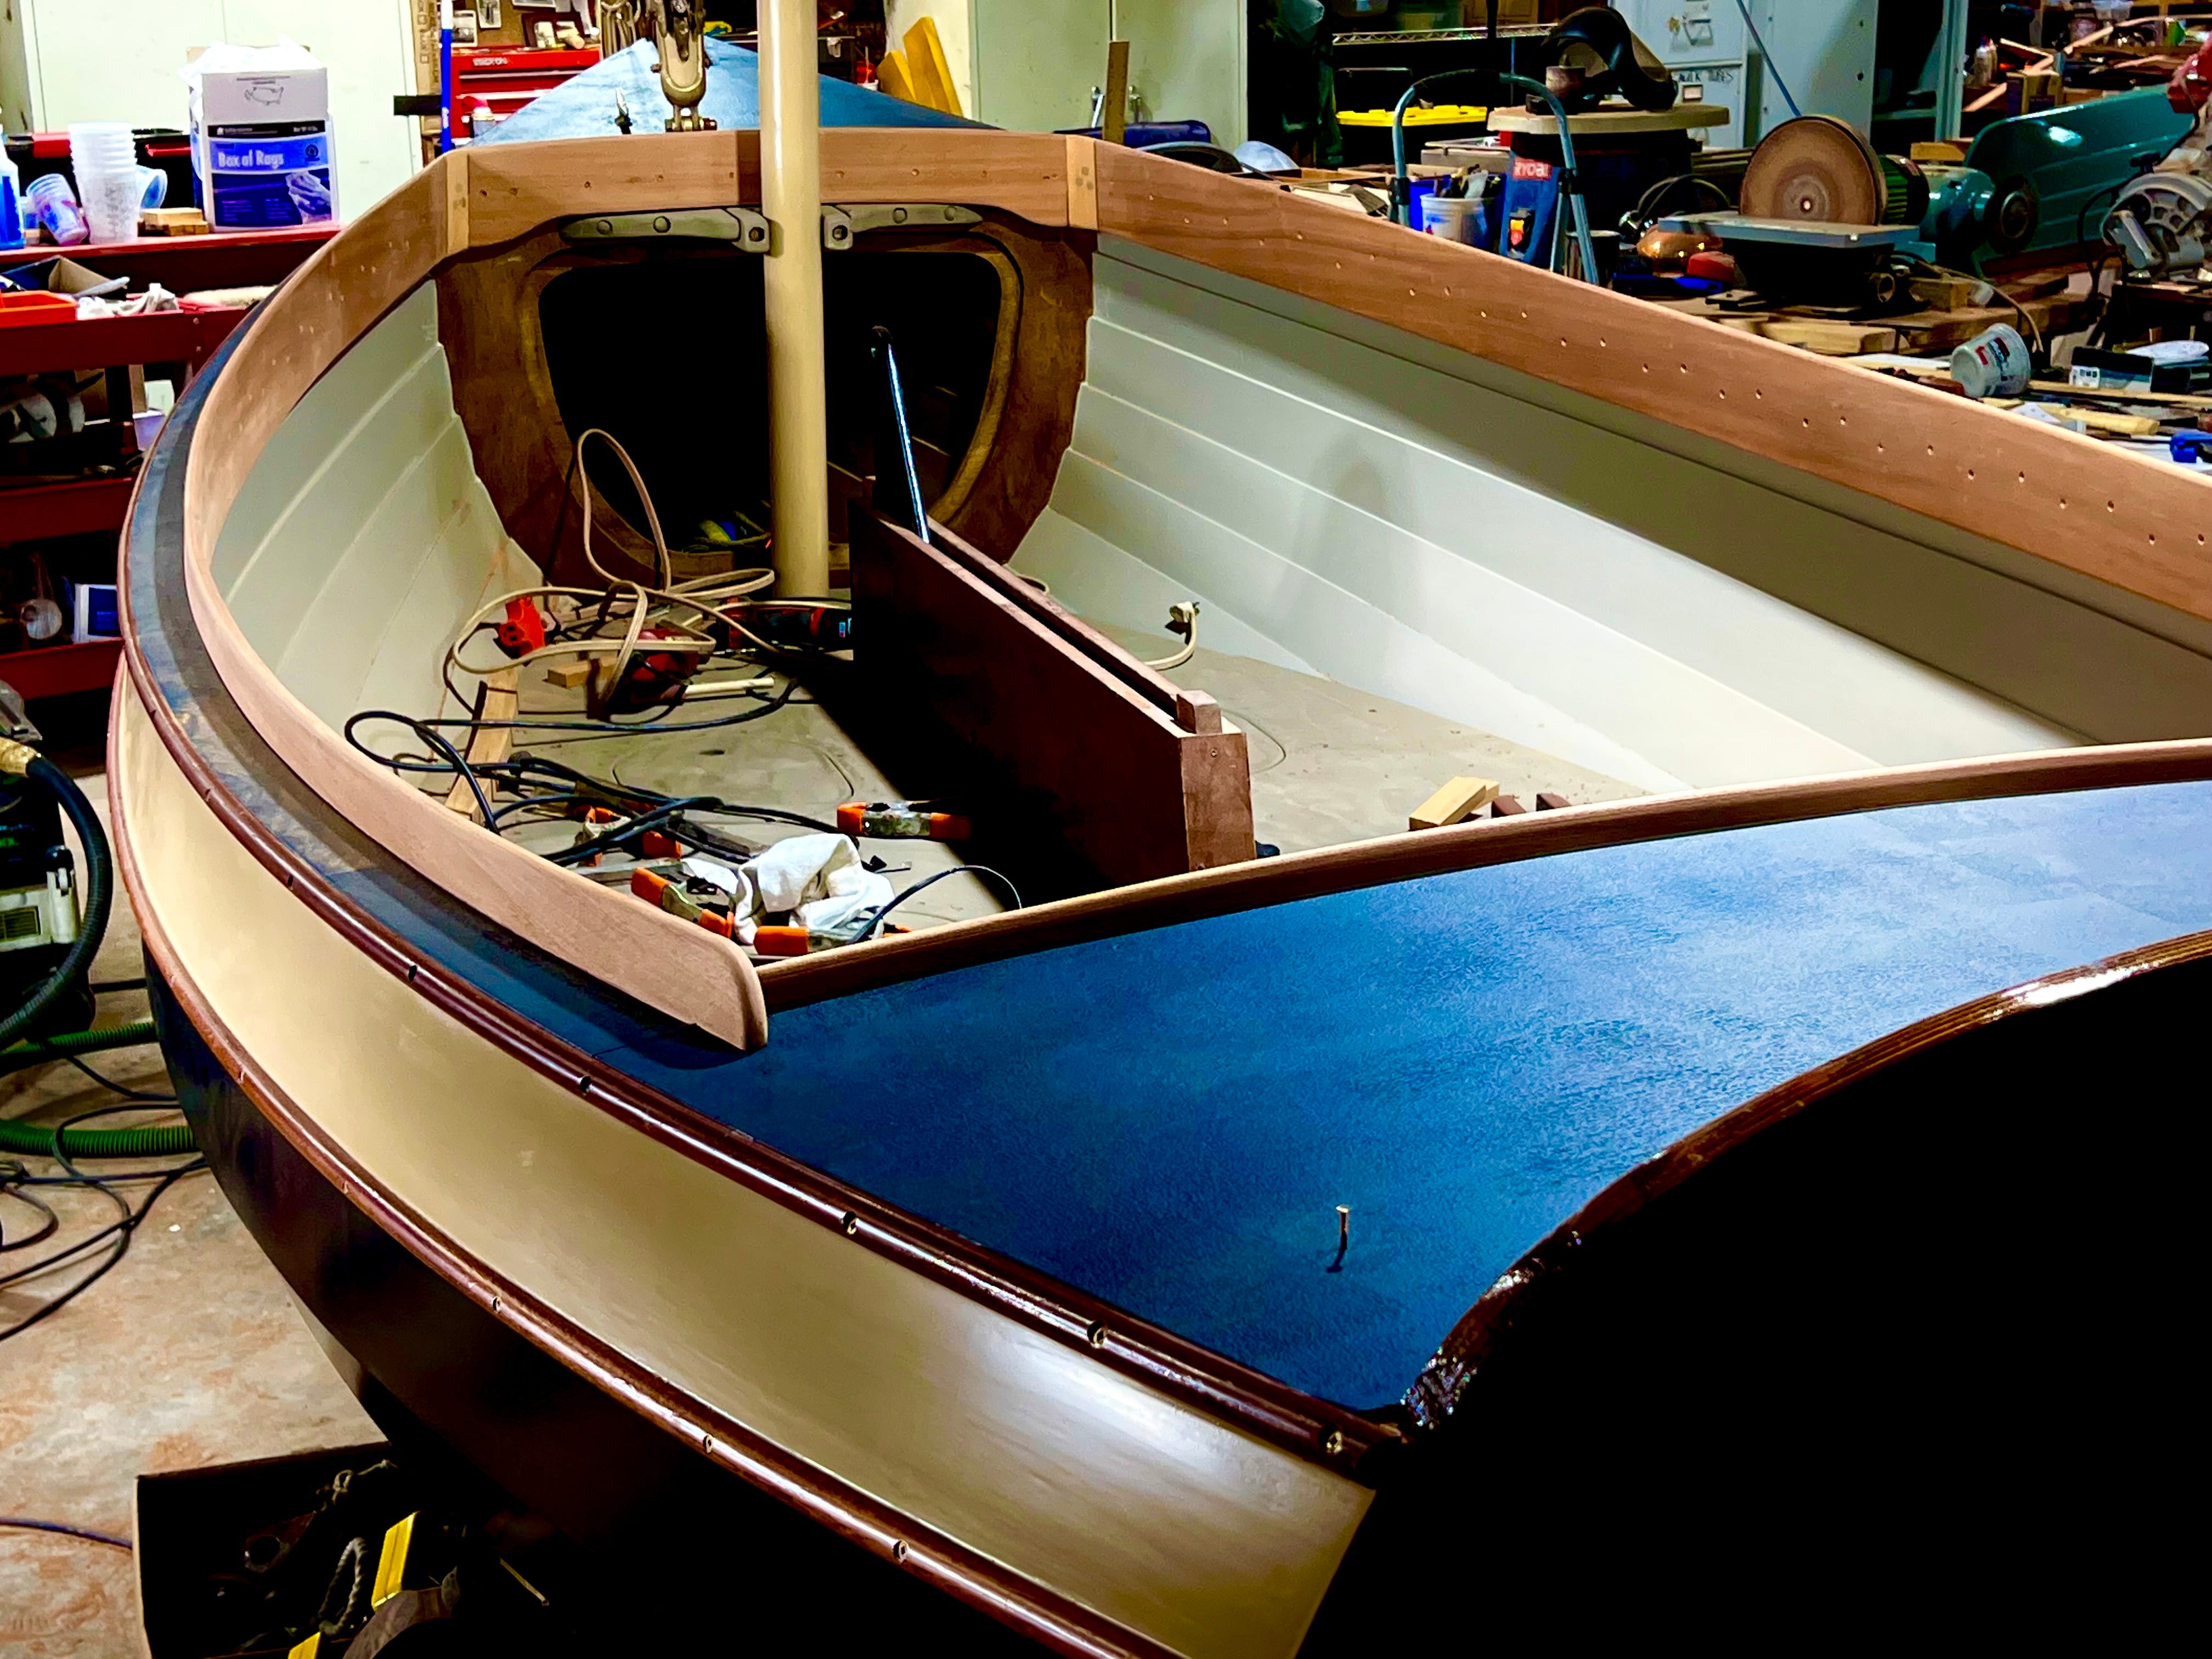
The aft deck hadn’t yet been laid when we started building the wishbone tiller, which you see epoxied, shaved to uniform thickness and temporarily clamped around the rudder (at right), and onto a block of wood at left that’s standing in for a new straight, pivoting tiller arm. It was at this point, standing back to look at the work, that we decided the whole thing—no matter how strong when finished—looked too small and delicate in scale for our shippy gunter yawl. Also, we ideally wanted the wishbone to more closely match all of the dark-mahogany varnished surfaces on the boat, including the adjoining transom, cockpit coaming and new mahogany tiller…so a plan was devised—next photo—to help the wishbone blend with its neighbors and also have a bit more heft.
Feeling the need for a more size-appropriate wishbone, we rough-shaped some scraps of 3/4”-thick mahogany around the epoxied-together oak wishbone, and bonded them to the oak with thickened epoxy. After the epoxy cured, we developed final shape with a jigsaw, using a router table to soften edges all around. This view, just to be clear, is of the underside of the wishbone. (See next photos.)
Here’s the wishbone, alongside a removable shelf going into the lazarette, with its first coat of Epifanes Matte varnish…perched on the router table.
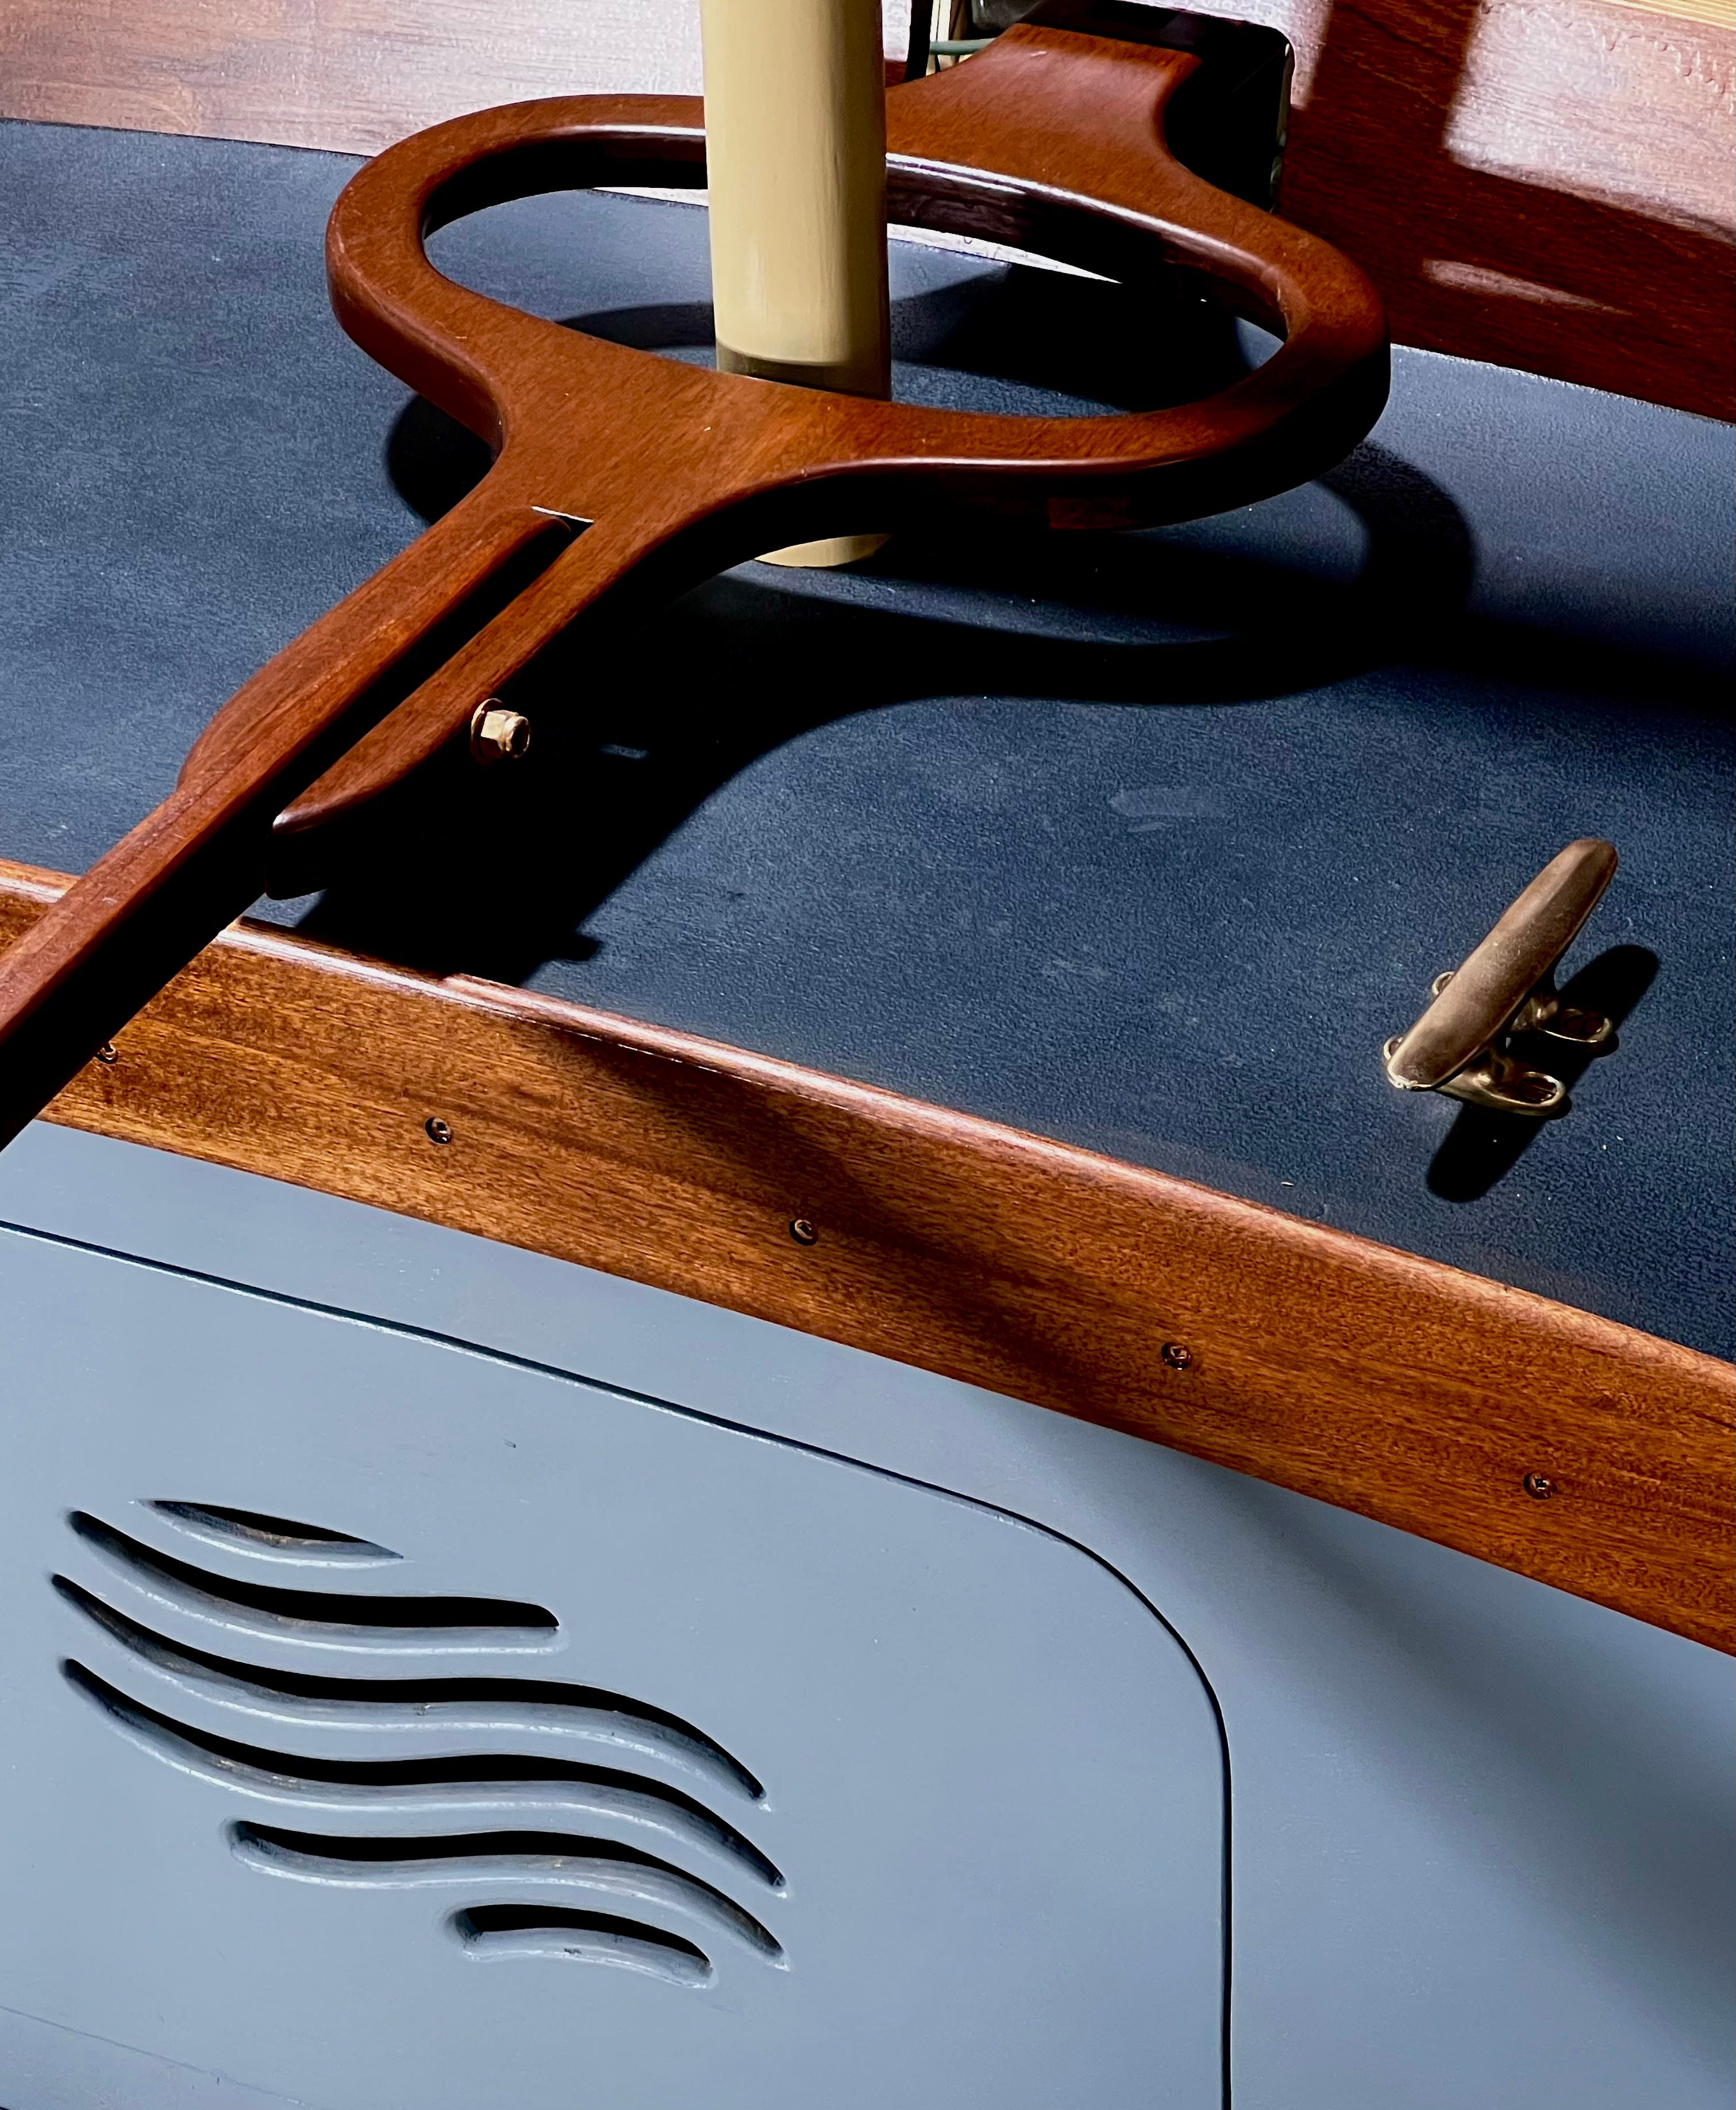
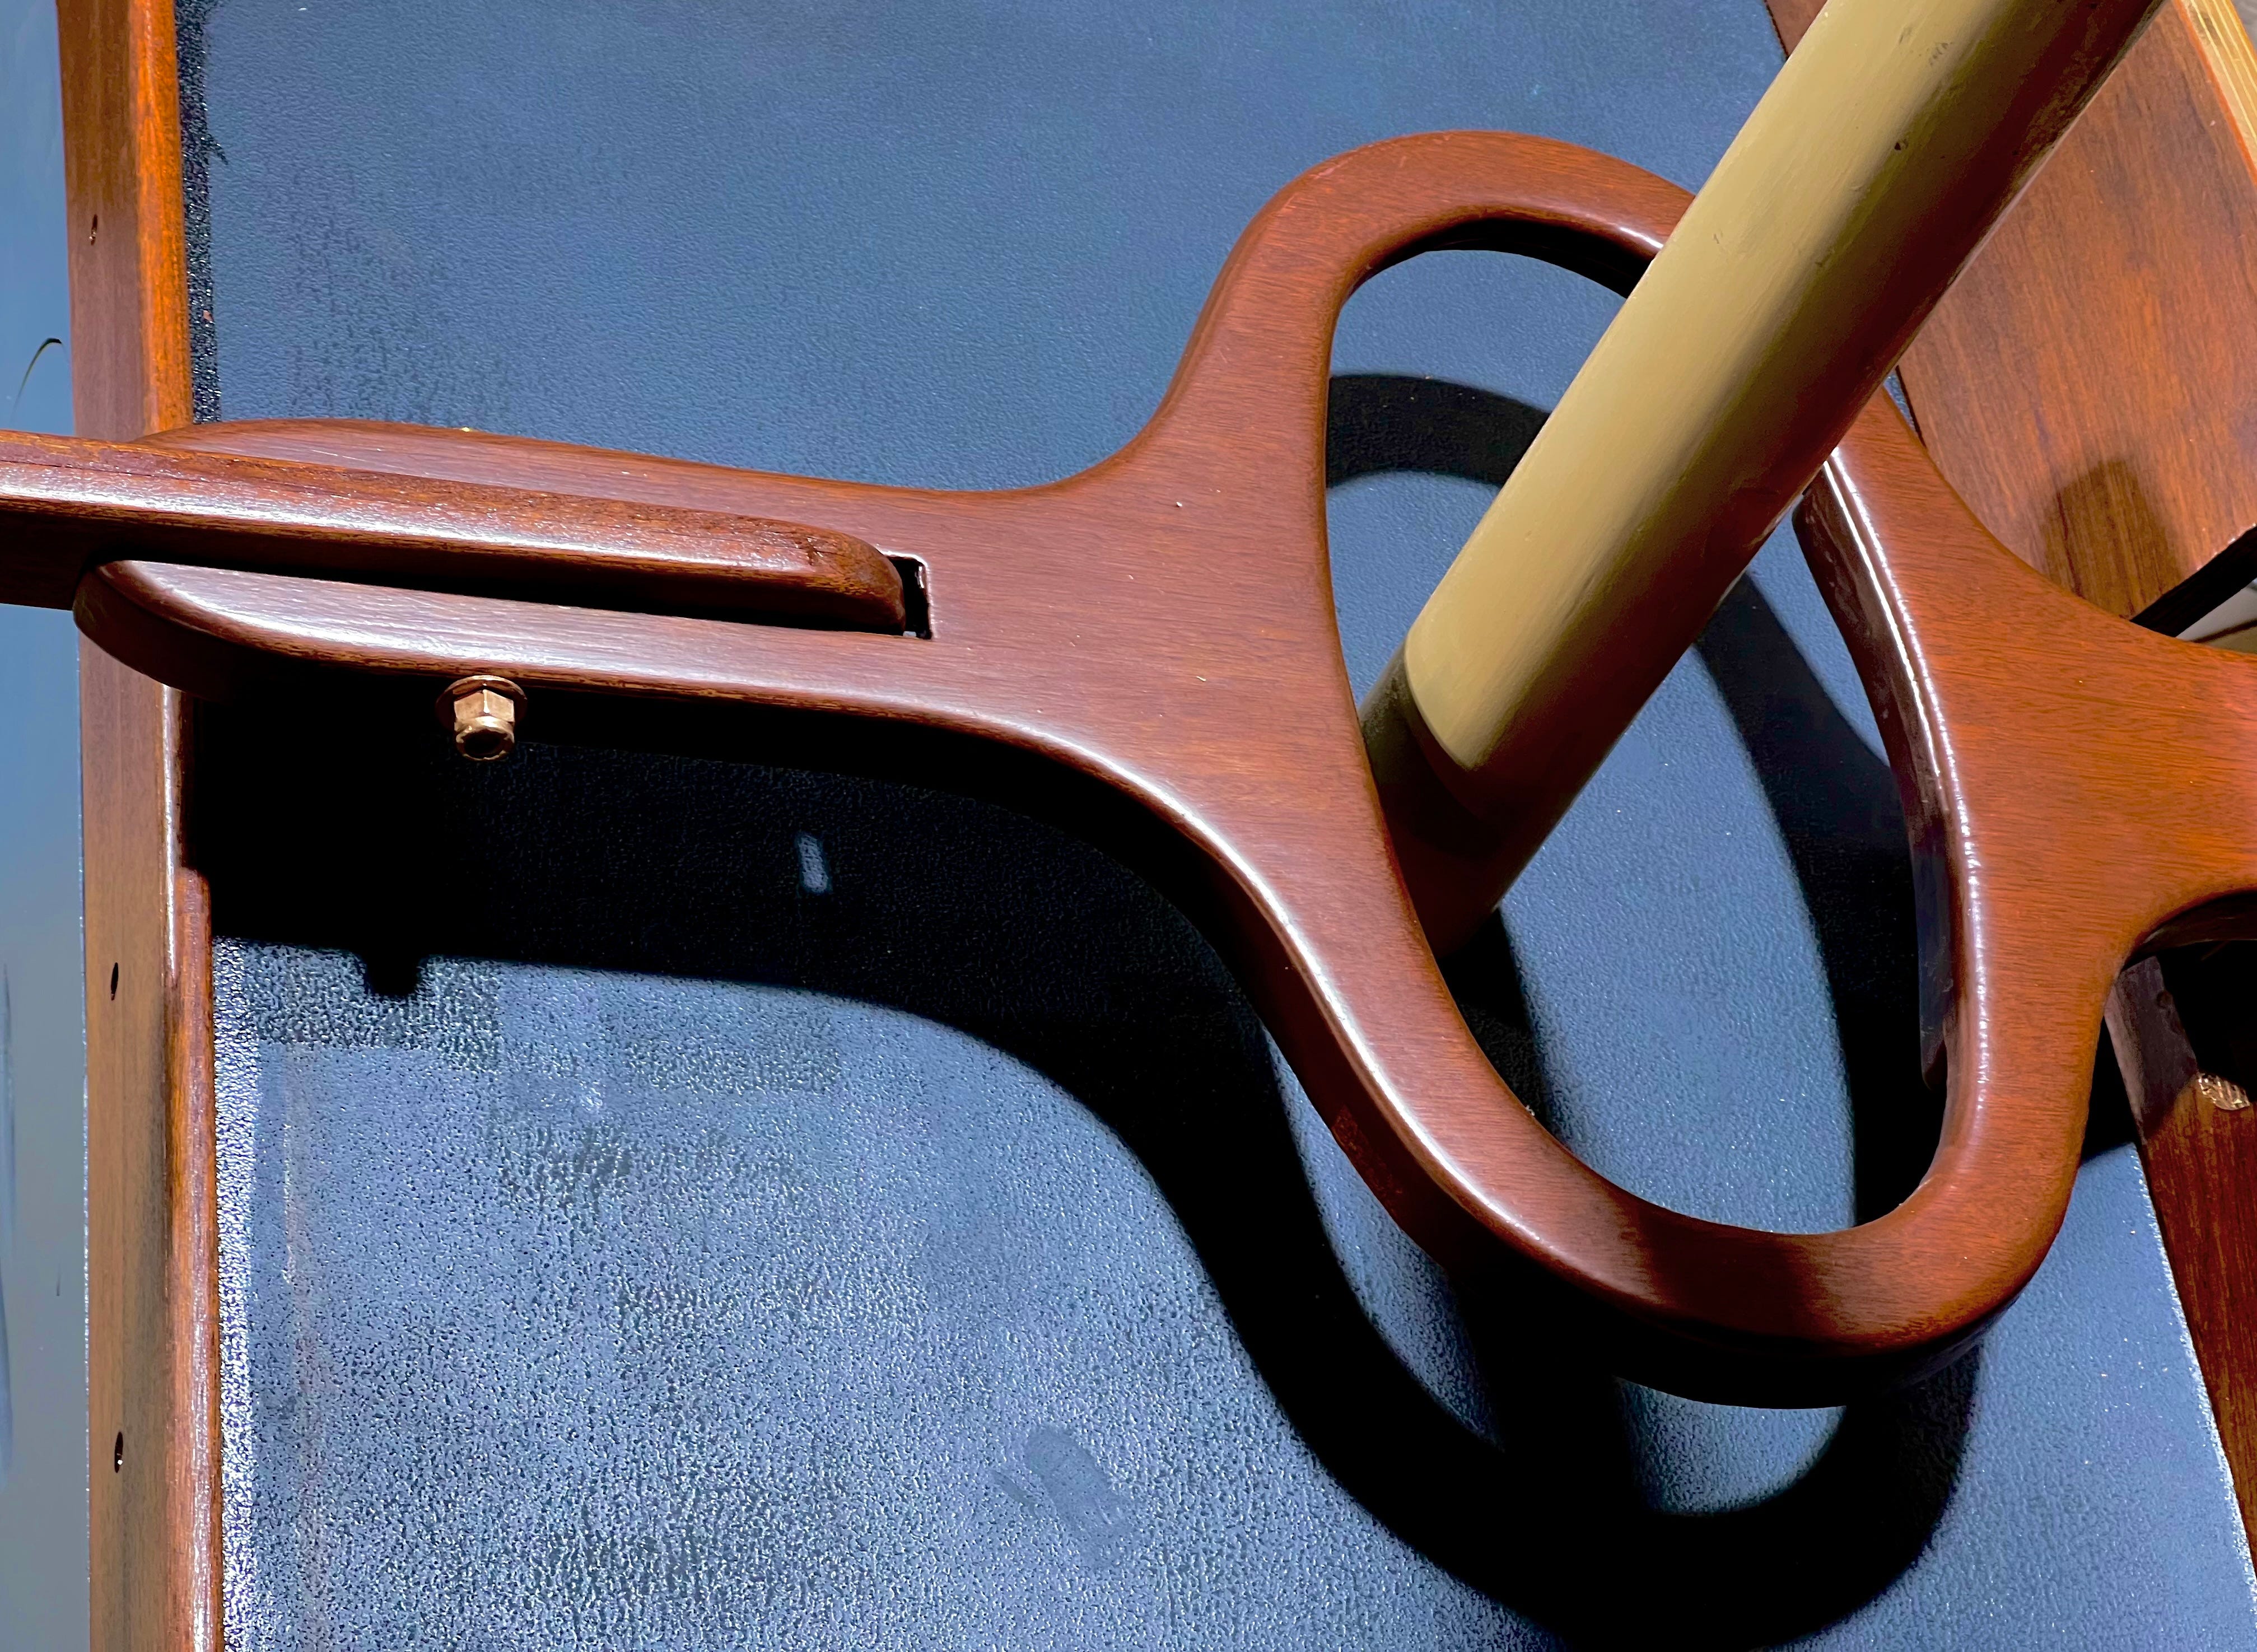
The boat won’t be finished for another few months, and there’s a lot of additional paint and varnish work to do everywhere, but this is a glimpse of the wishbone and how it goes through the raised transom lip to the rudder, turns freely around the mizzen mast, and attaches to the pivoting tiller arm with a bronze bolt. The gray-painted lazarette bulkhead has a large ventilated hatch for easy access to the stern area.
Everything remains a work in progress so I don’t have “finished” photos of anything, but this is what the not-yet-completed aft deck looked like last Friday-…with more coats to be applied everywhere.
MOUSE a few weeks ago, before new cockpit coamings received first coats of varnish. With completion of the rudder and wishbone tiller, one of the next steps will be construction of thwarts and side bench seats aft…along with lots of finish work and then rigging. Stay tuned for a series on the design, construction and first adventures aboard MOUSE, a beefy little boat we can’t wait to enjoy.
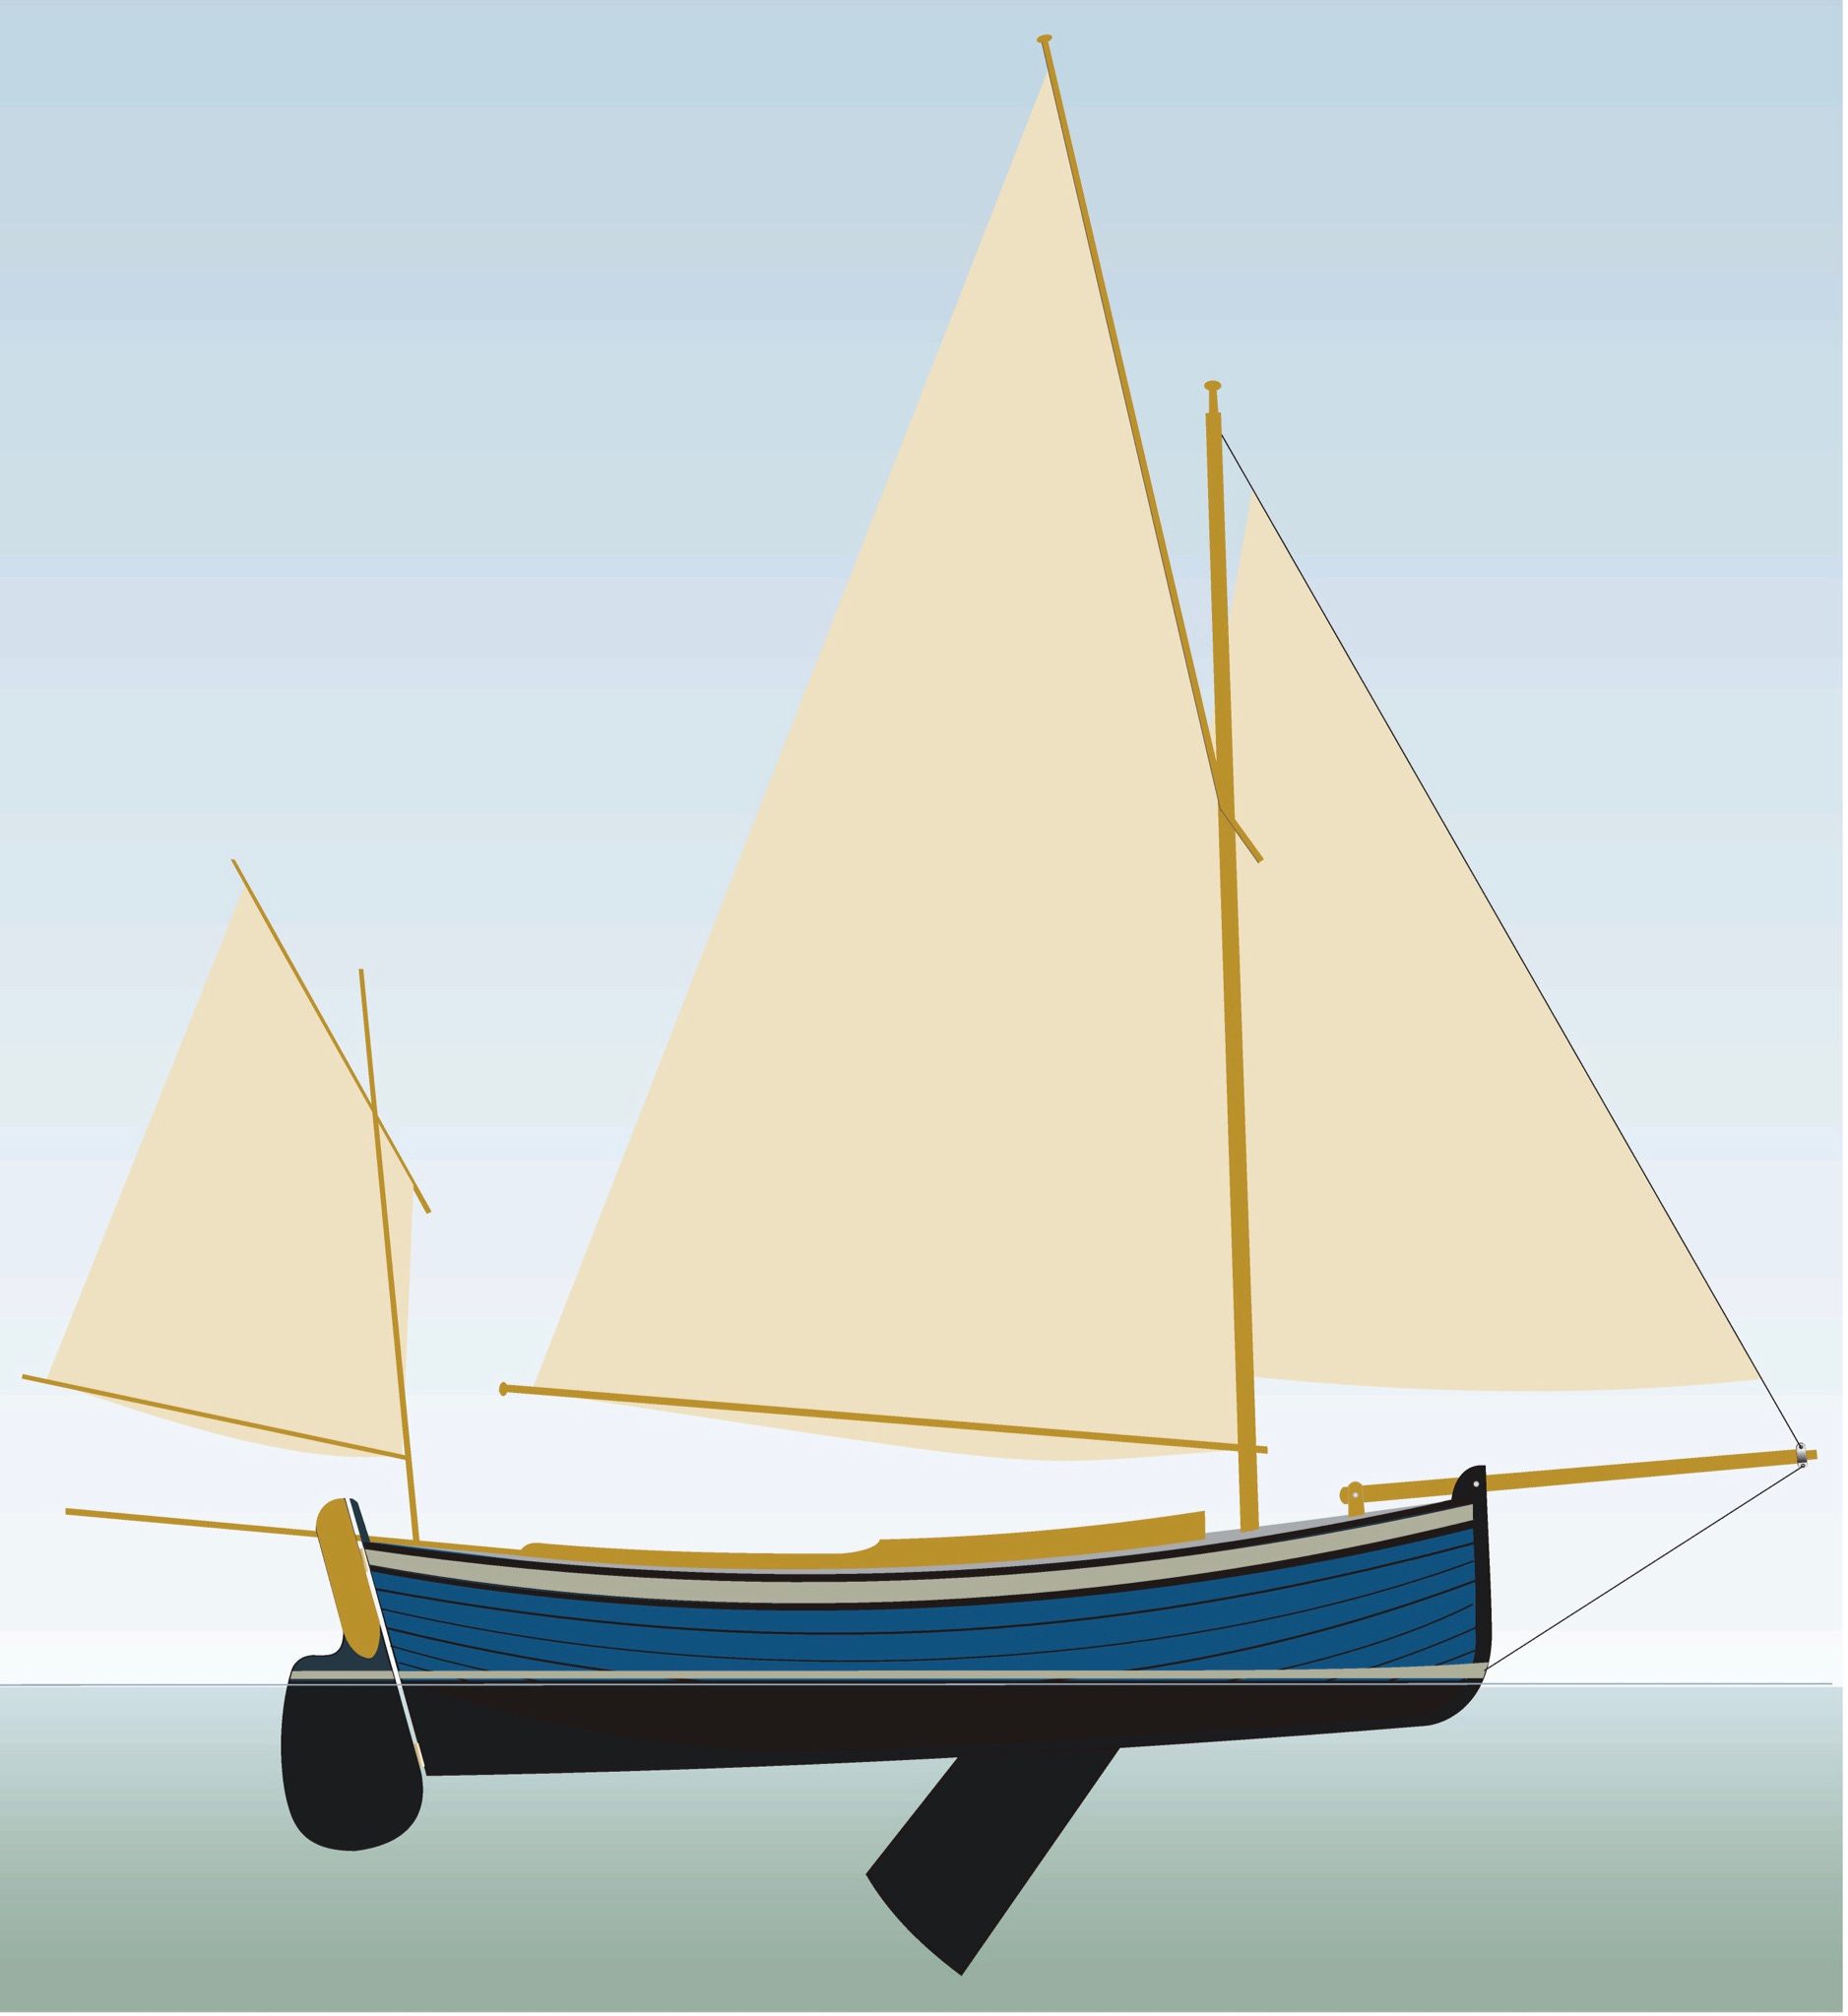
Never mind the color scheme, since the illustration isn’t accurate in that regard, but this is what the gunter yawl rig will look like, approximately.
So, even though a wishbone tiller might not be in your future, hearty congrats for making it through this narrow-focused installment. If you have questions, comments, or better things you’d like to read in the future, please post them below. Back to work! - Marty •SCA•
Having gone from single-sided to push/pull to finally a wishbone tiller I am in the "two thumbs up" camp. In the design phase it is hard to over emphasize the need for a mock-up. You'll want to know the distance from the pivot point of your rudder to the mizzen mast and the diameter of the mast. Conventional wisdom says the rudder "stalls" at about 35 degrees, it can take a lot of swing to get the rudder to "hard over" that far and the farther your mizzen is from the pivot point the bigger section of arc you'll need to accommodate. My tiller is by far the thing people most ask about at the Port Townsend WBF each year.


Having gone from single-sided to push/pull to finally a wishbone tiller I am in the "two thumbs up" camp. In the design phase it is hard to over emphasize the need for a mock-up. You'll want to know the distance from the pivot point of your rudder to the mizzen mast and the diameter of the mast. Conventional wisdom says the rudder "stalls" at about 35 degrees, it can take a lot of swing to get the rudder to "hard over" that far and the farther your mizzen is from the pivot point the bigger section of arc you'll need to accommodate. My tiller is by far the thing people most ask about at the Port Townsend WBF each year.
As usual---I am amazed, humbled, full of admiration! Gorgeous, Marty. Again.... as usual!