
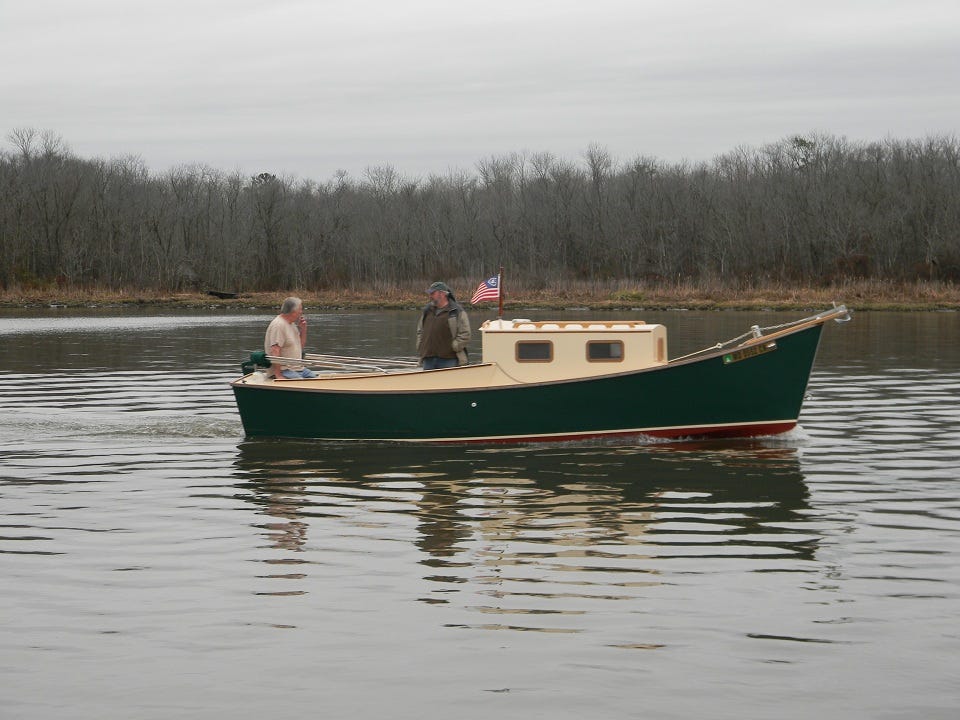
TUFFY II
John Schnepel's Custom Cruiser
by John Schnepel
I have been boating for almost 60 years, mostly in sailboats. I have owned fiberglass sailboats from 18 to 26 feet. When my father retired, we built Sassafras, a 30 foot William Atkin sloop that we sailed for 10 years. After that, I bought a Beachcomber 25 and sailed it for 16 years. I found it to be a very comfortable and easy to sail design. When I sold it, I tried unsuccessfully to find a smaller boat that I liked as much. I tried a Sea Pearl, Montgomery 17, Seaward Fox, and a Mud Hen. None seemed to work for me. Despite their attractions, each had a feature that I didn’t like. These were all excellent, popular designs, and I concluded that the problem lay in my age and worn out body, not the boats.
Rather than continue trying to dance around on a pitching deck handling sails, I started thinking about a powerboat. Not just any powerboat, but a classic looking design with an antique engine. I grew up around old workboats with Palmer engines in the 1950s when they were being used by watermen for crabbing, oystering, clamming, and fishing. There was something about those low rpm, single cylinder engines putt-putting with power as they pushed a wooden boat into the morning mist that stuck with me through the years. This interest developed into a lifelong hobby of collecting and restoring antique engines.
Unlike many amateur boat builders, I began the planning process with a power plant concept that I desired, and intended to wrap the boat design around that. I had been collecting antique engines for some time and I had a ZR-1 Palmer on hand. This classic power plant squeezed seven horsepower from its massive 425 pounds. A good friend of mine, Dick Day, who has collected Palmer engines for most of his life and is quite an authority on them, recommended using a Briggs & Stratton single cylinder air cooled engine. He reasoned that the Briggs would provide the same authentic sound that I sought, but with greatly increased reliability. I found one that fit the specs, rebuilt it and detailed it to function and look like new.
I thought that laying a keel would be my next move, but before I ordered the first batch of lumber, I came across an ad for a two cylinder Yanmar diesel engine. For only $779, new with warranty and owner’s manual, I bought the diesel engine producing 13.4 horsepower. I knew it wouldn’t sound as good as an old Palmer, but it would sound okay, and the advantages of a fuel sipping, safe, and long running diesel kept going through my mind. With that decision, my thoughts about the design of the boat began to change toward a craft with a cabin, and the idea of a few creature comforts seemed nice. My final plan consisted of a length of 22 feet or less, a beam under 8 feet, draft no deeper than 18 inches, and berths for two along with a head and galley.
With that design in mind, I began collecting materials: lumber, hardware, and whatever other components that I could scrounge up that would make the boat a reality. This boat had to be built on a very tight budget, so that principle guided my purchases. I began converting the Yanmar engine for marine use with fresh water cooling. My brother Tony, an engineer and machinist, designed the engine mount and the parts to attach the ZF-5 transmission to the engine and also the engine and transmission to the bedders. We used 1/2 inch steel plate and angle for the adapter plate and brackets along with rubber mounts to lessen the vibration. The heat exchanger for engine cooling is an oil cooler for a large engine. Scrap stainless steel pipe and fittings were used to fabricate a stainless steel expansion tank. I constructed a 2 foot long stainless steel exhaust pipe and made brackets to mount a 3/8 inch Jabsco raw water pump. A stream of raw water exiting the heat exchanger sprays through a fitting into the stainless steel exhaust pipe for exhaust cooling. Since I was not water cooling the exhaust manifold, I made a stainless steel shield to protect the alternator and wiring from heat. Square 4-inch 12-volt computer fans and a 4-inch inline blower on a variable speed switch provided a flow of cooling air through the engine enclosure and air exiting the box feels barely warm. The engine ran well during a bench test, with everything working as planned and requiring only minor changes. I expect it to work as well in the boat.
Careful shopping and parts selection yielded a complete power train and diesel engine with rebuilt transmission, new heat exchanger and cooling pump for approximately $1600. With the propulsion configuration resolved and implemented, it was time to more clearly define the specifics of the boat and determine what materials I would need.

Contacting Del Walter about his time schedule and ability to commit time to a boat building project was the next step. I’ll let Del describe the process of designing and building a good looking boat in his own words.
John’s Boat
by Del Walter
The decision to build this particular boat evolved from many discussions about what John needed and wanted. We took into consideration the operator’s age, bad knees, the place and probable use of the boat. We considered esthetics, cost of construction and the maintenance level John thought he could manage. What eventually evolved was a 21-foot inboard boat that could be easily trailered, launched and recovered. It could be stored in a shed and would not ever require a mechanic with greater skills than the owner. It would have the character of a 1930s day boat and be easily built by two (for the most part) and operated by one.
The hull’s construction combines a cold molded bottom with sheet plywood topsides. The cold molding method allowed for compound curves in the deadrise portion of the bow and rockered portion of the bottom. A bottom without seams means no leaks, no rot and low maintenance. It is also extremely stiff for the amount of materials involved. It is, however, labor intensive.
The hull was built upside down over a minimum of supported stations. A traditional keelson and chines of white cedar were used with a laminated oak stem. The chine and keelson were selected from clear white cedar with dimensions that would insure a fair bend and adequate gluing area. A 3/4" marine plywood transom was set on the strongback. A midship form and the stem were squared on the strongback and the chines and keelson were attached to secure the overall shape of the hull.

The sides are a single layer of 3/8" fir plywood. The panels were scarfed to length on the strongback prior to setting the construction forms for the hull. The scarfing method was a simple butt joint with layers of glass on both sides of the seam. This method can result in a strong joint with a minimum of skill. Care was taken to feather the edges of the plywood prior to laminating on the layers of glass and a special clamp insured a perfect joint requiring little fairing after the resin cured. The final product requires several people to handle the long and flexible panel and it can be unnerving while positioning. The long panels were positioned on the chines, marked, cut and reinstalled without cutting in the sheer. The sheer was determined after the hull was turned right side up for finishing. The chines and keelson were beveled to receive the bottom panels.
The bottom is constructed of three layers of 1/4" marine fir plywood. The layers are set in epoxy and sheathed in two layers of glass. The bulk of the bottom was covered with the plywood in sheet form and the seams were staggered within the overall laminate. The deadrise portion near the bow required greater curves than torturing of the full sheets would allow. We therefore cut the plywood into strips about three inches wide. We then laid on three layers in alternating directions. Each layer was set in epoxy with the seams filled with a thickened epoxy paste and faired before the next layer was added. Drywall screws were used for positioning and gluing pressure. These were removed before subsequent layers were applied. The final structure has no mechanical fasteners in the hull. Two layers of six ounce cloth were laid over the bottom and chine. A single layer laid over the hull topsides also overlapped at the chine. Multiple layers were applied over the faired stem. A keel (skeg) was constructed of laminated oak and marine plywood. It was then bedded in epoxy and heavy glass cloth was laminated to make the structure substantial enough for an inevitable hard grounding and the repeated abuse trailering would provide.
The hull on the strongback was rolled outside where it was detached from the strongback and was rolled over to be set back on the strong back and returned to the shed for finishing. That simple action required a dozen men and a great deal of coordination. John was fortunate to have able friends eager to help.
The hull’s sheer was determined by taking a batten and bending it on the hull to an eye pleasing line. Long discussions and several days of pondering rendered the final shape. Freeboard was kept high to give adequate cabin room and security in the cockpit. The bow was left as high as the plywood would allow. The height of the transom was determined by the position a tiller from the outboard rudder would lie comfortably in hand when standing or bracing against the stern deck. This was a boat designed and built to fit a very specific owner’s needs and likes.
The deck is molded from two layers of 1/4" fir plywood set in epoxy. It was laid over traditional deck beams in the bow and stern and over hanging knees in the cockpit. The knees support an oak sheer clamp to the outboard and on the inboard carlin which in turn supports the cockpit coaming. The coaming is laminated from two layers of 3/8" plywood and capped with cedar. The entire structure is glued and screwed together and sheathed with glass cloth and epoxy. The main bulkhead is 3/8" plywood and is further supported by pine framing. The cabin sides are 1/4" ply with traditional corner posts and framing. The cabintop is laminated of two layers of 1/4" ply set in epoxy and bent over fore and aft frames from the bulkhead to the cabin front. This allowed for adequate camber to stiffen the cabin top enough for a large man to stand on without apparent deflection. The entire structure was also sheathed in six-ounce cloth and epoxy. The after deck was also cambered and constructed in a similar manner.
The interior structure used 3/8" ply for the V-berth which was glassed directly to the hull and bottom. The corner joints were “stitch and glue” with cedar glued to the top edges for stiffness and support. The bunk tops rested on the edges and a cedar stringer glassed to the hull. The practice of tying all components to the hull allowed for the overall scantlings to remain very light. Very little wood was left to a bright finish. All surfaces except the cabin door were primed and painted with urethane paint. The cabin door was kept bright to display the raised panel construction and accent the stained glass window. The rubrails were made from a plastic decking material for low maintenance. A stainless steel cap was put on for additional protection. Many of the trim items were salvaged from other boats. The portlights were recycled from an old wooden ketch and the stuffing box from an old workboat. These items, along with the bollard and prop donated by a good friend, John Walston, saved us hundreds of dollars.
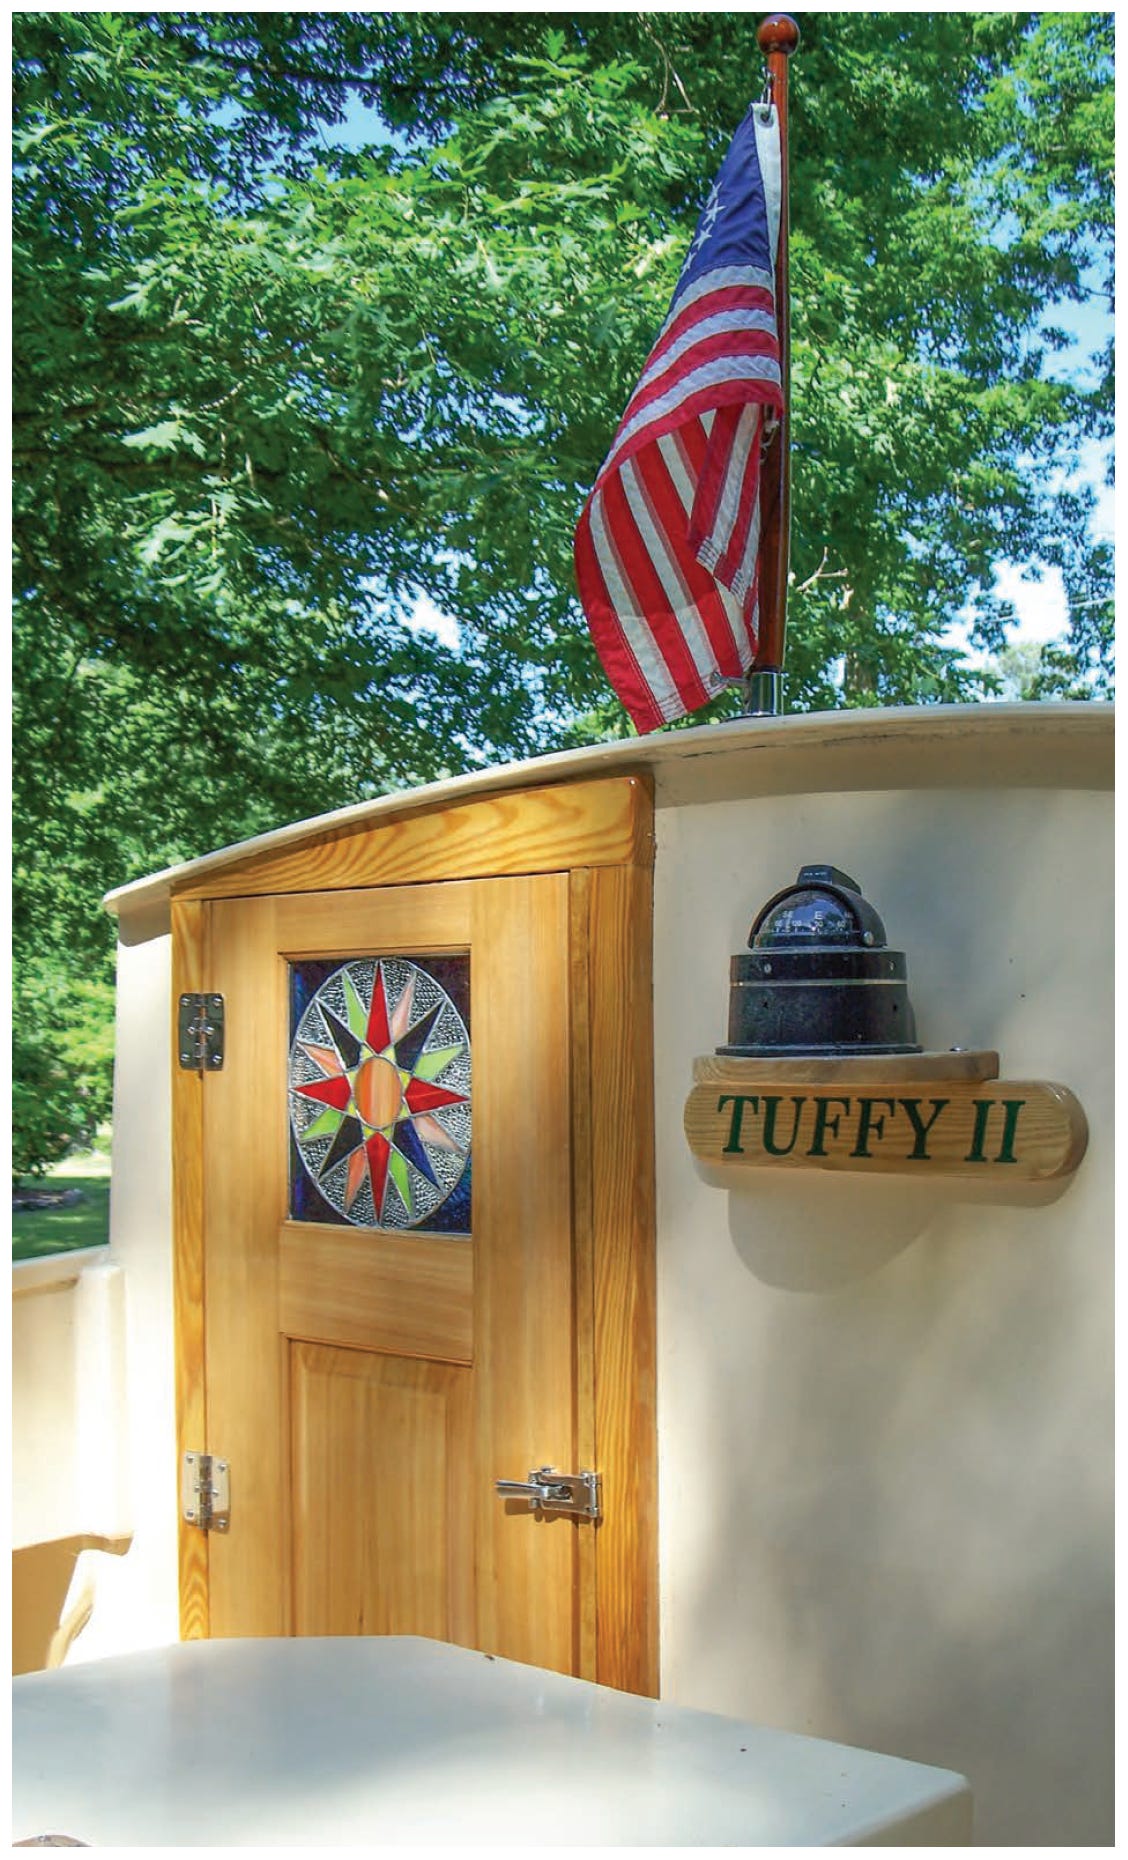
Specialty skills from several sources helped finish the project. John’s wife, Ginny, tops the list with lunches, baked goods and support every day that we were working on it. Kathy Whitelock made a beautiful stained glass for the cabin door. John’s brother, Steve, donated lumber and constructed the raised panel cabin door. Doug Travis did a great job fabricating a custom strut and cutlass bearing. John’s grandson, Ryan, did the sanding in all the tight places and also did the wiring, which required more flexibility than either John or I possessed. Too many to mention were used to turn the hull over and all who visited during the construction gave some supervisory advice.
The boat could have been assembled in a few months of full time work. The reality of this and most projects means a great deal of time is spent gathering materials, pondering design evolution, securing the time of friends with specific skills, and financing as opportunity presents. There is also the wax and wane of enthusiasm, but in the end; this is a great boat for old men with bad knees and has galvanized the friendship of all who contributed. When the vessel was launched for sea trials, she floated on her lines, ran flawlessly and within all expected performance parameters. Life is pretty damn good! •SCA•
As published in SCA #94
What a perfect boat and a great story.
I love the door. I am GREEN with envy of the craftsmanship shown here. AND YOU THOUGHT THOSE WERE THE NORTHERN LIGHTS!!!