
Article by Paul Esterle
We small-boat sailors are hit with a double whammy—any of us sail solo and the trim and balance of our boats are greatly affected by our moving around on them. This is especially bothersome when we have to go forward to tend to the main or jib. The big-boat guys have less of a problem, their boat’s trim is less affected by their movement and many of them have the luxury of an autopilot.
There are some things we can do without breaking the bank on expensive autopilots and such. I sort them into three main groups: First are those devices that just lock the tiller in a given position. The second group are devices that actively seek to steer the boat, at least to some extent. The third group, just for grins, are those high-end devices—the autopilots.
Obviously, I don’t have space in an article like this to explore the installation of each and every device. Rather, use this article as a guide to what is currently being used, and as inspiration for upgrading your own boat.
Tiller Lockers
This group of tiller control devices seeks to lock the tiller in a fixed position. As such they have no ability to adjust to changing conditions, wind, wave or current. That isn’t to downplay their usefulness. I have such a device on Ternabout and wouldn’t be without it. I can lock the tiller in place and go forward to raise or lower the main or jib, get the anchor ready for deployment, and accomplish other tasks.
While these devices don’t adjust for conditions, they work very well for the short periods of time required to perform those foredeck tasks. That being said, I’ve used mine for long periods of time in settled conditions, requiring only a tweak from time to time to keep a steady course. In the meantime, I can sit back, relax and keep a close eye on local traffic and navigational tasks.
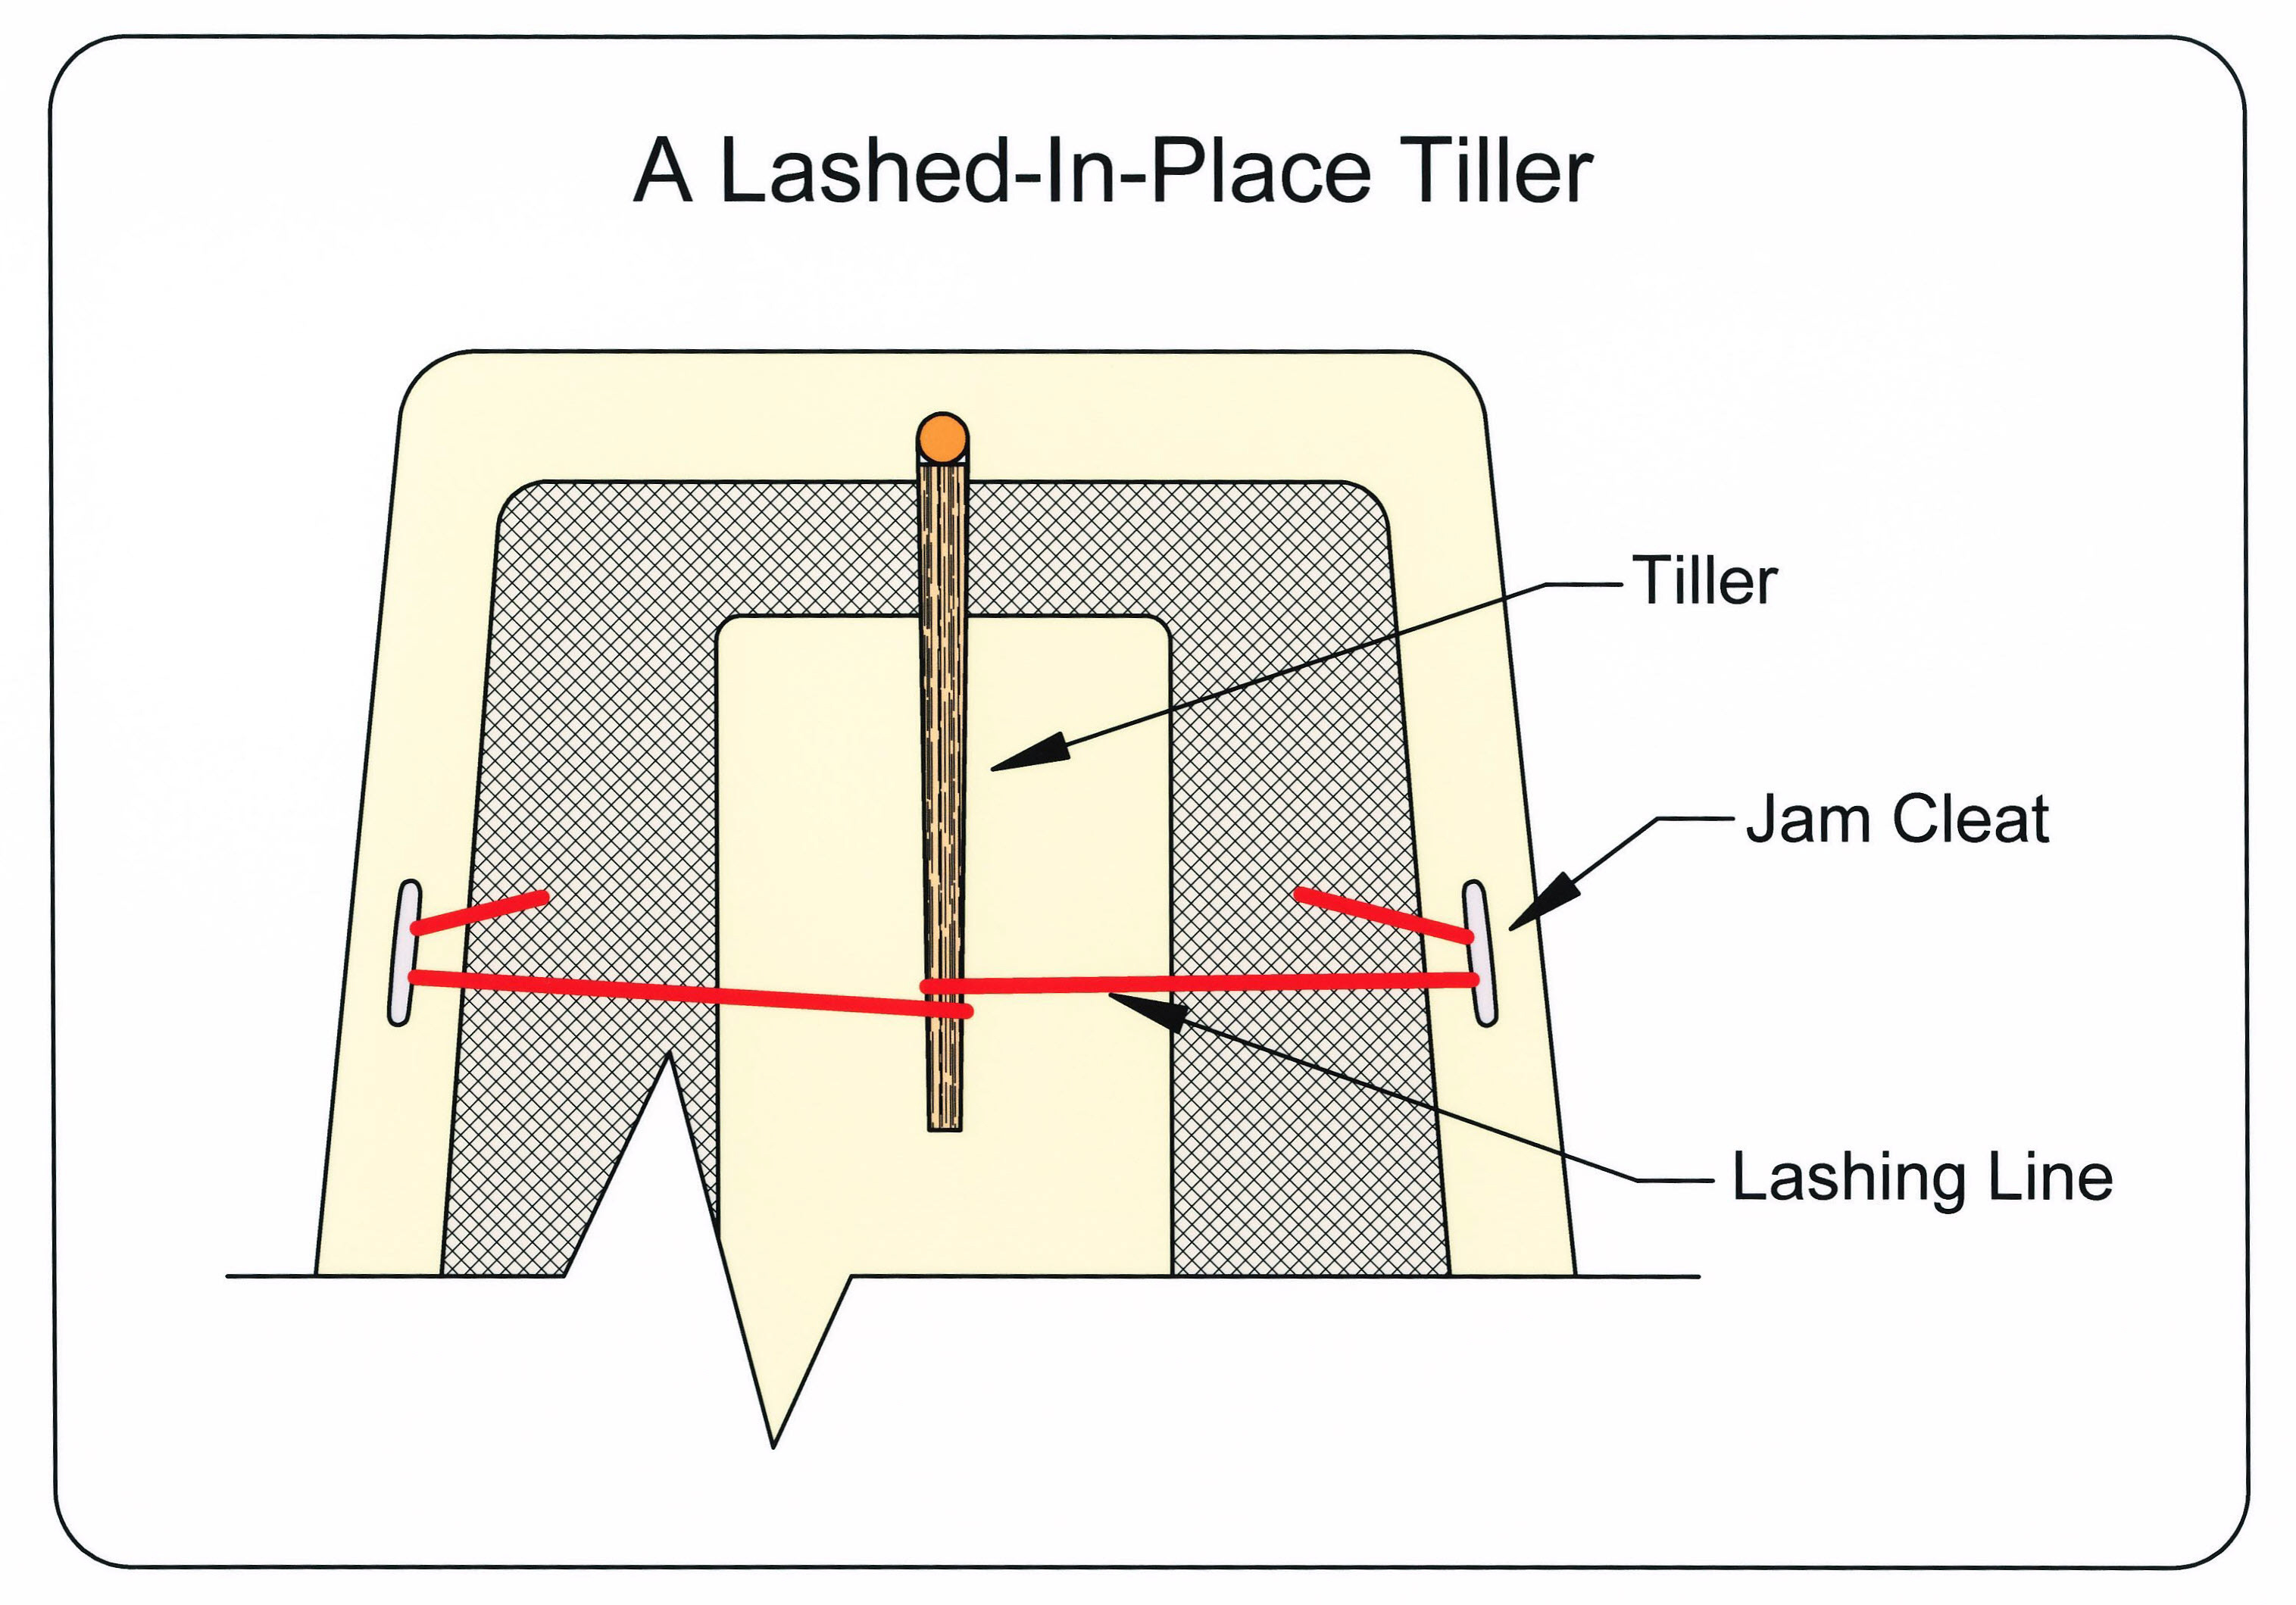
The simplest device is just two pieces of line, each with a loop in the end. The loop goes around the end of the tiller while the bitter ends are tied off or otherwise secured. If you choose to tie the ends off, you have a harder time adjusting the tiller location. A better solution would be to install a couple of jam cleats at the required locations, allowing a quick adjustment of the tiller. Bungee cords could be used, but you will spend more time adjusting the tension on them to get the right length and tiller location.
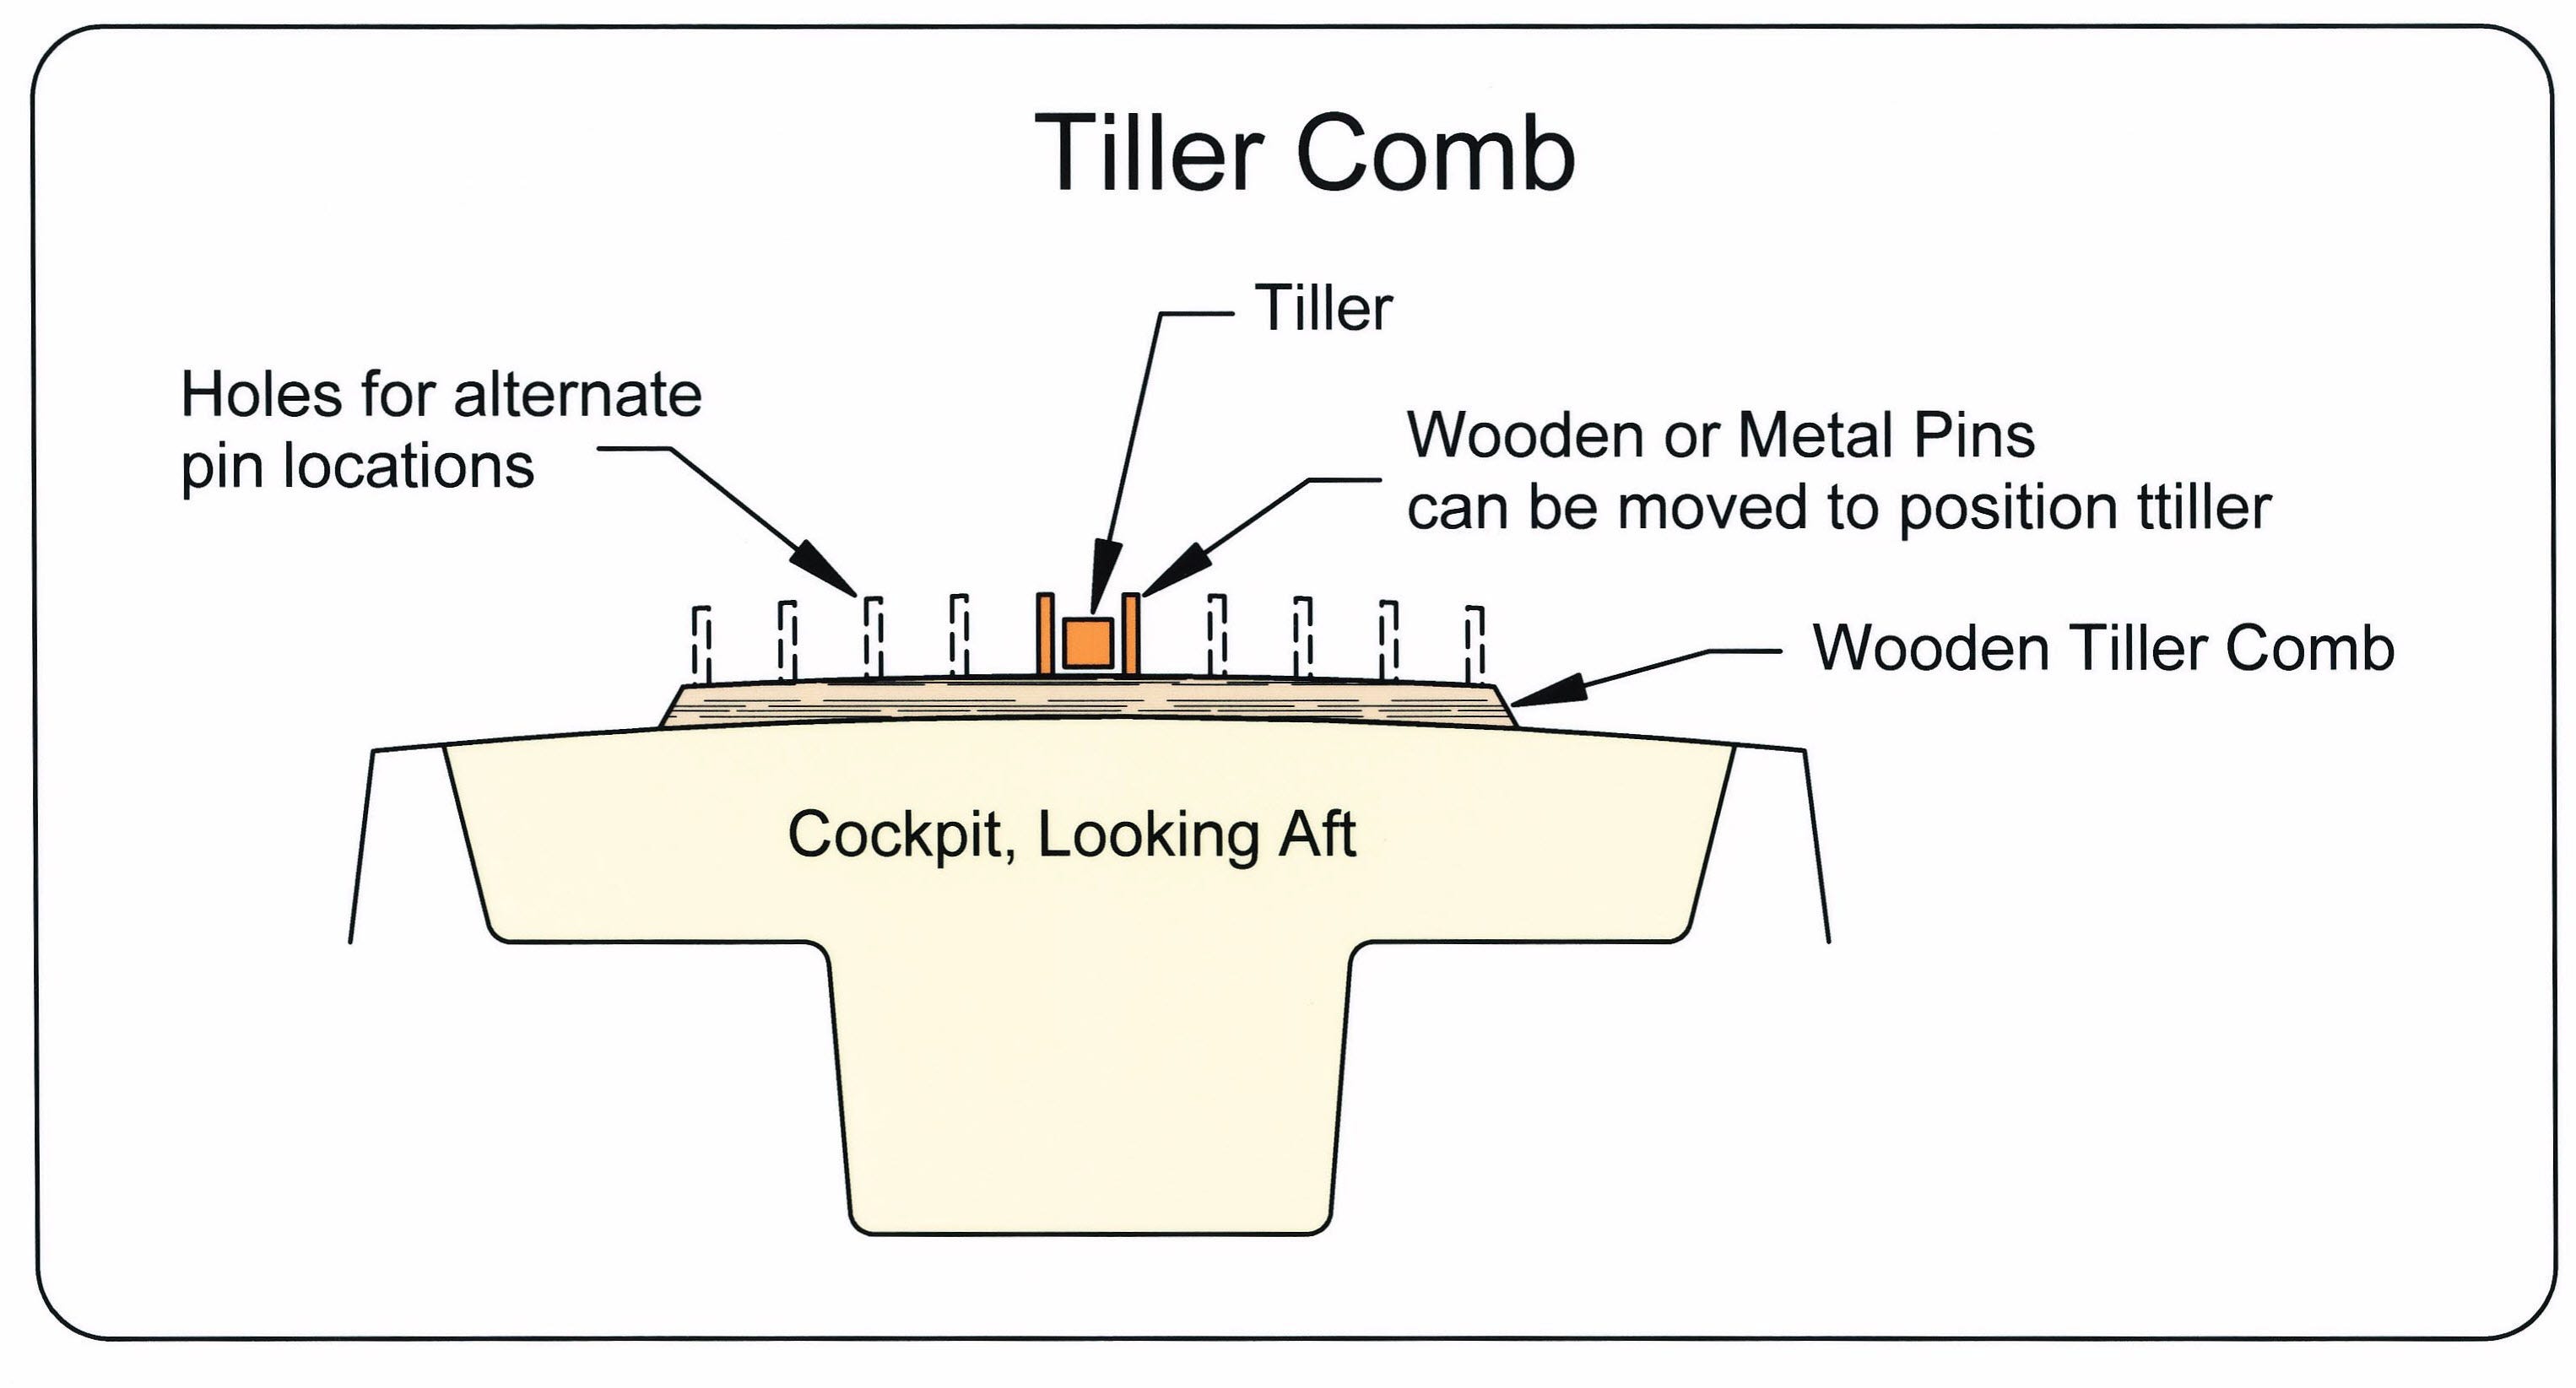
A tiller comb is another method of controlling the position of the tiller. A horizontal member, usually wood, runs under the tiller and from side to side. The comb has either notches on the top surface of a series of upright dowels. The tiller is raised, moved to the desired location and then lowered onto the comb to lock it in place.
The tiller is held securely in place, but the comb can interfere with tiller movement if it can’t be lowered out of the way or removed. While you think you may be able to hold the tiller off of the comb for normal operation, you usually end up inadvertently hitting the comb. Irritating to say the least.
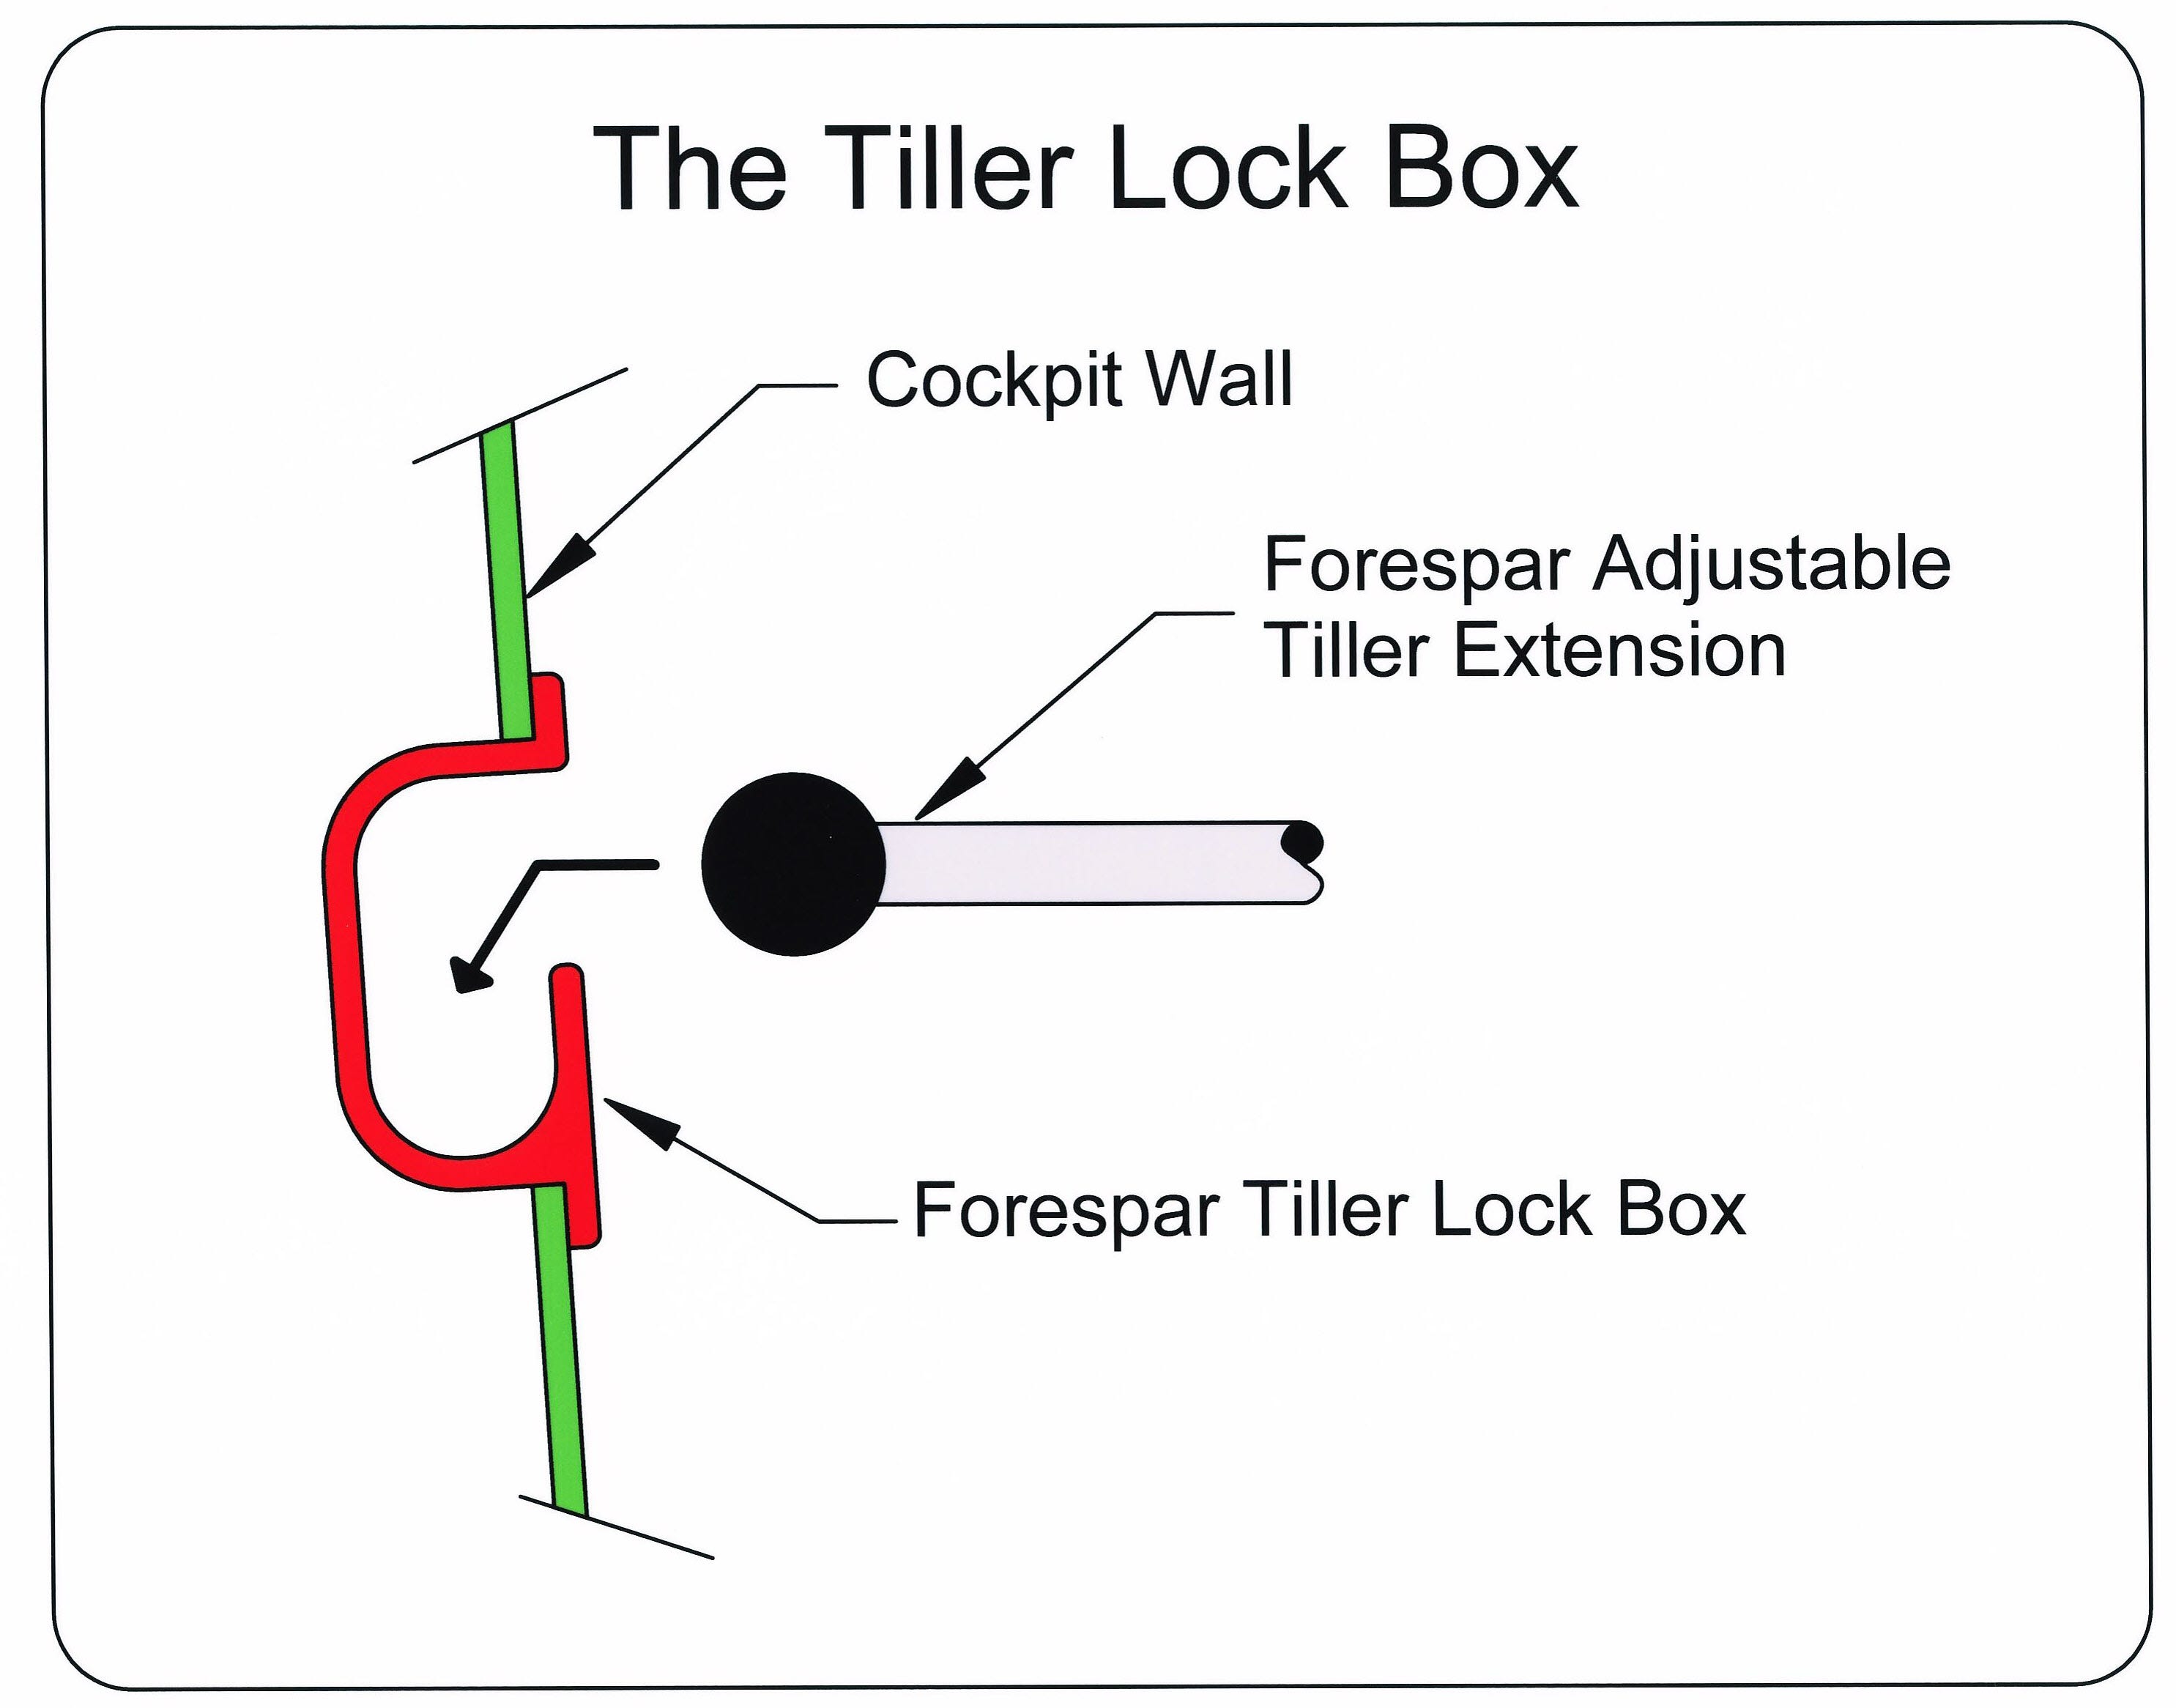
One off-the-shelf solution to tiller locking is the Forspar Tiller Lock Box. This consists of a simple plastic socket that mounts on the side of the cockpit coaming. This solution requires a Forspar tiller extension that has a ball end and is adjustable. To use it, you adjust the tiller extension to the right length and then place the tiller extension ball in the Tiller Lock Box. It makes for a clean and simple solution, especially if you need a tiller extension anyway
Davis Instruments makes a device called a Tiller Tamer. This device attaches to the tiller and has a channel for a control line. The line wraps around a pulley and has a knob to clamp the line. The knob can adjust the friction on the line from a mild resistance to fully locked down. The line extends from the tiller to the sides of the boat at roughly a 45 degree angle. The ends of the line are locked into jam cleats.
To use the Tiller-Tamer, You move the tiller to the desired position and tighten the knob. I have this very unit installed on Ternabout and have used it successfully for years. The one weak spot in the design is the friction control knob. It is plastic with threads molded into it. All was well until I upgraded to an IdaSailor rudder. The new rudder provided much more control authority. As a result, I stripped the threads in the plastic knob. However, the solution was simple; I found a replacement knob at Small Parts, Inc. that had a metal insert for the threads. This knob allowed me to reliably lock down the control line.
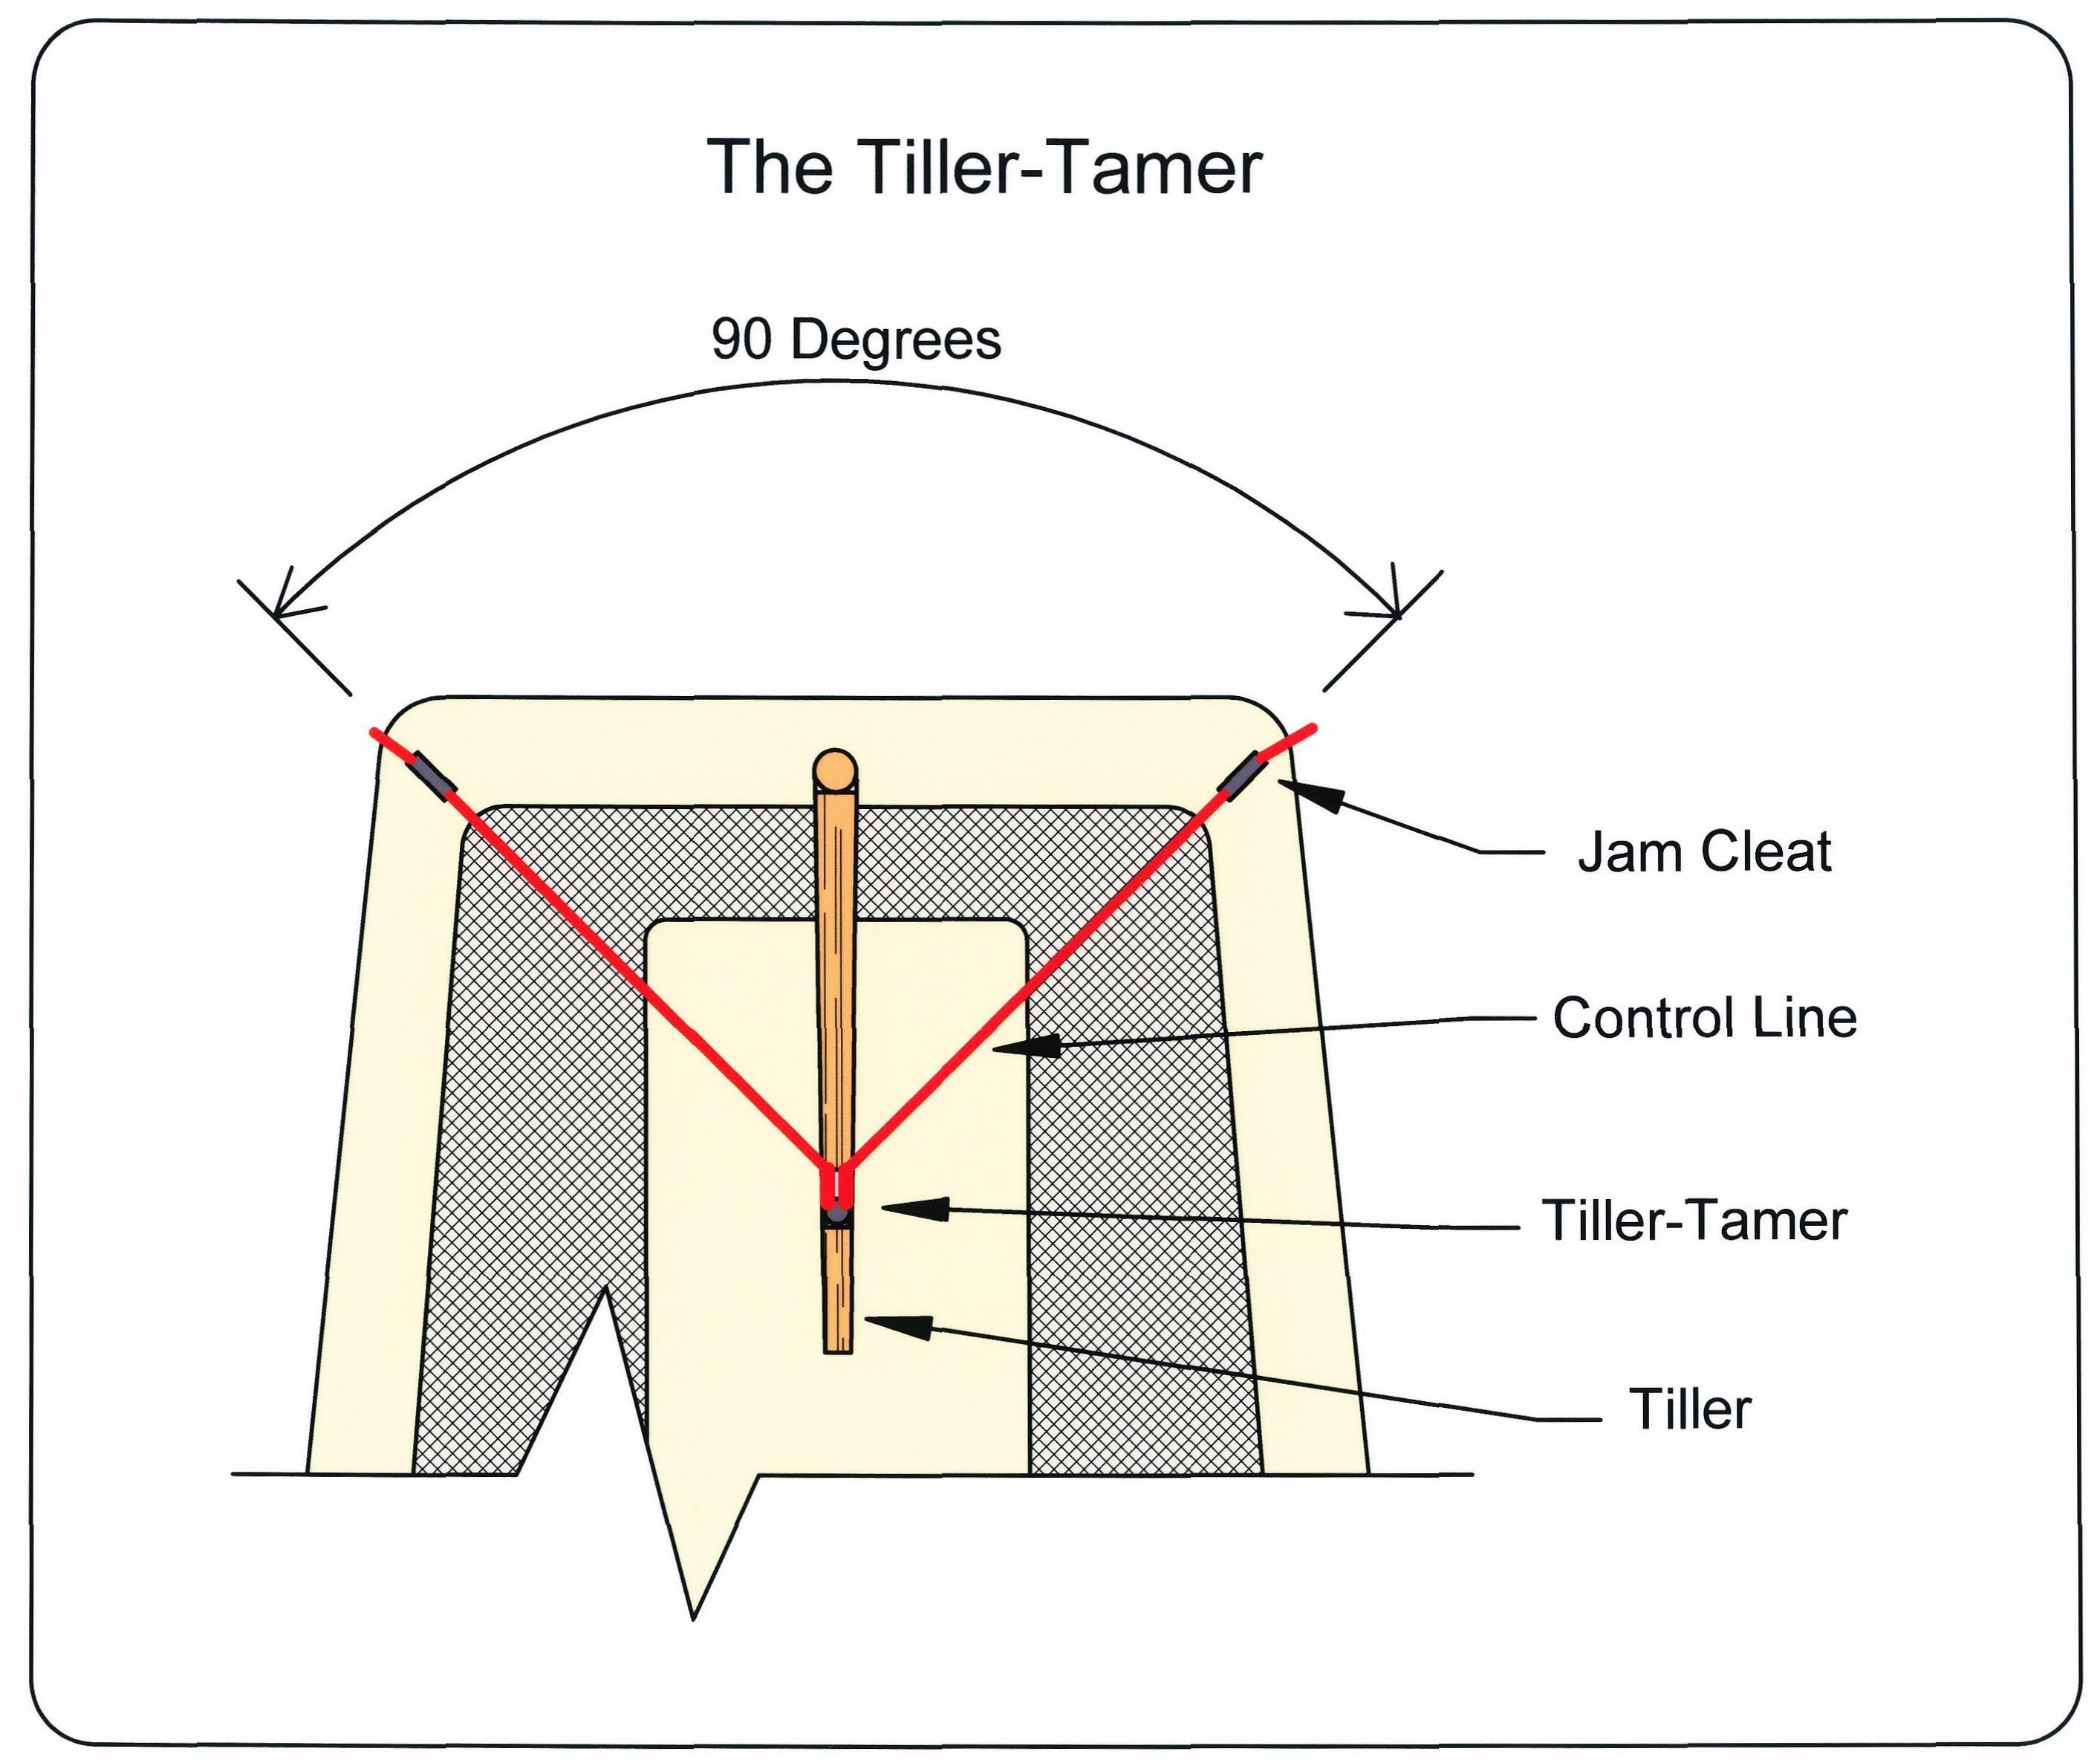
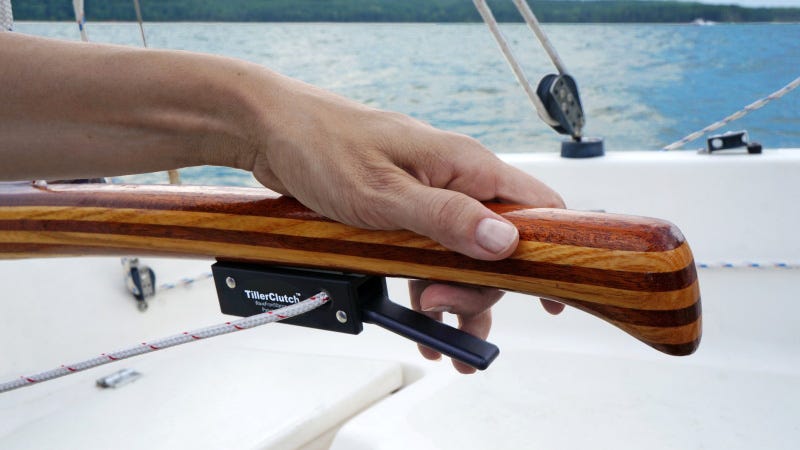
A similar, but newer, version is offered by Tiller Trimmer. The price is marginally higher than the Tiller-Tamer but offers free shipping, a control knob with a threaded stainless steel insert, the line and two cleats for tying off the bitter ends of the control line. I’d go for this one just based on the knob with the stainless steel insert.
Editors note: We don’t see a Tiller Trimmer available anymore, but we sell the newer Tiller Clutch design through the SCA store.
Active tiller control
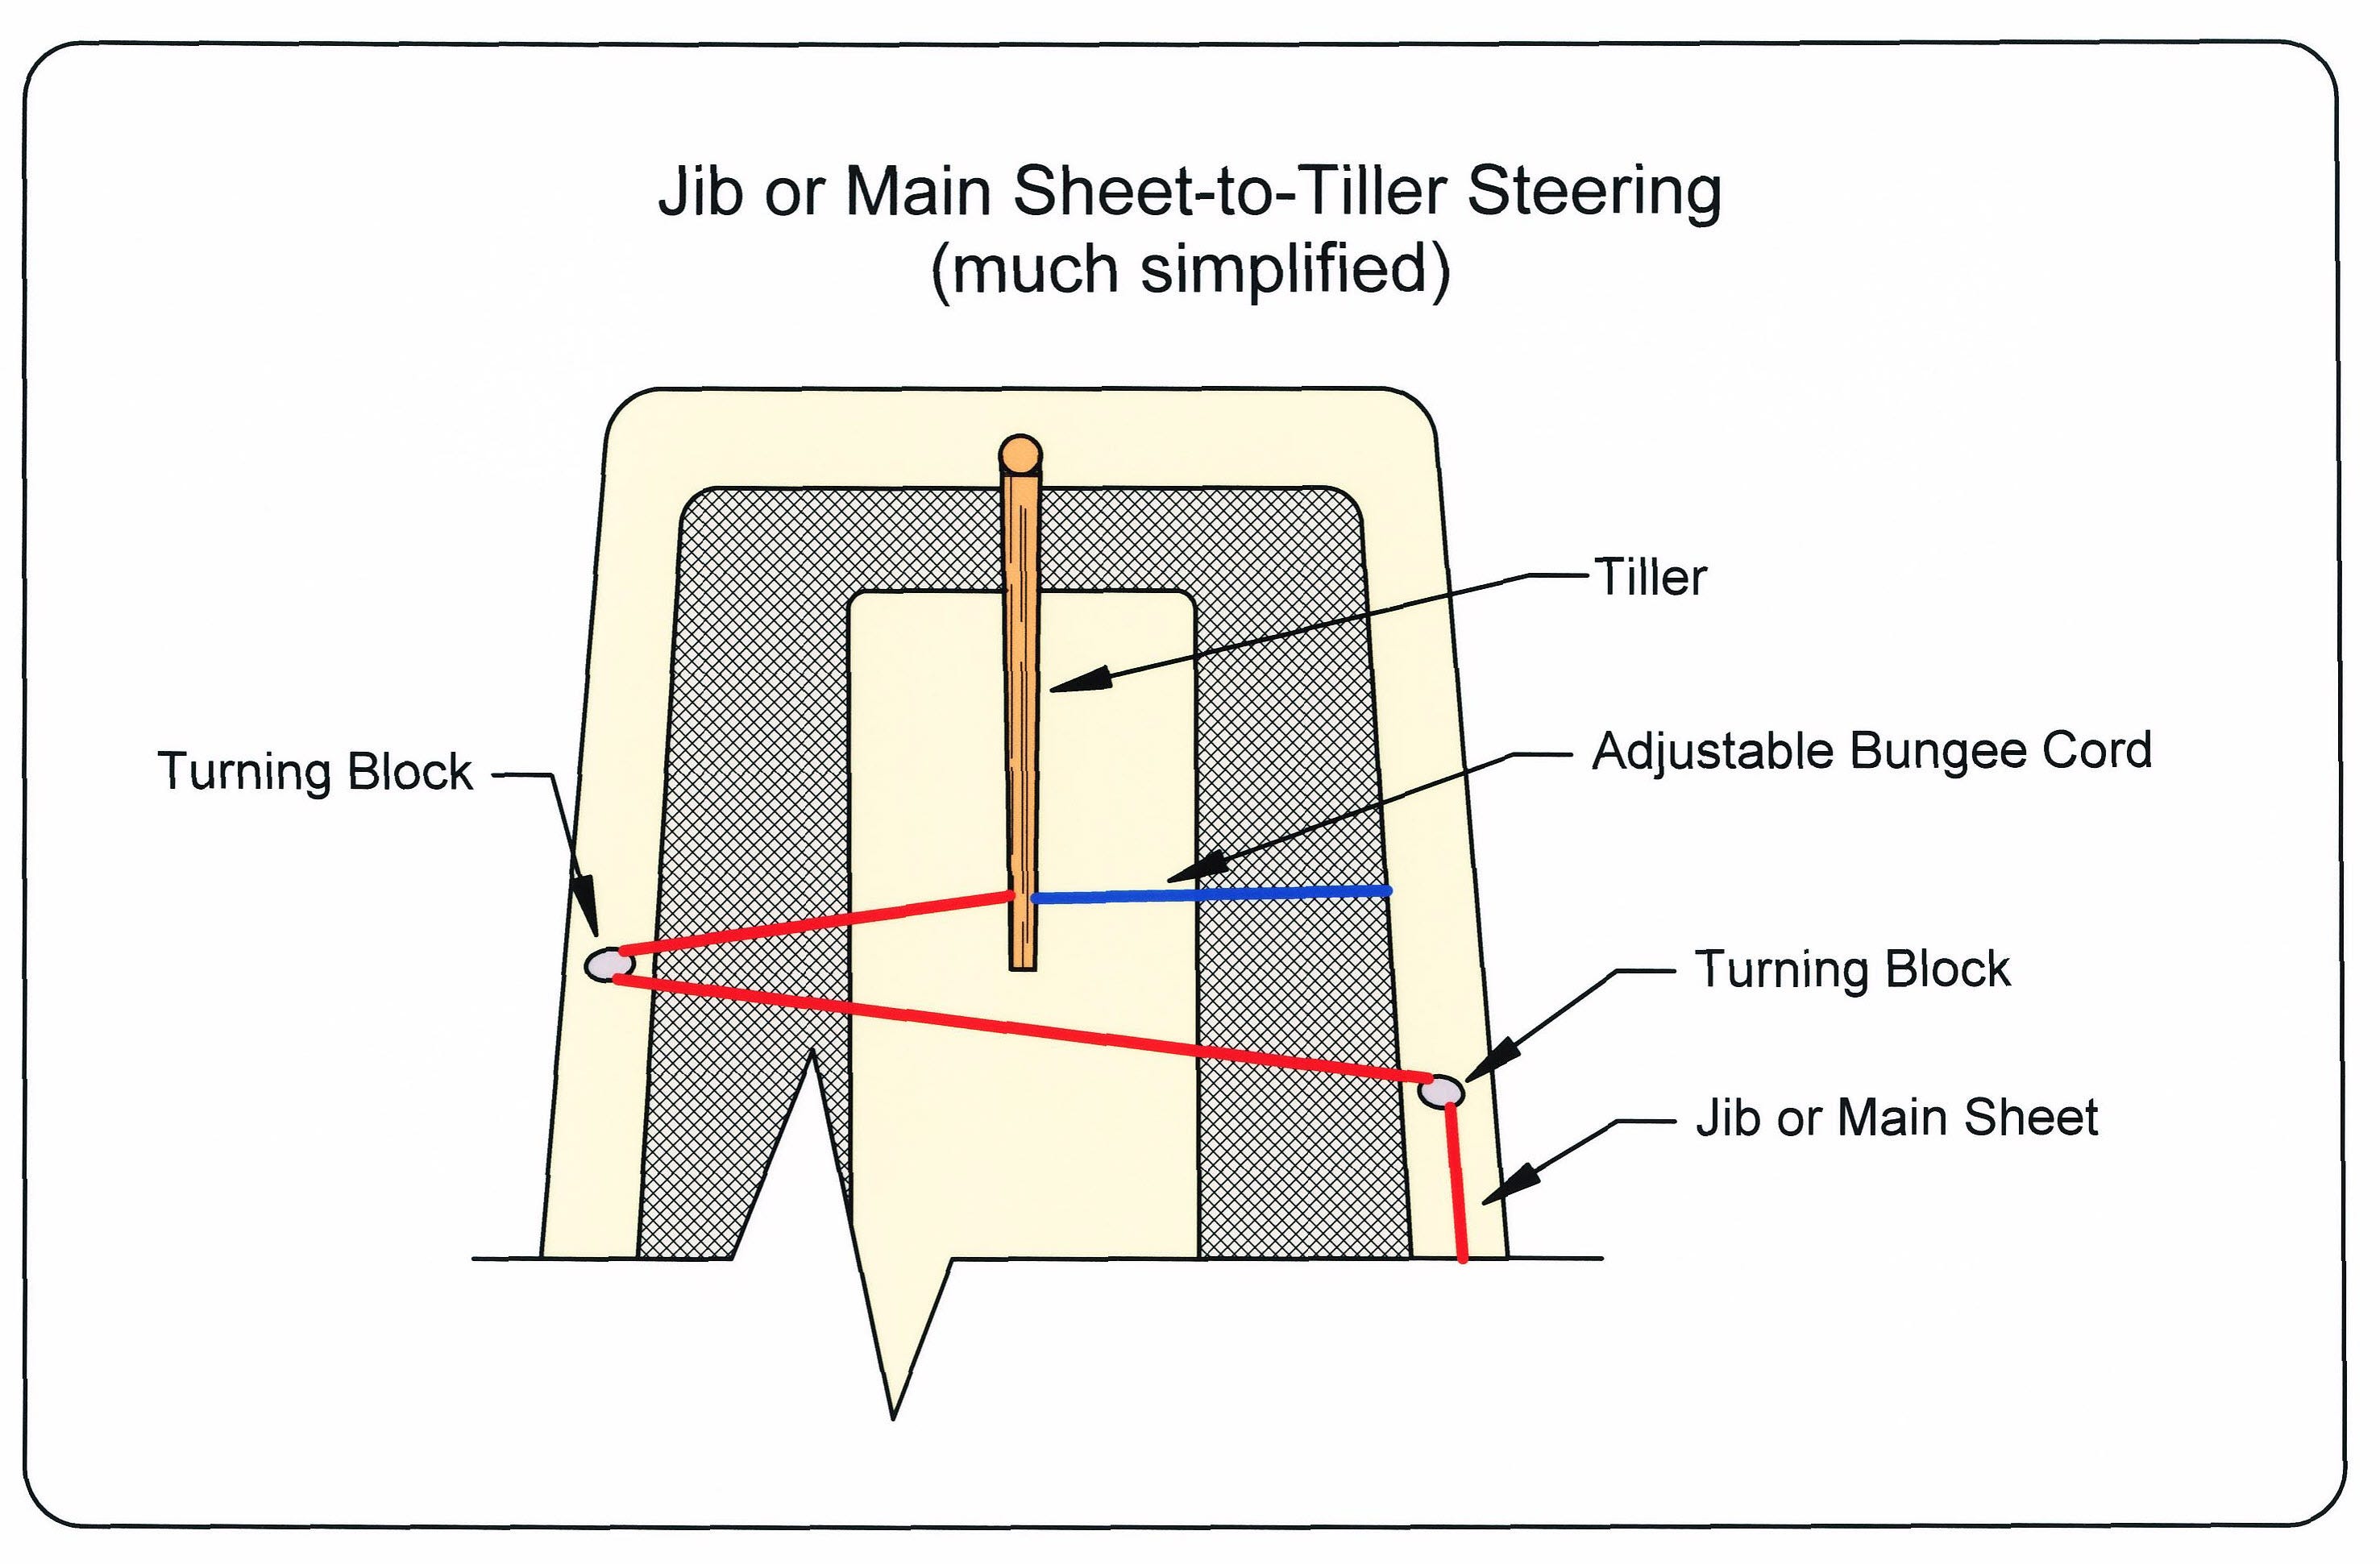
Those of you wanting a little more in the way of active control without the expense of an electronic autopilot can experiment with sheet to tiller steering. Simply put, the tension on a sheet or extension on the sheet is used to adjust the position of the tiller. The sheet, from the main or jib, is led to one side of the tiller through a series of turning blocks. The other side of the tiller has an adjustable bungee cord attached to it.
By adjusting the tension of the bungee cord, you can set the tiller and the course of the boat. As conditions change, gusts and wind shifts for example, the setup will bring the boat back on course. If you sail for long distances, this setup can be very effective. It is also a great project if you like experimenting and tweaking things on your boat. However, depending on your boat, some of these setups can be a little complicated. The Internet is a great resource, though. Just Google “tiller self steering” and you gain access to many web pages showing installations, often including great pictures, drawing and parts lists.
There are two good books on the subject. Unfortunately, both are out of print. One is Self-Steering for Sailing Craft by John S. Letcher. I was able to find a used copy on Amazon.com for $20.00. The other is Self-Steering Without a Windvane: How to Make a Sailboat Steer Itself by Natural and Sheet-To-Tiller Systems Using Only a Few Dollars’ Worth of Gear by Lee Woas. While it is available on the used book market, prices range from $75 to well over $100. Needless to say, I passed on this one.
Autopilots
If money is no object and you still sail a smaller boat, you could always consider an autopilot. These electronic and mechanical devices allow you to steer a compass course and can actually be driven by your chart plotter/GPS. As an aside, that in itself can be very scary, especially if you sail in crowded locations. Imagine 40 boats under autopilot, all approaching the spider buoy off Annapolis, and all using that same buoy as a waypoint.
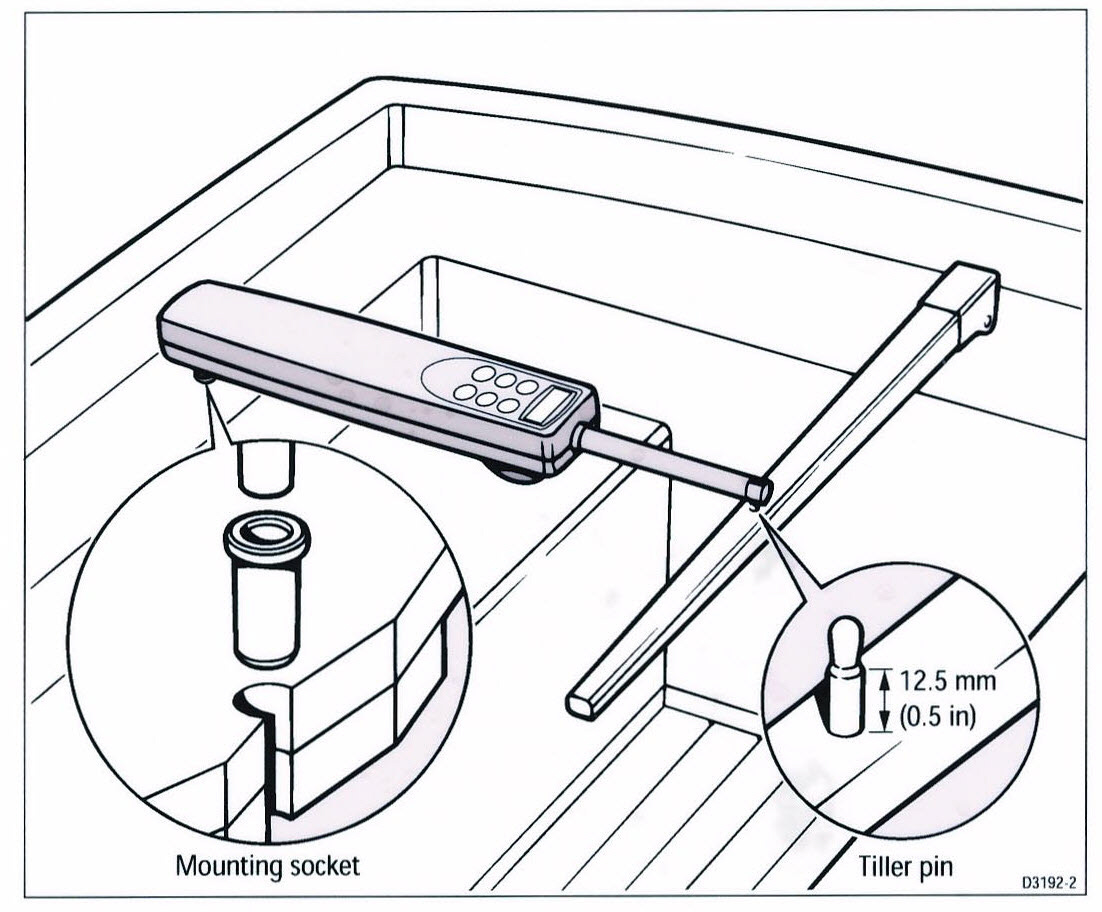
There aren’t a whole lot of options for small-boat autopilots. Many of the smaller units are designed for power boats and require heavy duty battery power or hydraulics. Probably the most applicable unit on the market today is the Raymarine S1000+ Tiller Pilot.
This unit is suitable for tiller-steered sailboats up to 26-feet and displacements under 6,600 pounds. The control head end has a pin that drops into a socket in or on the side of the cockpit coaming while the actuator shaft hooks onto the tiller. The control head has the control buttons. You need to provide 12-volt electrical power to the unit as well as communications lines if you are attaching the unit to a chartplotter or GPS. As this unit is designed for tiller-steered sailboats, it offers a tacking mode that allows you to tack the boat, as well as host of other neat options.
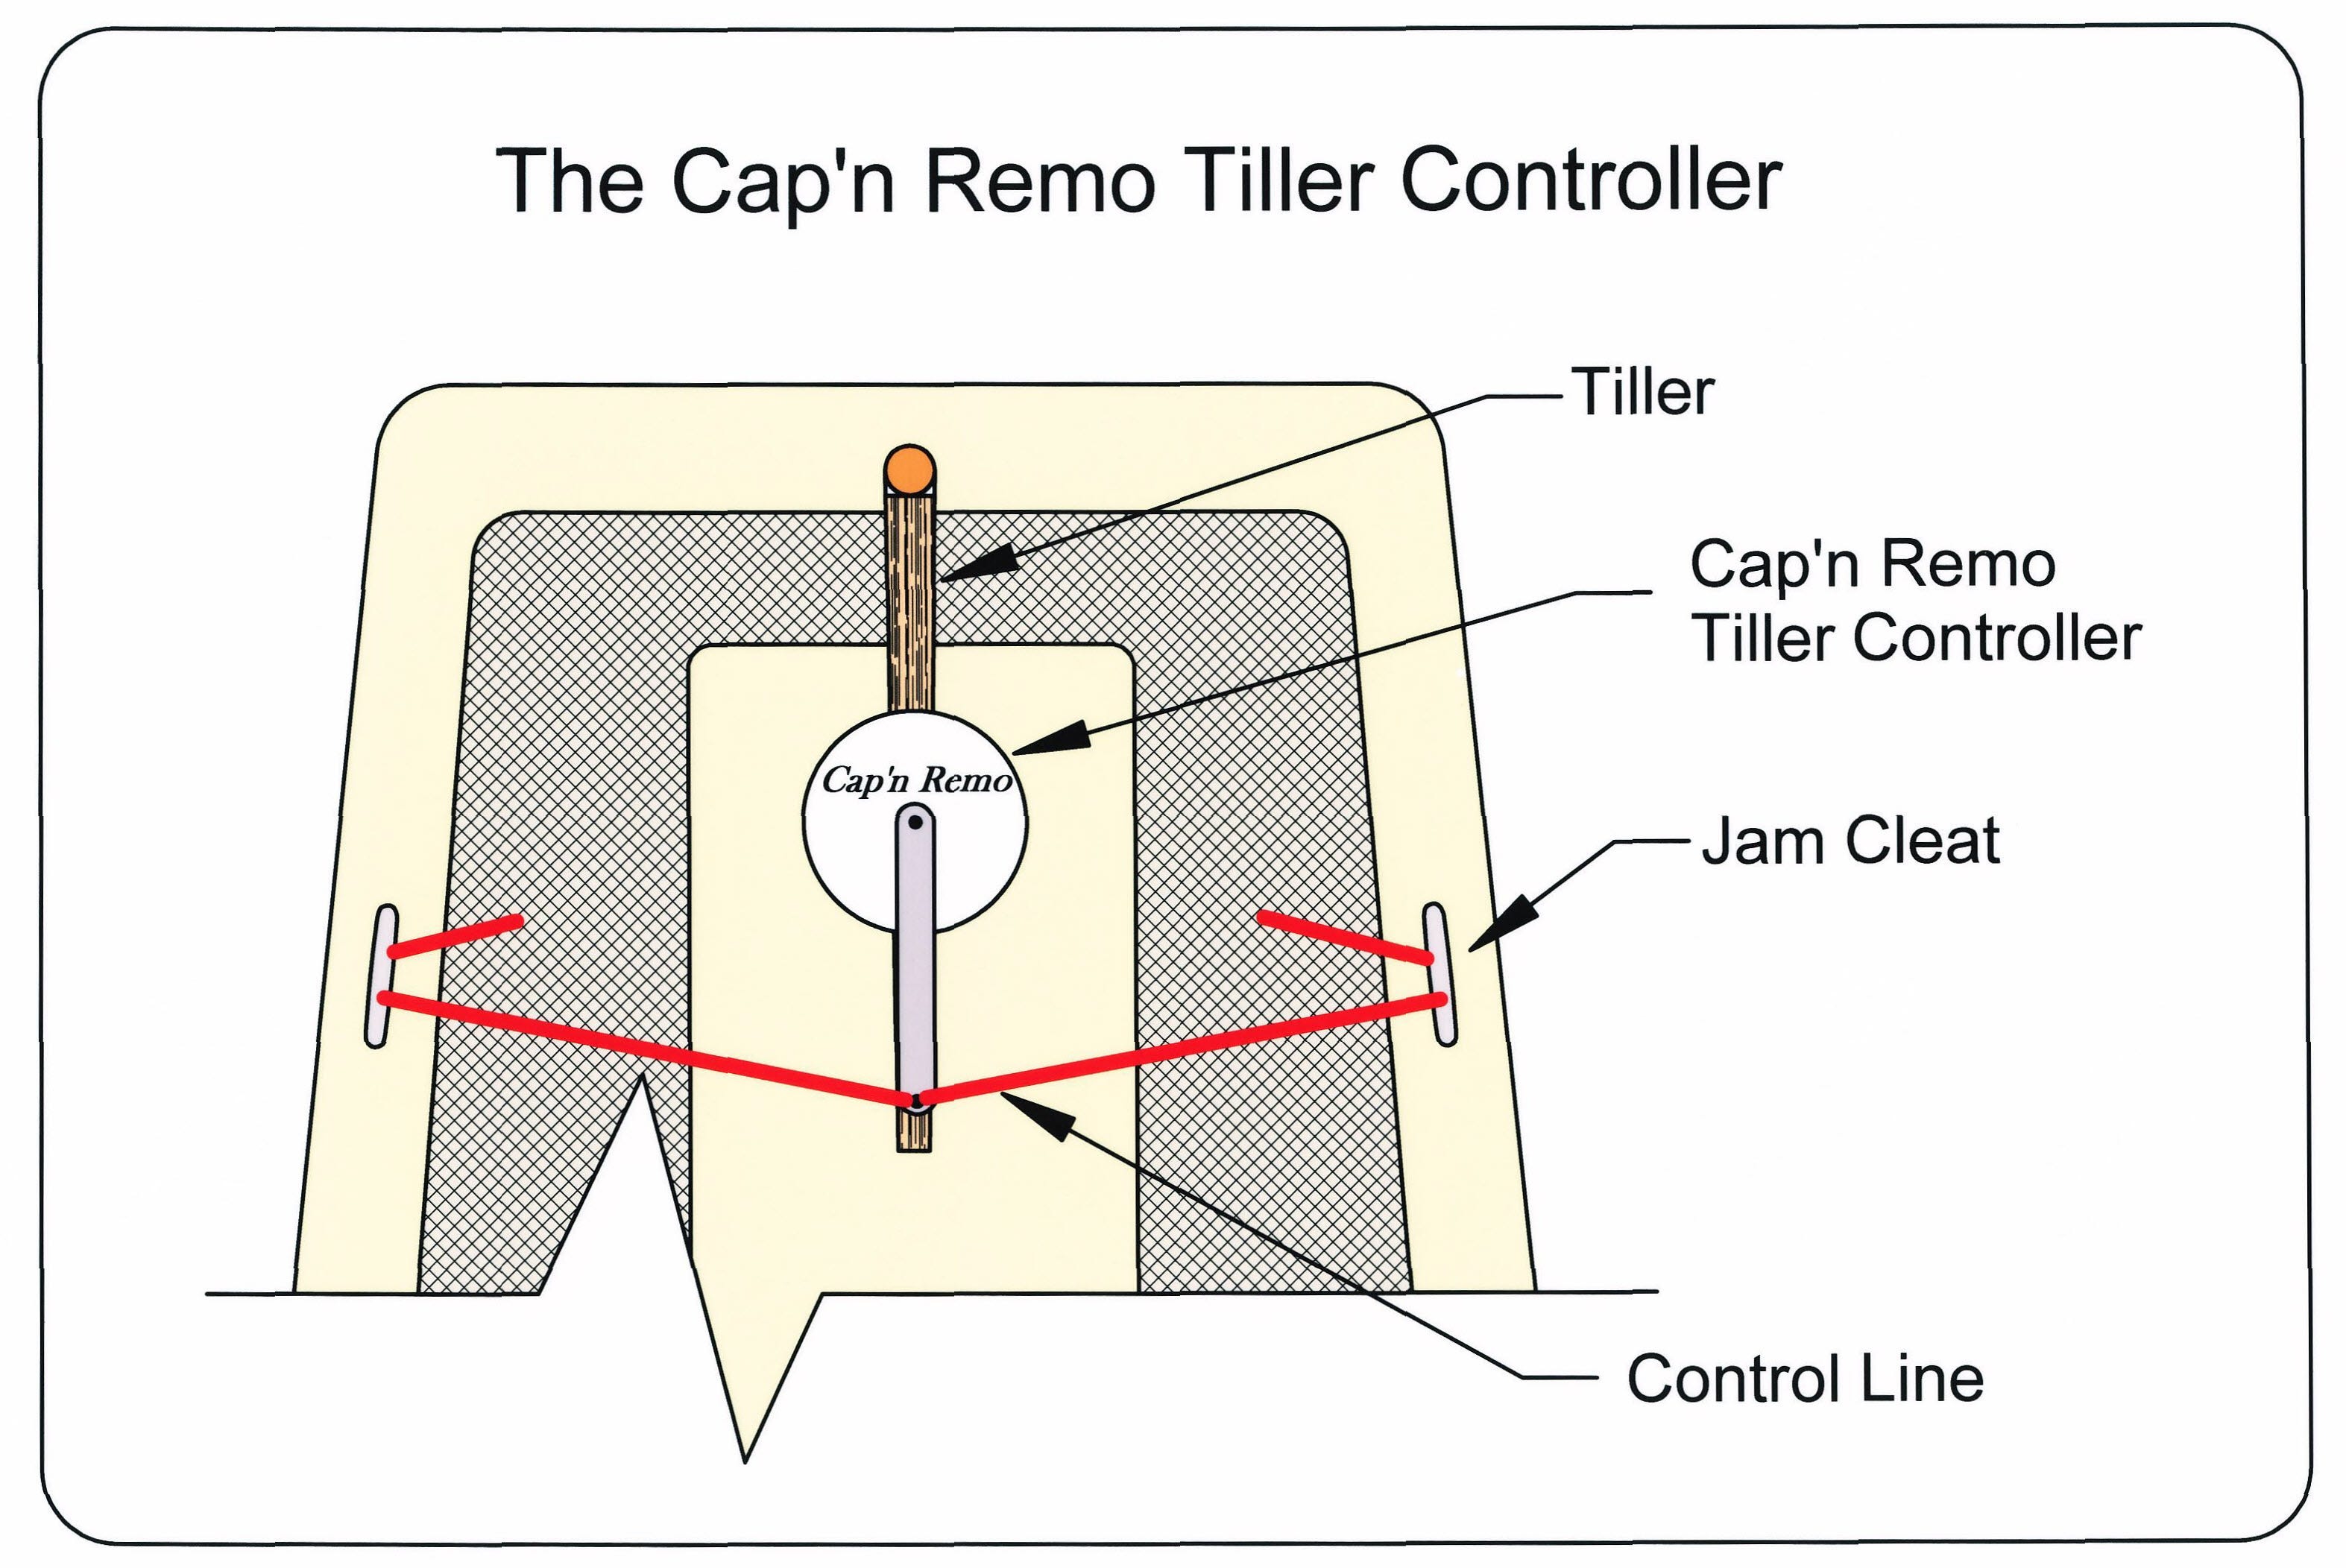
An option in the small-boat autopilot market is the Cap’n Remo unit. It is not so much an autopilot as it is a wireless tiller control device. The main unit sits on top of your tiller. A control arm, on top of the unit, has a line attached to each side of the cockpit. A handheld wireless remote allows you to control the tiller position. So you can sit on the bow and steer the boat remotely.
Finally
There you have it, tiller control from A to Z. As I mentioned in the beginning, this article isn’t a complete installation manual, just an overview of some possible solutions. Remember that cheap is good and simple is better. Whatever choice you decide on, be sure to keep your attention out of the cockpit and on your surroundings—that other boat may well be on autopilot too. •SCA•
First appeared in issue #57
I've been quite happy with the Huntingford Helm Impeders I've installed on four small sailboats so far. I first discovered the Helm Impeder about a quarter century ago, mentioned on the Interweb by someone in the Dinghy Cruising Association, IIRC. It's cheap, simple, almost foolproof, and offers an infinite adjustment of its "impeding" power. :) Each of my installations was a little different from the others. I don't have pictures of the Impeder on Sage, my Michalak Jewelbox, Jr,, due to the difficulty of taking pictures where it was installed, but here are the other three:
https://www.flickr.com/photos/jkohnen/albums/72157644664027219
The only thing to watch out for is having too much slack in the athwartship line when the Impeder is is completely released. Sometimes excess line will let itself get jammed up when the tiller is turned quickly. Put a stopper knot in the control line and adjust the slack so the tiller turns freely, with little slack in the athwartship line.
I like New England Ropes' 1/8" braided polyester cord (available from Wet Marine) for Helm Impeders. Its firmness and friction seem about right for the task, and I've always got some lying around.
Two things - The simplest version version of the first one is just a length of line (no knots, splices or anything), with a few wraps around the tiller to provide friction, enough so the tiller stays located but can be moved by hand. Second - the sketch of the sheet/tiller/bungee cord should have the sheet or extension on the same side of the tiller as the sail providing force. As shown, if the wind increases, tension increases in the line and the tiller heads the boat down, not what you want in increasing wind. The sheet should be attached to the lee side of the tiller, with bungee to windward.