
Article by Paul Esterle
A quick look at my e-mail inbox tells me that the boating season has started. The number of questions about rudder repairs has ramped up, indicating more people have their boats out and, as a result, are running aground or otherwise damaging their rudders. In some cases, just prepping the boat for the water has turned up rudder problems. Note that most of the repairs and suggestions for rudders also apply to centerboards and leeboards.
Many smaller and/or homebuilt boats have wooden rudders, often constructed from one or more laminations of plywood. Others have solid wooden foils, frequently made from mahogany. My first sailboat, a plywood Sunfish (don’t even think about how long ago that was!) had a solid mahogany rudder and daggerboard, well varnished. These actually held up pretty well. The solid wood was free to expand and contract with temperature and water immersion. I’d check them occasionally for wear and re-sand and re-varnish as necessary. Worst case scenario, it was easy to cut out a new one and be back sailing.
Plywood rudders usually don’t hold up as well. Most are sheathed in fiberglass. This sheathing is important as it protects the exposed end grain of half the plywood plies. This end grain readily soaks up water when exposed and causes the rudder to expand, further cracking the fiberglass sheathing. So keeping an eye on that sheathing and repairing as necessary is important to the life of the rudder.

Making a replacement plywood rudder is fairly easy, compared to the difficulties in locating decent solid boatbuilding lumber. Often two or more layers of plywood are laminated together to form the rough blank for the new rudder. The leading edge of the rudder is rounded while the trailing edge is tapered. The plies of the plywood can be used to provide excellent reference points for the sanding process. Be aware that if you are racing in a class, that class may have rules about rudder and other foil cross sections that you might have to adhere to. Most of us just want a new rudder to get back to sailing, though.
Once the rudder is sanded to shape, you may have to address a weighty issue. Some kick-up rudders will need some ballast to help overcome the natural buoyancy of the wood and keep it down. This is often in the form of a lead block cast into a cutout in the rudder blade. While you can melt lead on the average kitchen stove, do some research into the dangers of lead and the safety practices to be adhered to. Lead shot, mixed with epoxy resin, can also be poured into that cutout, a much safer practice. If you laminate your rudder from two layers of plywood, you can also rout a pocket in each half and encapsulate the weight inside when you glue the two halves together.
Sheathing the leading edge and rudder bottom are next. Apply several coats of epoxy to saturate the plywood as much as possible. Don’t apply the epoxy early in the morning as the day is heating up or in sunlight. The heating of the plywood expands any air in the plywood and forms bubbles in the surface. Apply later in the day when things start to cool down and the contracting air will draw the epoxy into the plywood.

Cut strips of fiberglass cloth at a 45 degree angle. These strips will wrap around the leading edge much easier than a straight 90 degree tape. Apply a couple of layers of cloth and epoxy and then sand the edges of the cloth fair with the rest of the rudder. You can then cover the rest of the rudder with fiberglass cloth.
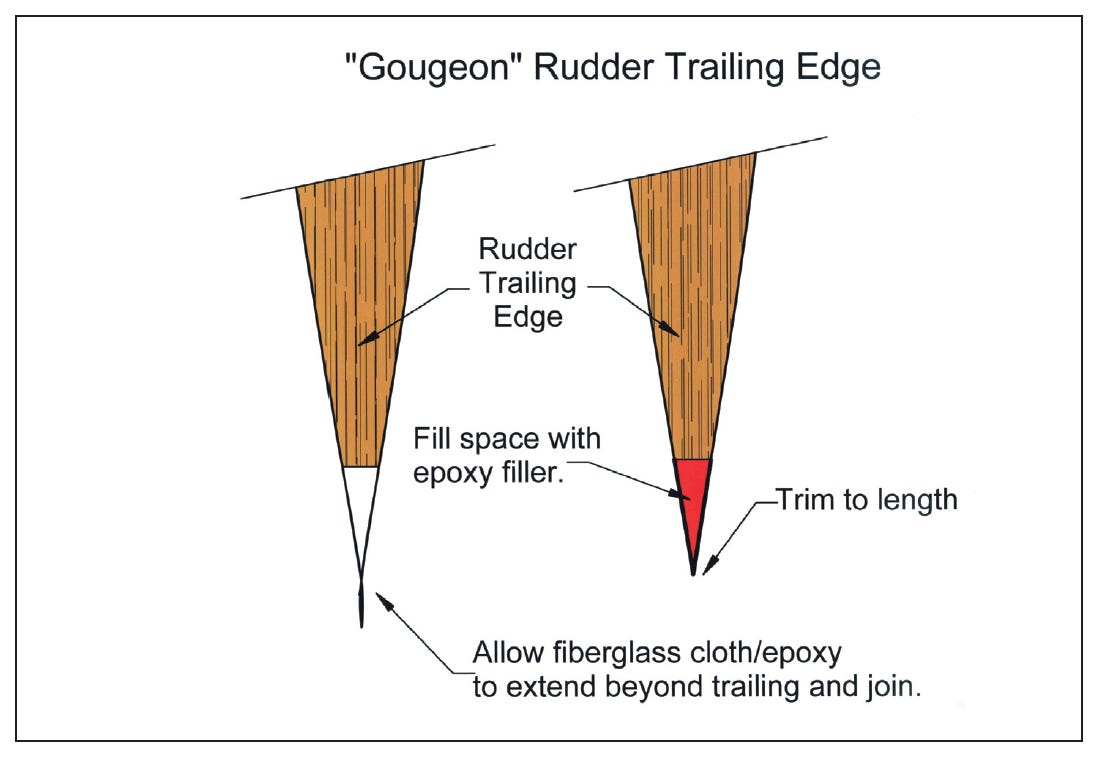
There are two schools of thought on treating the trailing edge. One says that the trailing edge should end in a flat, about 1/8" wide, with sharp edges. The problem with this edge is that you won’t get fiberglass cloth to turn the corner on that flat. Another school of thought says that the trailing edge should taper to a fine point. This is hard to do and subject to nicks and dings. However, WEST Epoxy (Gougeon Brothers, Inc.) came up with a neat method to accomplish this: The trailing edge is planed flat as above. Support the rudder with the leading edge up. Fiberglass cloth is draped over the rudder and allowed to hang down below the trailing edge of the rudder. The glass cloth, wetted with epoxy, will follow the surface of the trailing edge and meet below the rudder. After the epoxy has cured and the trailing edges are sanded to shape, the open space at the trailing edge of the rudder can be filled with epoxy filler.
If you are tired of making replacement rudders or in a hurry to get back on the water, there is another solution—buy a rudder. Folks like Rudder Craft sell complete rudders for a wide variety of craft. While not inexpensive, these units certainly have their advantages. They are crafted from aluminum, stainless steel and high-density polymers. I replaced the fiberglass covered wooden rudder on my Matilda 20, Ternabout, with a Rudder Craft unit.
The replacement rudder was stronger, better designed and had a better kick-up, hold down arrangement. Best of all, the high-density rudder was streamlined and will never, ever, absorb water or require finishing. Being made from high-density polymer, I can drag it across the bottom forever without any appreciable wear.
The only complication in my installation was that the existing rudder gudgeons on the transom were too anemic for the new rudder. Bolting a new set from Rudder Craft on the transom solved that problem quickly and with a minimum of fuss. All told a good option to get back on the water in a minimum amount of time.
Many production fiberglass boats also have fiberglass rudders. These usually have a stainless steel rudder shaft encased in foam. The foam is then encased in a molded rudder shell. These rudders can suffer a variety of ailments as they age. Groundings can split the molding or the fiberglass itself can be hit and cracked. The joint where the rudder shaft enters the rudder blade is also a problem area. As fiberglass and stainless steel expand and contract at differing rates, that joint can crack.
The upshot of all these problems is wet, saturated foam interiors and corrosion. Remember that even stainless steel will corrode in the absence of oxygen. Evidence of these problems often becomes apparent when the boat is hauled for the winter. Persistent water leaks from the rudder are a sure sign of internal problems.
There are several manufacturers who can supply replacement rudders of this type. In many cases, they also built the original rudders under contract and so have the exact molds on hand. These are not cheap, however. They are usually much more expensive than a typical Rudder Craft rudder, for example.
However, many individuals have successfully repaired such rudders. I’ve heard several different solutions for drying out the foam. Some involve applying heat or a vacuum to the rudder to evaporate the moisture. In fact, I’ve seen rudders sucked into collapse by the application of vacuum to it. I have not seen any cases where the rudder was successfully dried out, though.
A successful rudder repair involves opening up or splitting the rudder shells followed by removing all the saturated foam. I have found it helpful to build a simple jig to hold the rudder stock in the proper location within the rudder shell. Make the jig before splitting the rudder!
Once the rudder is split, dig out the wet foam and clean up the rudder stock. Often there will be a flat plate welded to the stock for additional rudder strength. These are usually mild steel and may well be corroded. Clean up any rust and then apply a rust converter to the metal. The converter turns any remaining rust into a stable black coating.

Locate the rudder stock in one half the rudder shell using your jig, and begin pouring high-density two-part foam in place. Originally the rudder was foamed in one pour in a mold. You don’t have the mold so it will be difficult to get the correct amount of foam in one pour. Most repairs I’ve seen and done were poured a bit at a time, and then sanded so the other rudder shell can be epoxied in place. I then wrap the entire rudder with a layer or two of fiberglass cloth and epoxy.
A key area is where the rudder stock enters the rudder. I enlarge that opening so there is a gap between the rudder stock and the fiberglass rudder shell. A thick bead of sealant in that gap will provide a flexible seal that won’t allow water into your newly repaired rudder.
Remember, while I have consistently talked about rudders, most of the same procedures can also be applied to centerboards, daggerboards and leeboards.•SCA•
First appeared in issue #77
Another place to look for stainless corrosion is in your chain plate bolts. When I was doing some major work in the schooner, I found that the bolts had gone wasp-waisted. The 9/16 bolts were down to 1/8" inside the oak sheer clamp. The bolts were replaced with monel. Damn the cost--What is the boat worth?