
MAINTAINING AND RESTORING YOUR BOAT TRAILER
Suggestions from a professional mechanic and sailor
Article by Guy Light
During runs from home to the launch ramp, and back, trailers can inadvertently abuse the boats we so lovingly entrust to them. There are several reasons our boats can suffer a harsh ride while on the trailer. The tires are typically small in diameter; air pressure in these smaller units is high, and the springs don’t exactly mimic “Rolls Royce” ride quality.
Of these ride problems, the easiest to fix is increasing the diameter of the wheel and tire size, as long as it will still fit under your fenders with adequate clearance. In the market for new tires for my project, I called my buddy at the tire store and had a sticker-shock moment when he told me the price. Then I went shopping. It turns out that there are only a few manufacturers of these smaller sizes and the quality is nearly the same. I found that the farm-supply outlets and the tool-discount stores all had what you need, but the cool part is you can get a new tire and wheel already mounted for less than the price of only a tire—but only if you shop around. (As a side note, did you know that tires have a date-code stamp from the factory and that if the tire is over seven years old it’s what they call “timed out” and should be replaced. This fact is hard to accept when you look at your tires and they have plenty of tread left on them! Timed-out tires are a large problem on our highways today, causing many accidents due to tire failure.)

To illustrate the amount of vibration a boat experiences while on the trailer, you could do the experiment I did with a friend. He didn’t understand why stuff came out of cupboards, drawers opened and things fell off the table of his small camp trailer while in transit. I had him ride inside the trailer while I drove around a city block at 30 mph. He was amazed at the amount of vibration and movement in the trailer, even at relatively slow speeds on smooth roads, and was happy to escape from the pounding.
So with this in mind, it’s important to stow your gear in a logical manner with padding or carpet to protect the boat from being chewed by the gear. (A thin spot in the hull made by a bouncing anchor could make for a bad day.) In my Monty 15 project, that problem basically cost me a new mast, due to the way the forward mast crutch was fixed to the trailer, the rear crutch was on the boat, and the trailer flexed enough to cause a lot of fore-to-aft movement. The crutch padding was inadequate, triggering significant abrasion damage on the mast. So as you secure and store items for transport, think a lot about padding to protect your boat and your gear.
SPRINGS
The springs on our trailers are supposed to do several things. One is to hold the axle-tire assembly in place so the trailer goes straight down the road, and another is to allow controlled vertical movement of the wheel-tire assembly over irregular surfaces of the roadway. If springs fail, bad things happen very fast. First the trailer drops on the tire that is spinning at speed. That acts like a one-wheel brake, stopping the tire and potentially twisting the axle 90 degrees to the direction of travel. This causes the trailer to roll, possibly ripping it off the tow vehicle and destroying your prized possession.
I belong to a group of trailersailors called the Potter Yachters, about 50 members strong. Of that number, in recent times five people have had spring failures, myself included. Luckily, none of these incidents has caused injury.
I’ve talked to trailer manufacturers and after-market suppliers, concluding that problems often relate to where most trailer components are produced: nations with low wages and questionable quality control. The metal in good springs is expensive and cannot be sold for $25 per spring, such as the only ones I could get locally for my trailer. I think that from a safety standpoint, the only thing you can do is remove and inspect springs on a mileage or time basis, and understand that immersing the springs in salt water cuts into the life of the metal. Check out the adjoining photos—you will see that the failures are from metal fatigue because the steel is of poor quality and won’t flex indefinitely without fracturing. (This problem is so widespread that a company in California is marketing a bolt-on skid-slide device so that in the event of a spring failure you can get your trailer to the edge of the highway without a catastrophic accident.)

WHEEL BEARINGS
These are basically the only moving parts on your trailer. Due to lack of maintenance, I know you’ve seen the poor guy on the side of the road with no wheel on his trailer and a stub axle ground to a molten mess…maybe walking down the freeway looking for his wheel and tire. The key to avoiding wheel-bearing failure is maintenance and always having lots of grease that is water free. At the beginning of each season when you check your springs for cracks, and while the axle is jacked up with a jack stand under the axle, give tires a quick spin and listen for any grumbling or growling noises. Also, with one hand at the top and one on the bottom of each tire, see if there is any clunking sound as you push in and out in opposite directions. Noise and looseness are signs of a problem. If you think there is a problem, go to a credible trailer shop and have it checked out; they can repack or replace the bearings if necessary, or maybe show you how to deal with repairs on your own.
One of the big items a bearing needs is grease. When a bearing goes down the road, it gets warm or maybe a little hot. Now, there could be some air in the bearing hub, helping it get even hotter. Then you back the trailer into cold water and “bingo!”—now that air is cool. The air inside contracts, creating a negative pressure in the hub. What happens? The wheel seal gives up and says, “C’mon in, water!”…and that is the start of watered-down grease, rust buildup and wheel-bearing failure. There are some simple devices that can stop this problem. The common name is Bearing Buddies—basically a spring-loaded grease cup. After you pump the cup with grease, the spring puts pressure on the grease to eliminate voids and air in the bearing hub, adding pressure on the grease side of the seal to compensate for the water pressure on the other side. I recommend that you carry a small grease gun and use it to grease the wheels and the spring pivots after each salt water dunking. It really only takes a minute or so.

LIGHTS AND WIRING
“Yes, sir, officer, I’ll fix the problem as soon as I get home. Oh, and thank you for just a warning!” Don’t you just hate the embarrassment that goes with being stopped for tail lights that don’t work? Bulb and wiring problems start the day the trailer is being assembled by the manufacturer. They use “Scotch locks,” not solder and heat shrink, and they employ incandescent bulbs in non-sealed lamp fixtures, not LEDs in sealed housings. And while I guess you can’t blame them—it’s a matter of economics, not longevity—I’ve never owned a new or used trailer that didn’t need a redo on the wiring and lighting to improve longevity and reduce ongoing maintenance. One of the other problems is routing and securing of factory wiring. Eliminating those little clips that let the wires hang down and get grabbed by errant road debris is a must. Conduit from houses or hard plastic tubing from a yard sprinkler system work wonders to protect the wiring under a trailer.
You can get away with incandescent bulbs or non-sealed lamp units (at least for awhile) if you remember each time you back the trailer into the water to disconnect the wiring from the car, so that when you have your foot on the brake, the bright and hot bulbs don’t hit the cold water and go “Poof – lights out!” Also, if you’re in saltwater, the metal contacts inside the housing tend to fail when dissimilar metals are greeted by saltwater and electrical current. This is why totally sealed units are such a maintenance-free godsend.
BUNKERS VS ROLLERS
Whether you need bunks or rollers to support your boat is a function of the design and type of boat. The rigid hull of a powerboat that’s designed to take a pounding at speed over waves can usually be supported by lots of rollers, but a wooden hull or sailboat that is a displacement hull—not intended to jump over small buildings—can be deformed over time by the contact pressures of a roller. In thinner, more flexible hulls, bunks afford more surface area and thereby less pressure per square inch on the hull. So, as you look at your newly purchased trailersailor, make sure the trailer is properly and evenly supporting the hull.
TRAILER STRUCTURE
Channel or Tubing – The choice between these two structural shapes comes down to the environment in which they will be used. I heard about a fellow who was stopped by police, who wanted to know why he was towing the bare tongue of a trailer down the road. Well, as he put it, he had a boat on a trailer back at the boat ramp, but it was painfully obvious he now had only had the stub end of a trailer hooked to his car. It turns out the man’s trailer was constructed of square tubing and after many dips in salt water the yoke had rusted out from the inside and allowed his boat to part company while going down the freeway. (They went back and found the boat and trailer, rolled into an indiscernible ball in the median.)
An open section such as a channel is more flexible in a twisting motion than a closed section such as a square tube, but the open section can be hot-dipped galvanized on all sides, preventing rust. Open section trailers tend to be more flexible. Knowing that helped promote my re-engineering of supports for the Monty, to stop a hobby-horsing motion that the boat would do over certain road imperfections.
MAINTENANCE NOTES
It’s important for the life of any trailer to wash down all its surfaces and avoid having any trapped salt water. Here are some other thoughts:
Spares Box on the Trailer—Following the old Boy Scouts “Be Prepared” motto, I’d rather have it and not need it, than need it and not have it. I realize that I’m going to carry items you feel you’ll never need, but when out with a group it’s amazing how often parts I’m carrying have saved someone else’s bacon. That was especially self-evident during my racing career. (The phrase was, “Go ask Guy, he’ll have one.”)
Part of the reason for having a box for stuff on the trailer (see photo) is that you may not always use the same tow vehicle. In my case, depending on distance and time away, I may use the pickup camper or either of two SUVs, and with the trailer having a dedicated box of service stuff I don’t have to worry about forgetting the lug wrench or some other item.
My spares-box list would typically look something like this:
• Folding lug wrench
• Spare hub assembly with lug nuts
• Spare springs and hardware
• Small grease gun
• Hitch pin and clip
• A jack that fits under the axle when the tire is flat
• Wood plates for jack, pieces of 2 x 4, wheel chocks
• Winch strap or rope, depending on your application
• Tools specific to the items carried
• Gloves and rags
On Lug Nuts—If you haven’t had to remove the lug nuts on your trailer for a couple of years you may not be able to if you’re unlucky enough to have a flat. The problem is that the threads of the nuts and studs are not coated or galvanized and that salt water is having a field day rusting them in place. The simple solution is to replace them with acorn lug nuts and to put some marine grease on the threads—no more salt water on the threads.

Ball to Coupler Adjustment—We all know there are 1-7/8"-diameter, 2"-diameter and 2-5/16"-diameter hitch balls for towing. It is hard to mismatch a coupler and a 2-5/16" ball, and it’s impossible to put a 1-7/8" coupler on a 2" ball. The real danger, and it happens all the time, is to put a 2" coupler on a 1-7/8" ball. It drops on, the handle latches but sometimes the only thing keeping the trailer on the ball is the tongue weight—and that’s not what you want to rely on! Please be careful to read the size (listed on the top of the ball and on the coupler). There is a picture of a 1-7/8" coupler disassembled to show all the pieces and it’s a pretty standard layout. The notable thing about this is that almost every coupler has an adjustment to get the correct tension or fit of the shoe to the ball. To get a proper fit, here are some simple steps:
1. Have the trailer disconnected from the car sitting on its crank-up jack.
2. Take a proper size ball and put it in the coupler and latch the handle and install the safety pin or lock.
3. Push the ball up and down and shake it all around. How much slop do you have? Anything over 1/16" is too much. To adjust out the slop, take the ball out, adjust the nut a small amount, then reinstall the ball and repeat until the slop is removed. You will also need to avoid getting it too tight—it will be hard to latch the handle, so you may need to back off the adjustment until the handle can be latched without having to bludgeon it with a hammer.

Hitch Pins—In the picture you see four options, labeled A through D, and I’ll go through the pros and cons of each. The hitch pin’s purpose in life is to make it easy to change hitches and also remove that shin breaker from the bumper of your truck.
“A” is the standard hitch pin used by most everybody.
Pros – Quick and simple. Cons – Not the safest, as it can be easily disassembled, or become unsecured. (Hope you’ve got good safety chains!)
“B” is the lockable pin. It is great if there is no salt or grit on the road, if you have a couple of extra keys made and remember where you hid them. The pros are that no one is going to steal your hitch out of the receiver.
“C” involves using a pin and securing it with a combination lock that is easier to use. In the dead of winter going over Donner Pass on I-80, I had the lock and the pin disappear, so don’t tell me there isn’t a Murphy’s Law!
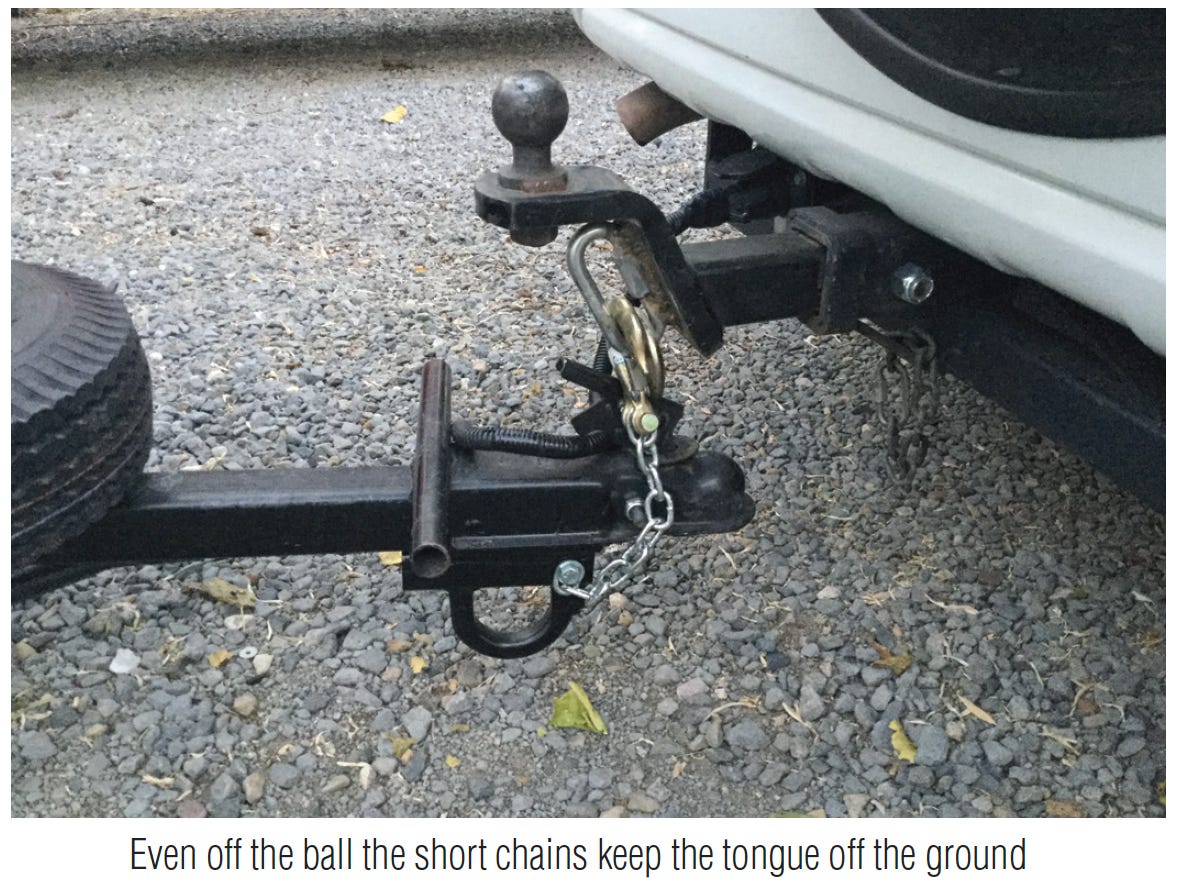
After that debacle I had to rethink the “pin” so “D” is now my new best friend. The cons are self-evident—you have to have some tools and they should be readily available to you, not on the bench in the garage at home. The use of a grade 8 bolt and a Nyloc nut does allow you to put the safety chain much closer to the ball which makes them shorter and much safer (see picture). The reason for this is that in the eyes of the law, if the hitch is bolted to the receiver it is now a physical part of the frame and cannot fall off because the clip pin got knocked out or wasn’t installed properly—that human error or Murphy’s Law thing again!
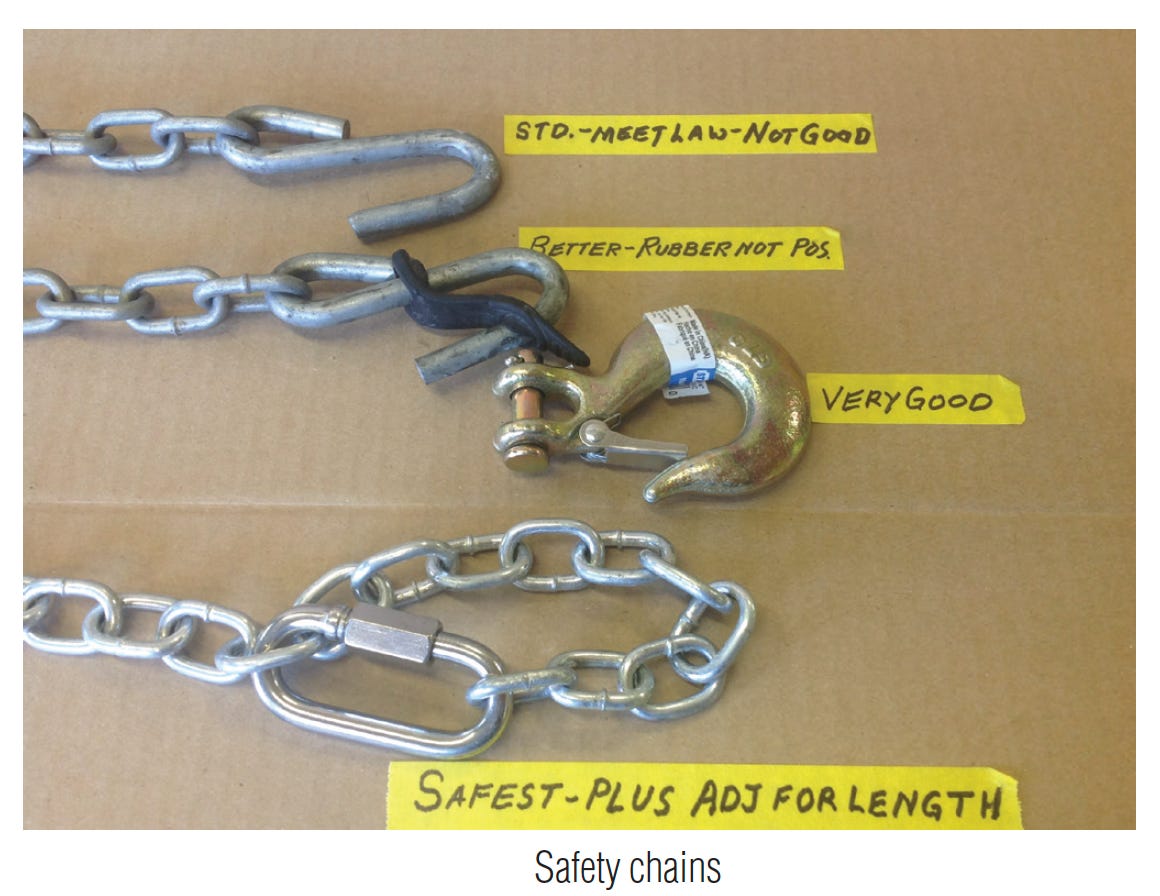
Safety Chains—These are your last port in a storm, and we hope that Murphy’s Law has not had any effect on them. In the photo you can see at the top the standard hook, with no retaining device, and the length adjustment is done by twisting the chain around or just letting it drag on the freeway.
The next hook has a rubber retainer. They are good, but suffer from dry rot and are not as positive as the chain hook with the spring-loaded retainer clip. But this doesn’t make for easy length adjustments. The bottom one in the photo is the best; it’s a standard chain link connector available at any hardware outlet and comes in sizes from 1/8" on up. The glory of using this device is that you don’t have to cut the hooks off the end of the chain if you don’t want to. And your chains will always be in place if you should need them. You can also adjust the length as required.
You know the law requires you to install the chains in an X pattern so if the trailer is no longer attached to the hitch ball, this X pattern will support the trailer. If the chains are too long, the tongue of the trailer might hit the pavement, with ensuing damage. But if the chains are shorter, the trailer doesn’t apply as much weight to the pavement as it is being pulled forward, therefore damage is less, we hope. The other aspect of shorter chains is that when you hit the brakes to stop the problem chasing you, a long chain will allow the trailer to go under your vehicle and the winch post on the trailer—or the 2HP Honda outboard mounted on the winch post will get to your tailgate first with unwanted consequences.

Road Skid—When the trailer hits the pavement it’s really nice if there’s a sacrificial skid that will grind away on the pavement instead of more important parts of the trailer: coupler, ball, the things that hold it all together. A proper road skid should have at least a half an inch of metal thickness that hits the roadway. The road skid should also have a taper so it can slide over imperfections in the road instead of hooking on them.
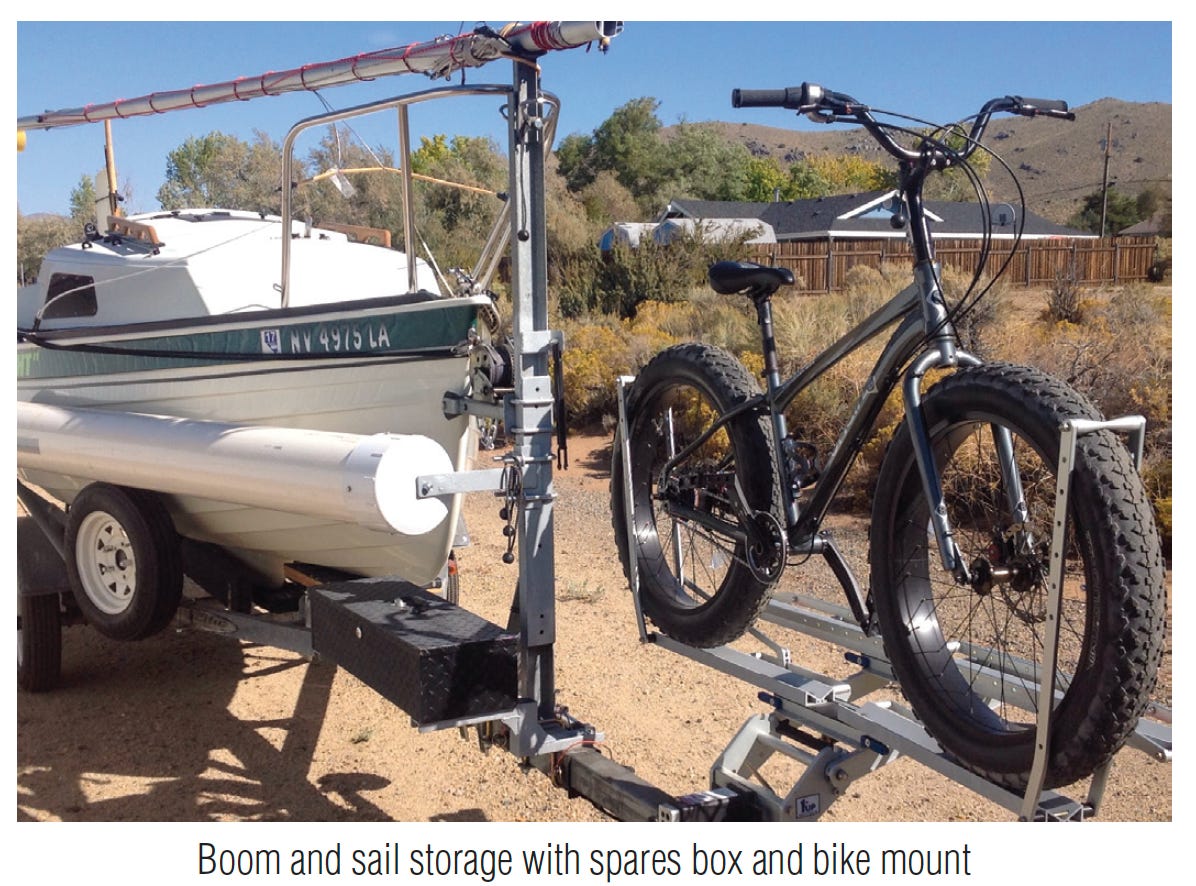
Extra Things Your Trailer Can Do—The photo above top is my boom and sail-storage container, nice because I hate putting them in the cabin of my Monty. The bike mount is a result of my realizing that when the tongue was extended for launching I had all that extra space and the trailer going down the road doesn’t care if it is long or short.
I realize many readers already know much of what we’ve described about boat trailers, but I hope you picked up a some tips that will, in the end, make sure your favorite boat continues to have safe and comfortable rides to and from the ramp. •SCA•
Guy Light has been sailing since he was nine years old. His first boat was a Chris Craft pram that his grandfather built for him. For 44 years he has designed, built and raced Endurance rally cars sponsored by numerous car companies, tire manufacturers, driving light companies and oil producers.
First appeared in issue #111
Josh, Have you planned all this or did these guys just appear out of thin air? I said you were on a roll and I meant it but am beginning to believe there is more to it and if so, we as readers need to appreciate the effort. I have personally owned something like 9 or ten boat trailers and in some cases went to great lengths to customize them for a particular need. I've actually built more than one trailer from scratch, that is from a pile of steel and some of these came to me not well cared for in the least. This great article can really help anyone who wants to read and consider the points. It is all important but the info on tires could be the most critical and therefore most important. Please keep this stuff up if at all possible!
Thanks to Guy for this practical article, and thanks for reposting it, Josh. Lots of practical tips that I wish I had known earlier, and many concepts that affirmed my current practices. I always look forward to SCA content.