
How You Can Restore a Classic Wooden Dinghy
Be brave and maybe a little crazy—you can do it!

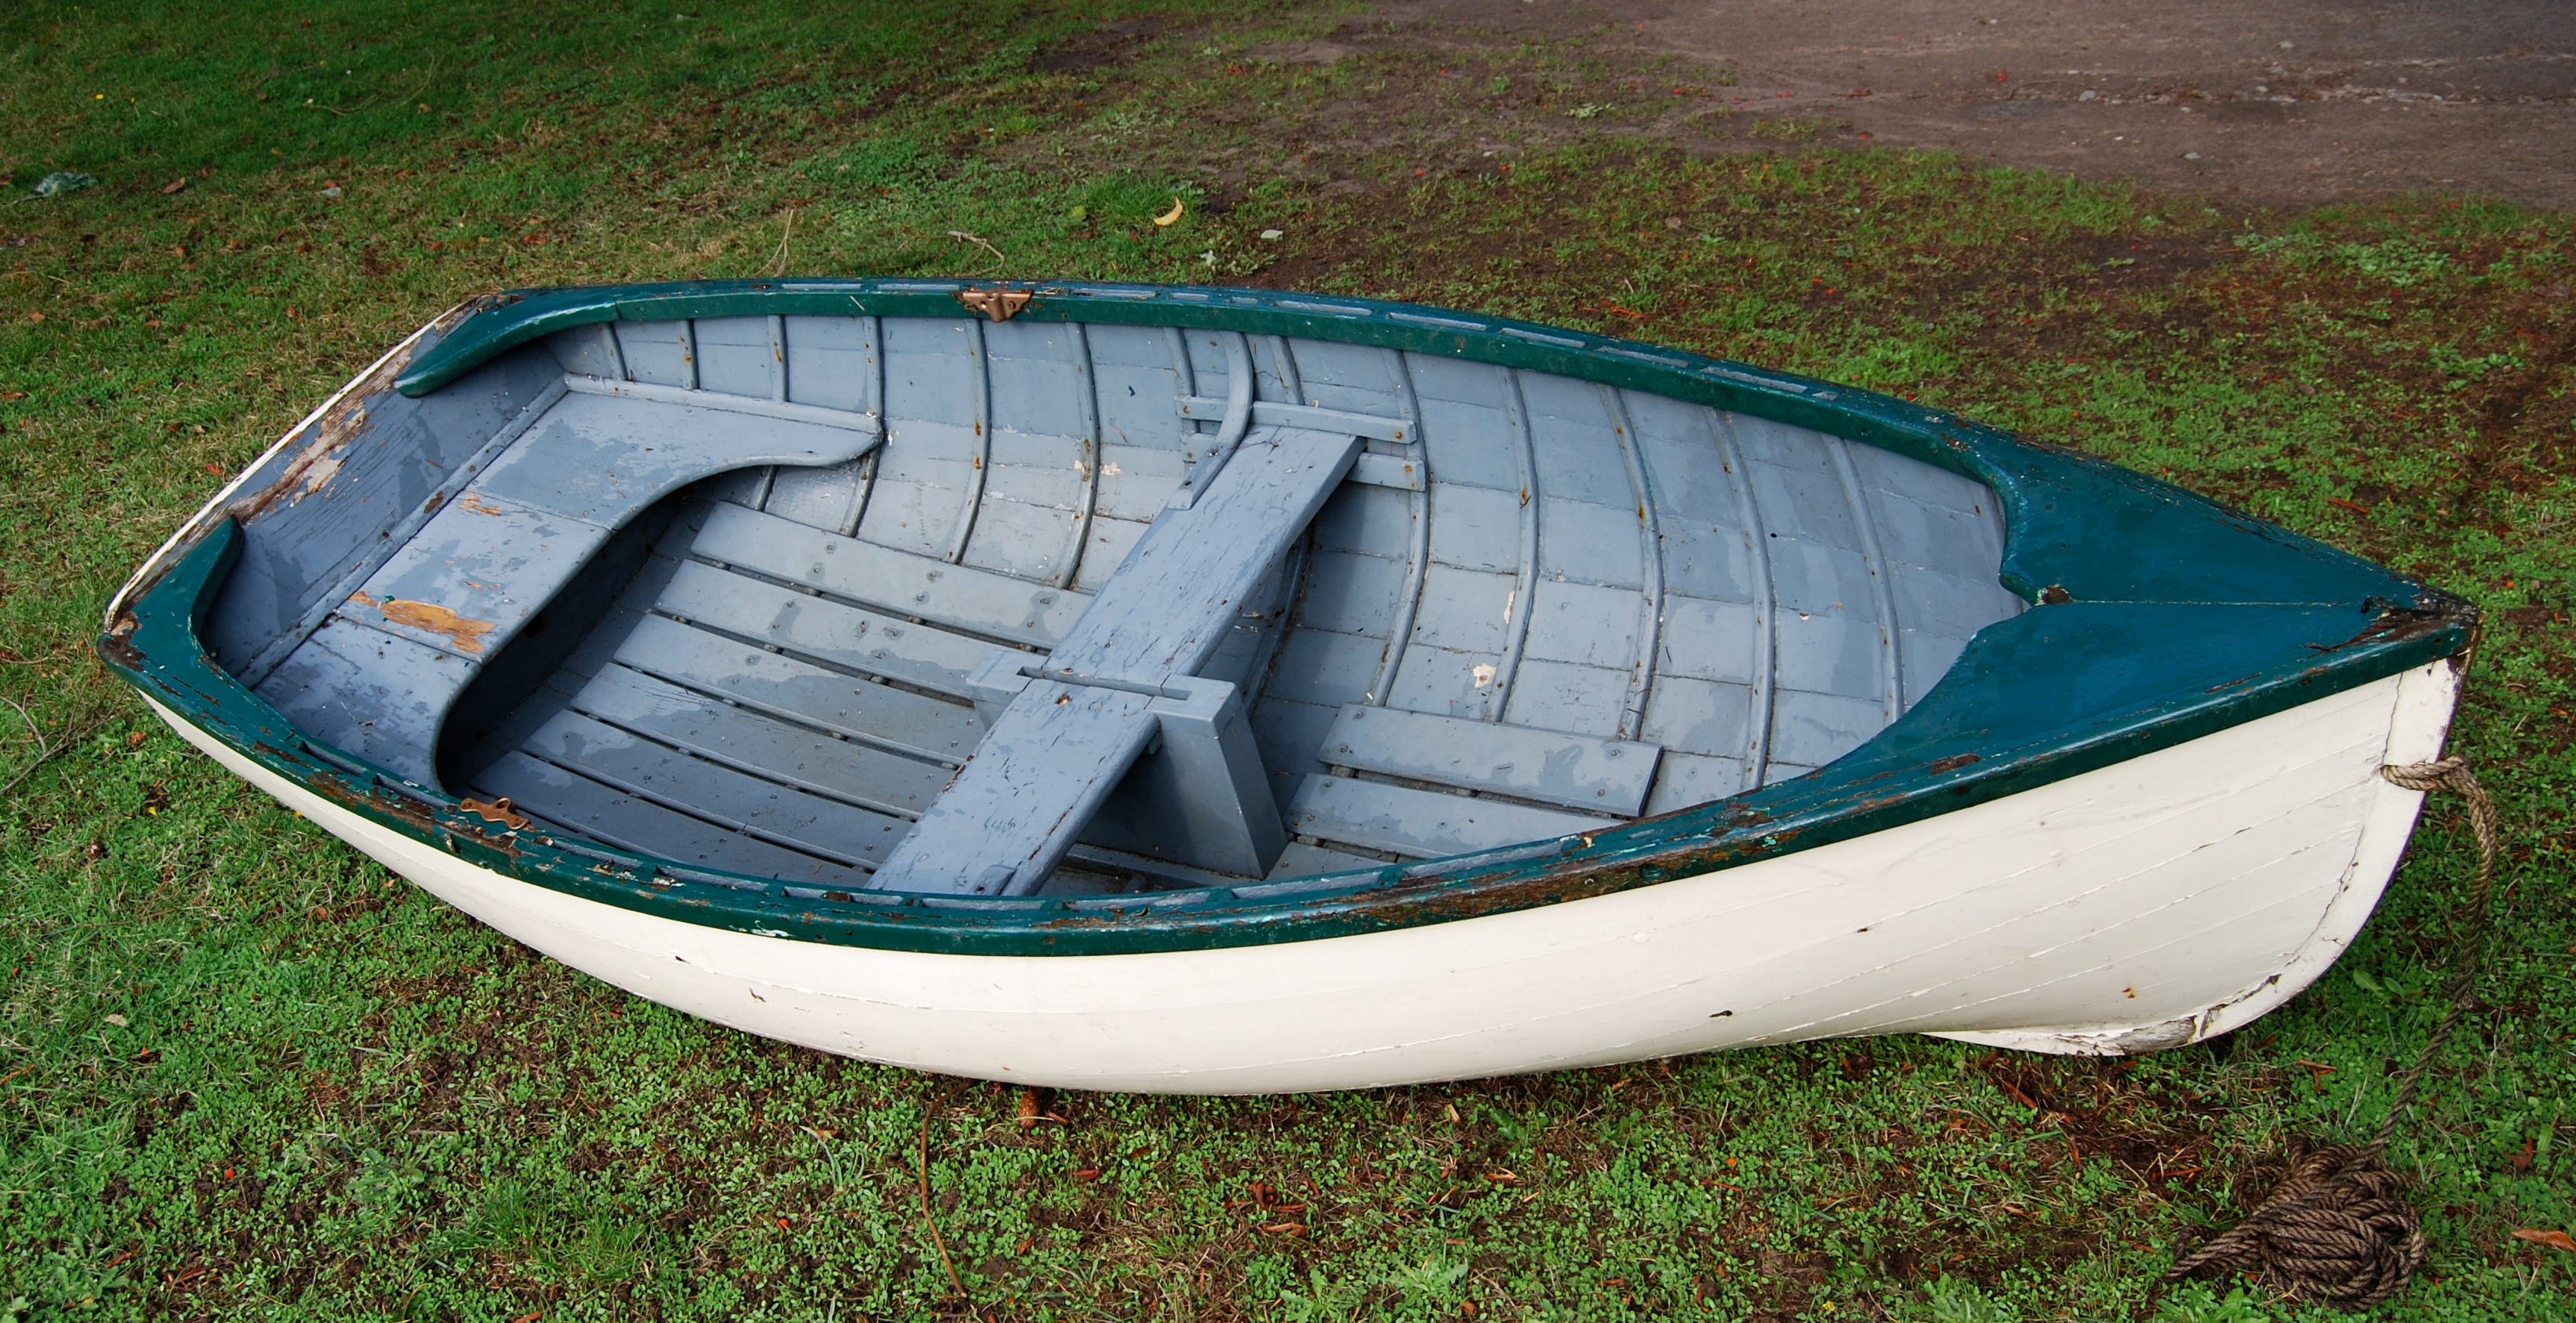
Odds suggest you might run screaming from the idea of restoring any ancient, needy plank-on-frame dinghy, like the 90-year-old tender shown here in the throes of open-heart surgery. But please hang with me for a moment, because if you have a small cruising boat; if you like standing out in a sort-of healthy way, and if you want the finest kind of tender for rowing and also towing behind your camp cruiser, there’s nothing sweeter and more functionally elegant than a little round-bottomed skiff.

Okay, we might be half a bubble off. But we’ve loved restoring and using lots of planked tenders similar to the ones in adjoining photos. Many were built in the 1930-1950 period, prior to fiberglass production and decades before “dinghy” meant only one thing to most boaters: An ugly, hard-to-tow, motorized inflatable you can barely move with oars. But don’t get me started on that subject.

Accepting that many practical folks with small cruising boats solve their dinghy needs with affordable blow-up kayaks or featherweight tenders like the Portage Pram, we’d still like to lobby for the daring choice of a small lapstrake or carvel-planked dinghy—more “classic” than sensible stitch-and-glue kits; a bit heavier than most boaters are willing to consider…but, jeez, they’re so elegant, slippery in the water and just plain beautiful.
Also, admit it: The idea of restoring a broken-down classic dinghy appeals to a twisted corner of your brain. We know you’re already insanely fond of small boats, meaning you’re inclined toward independent thinking and going-rogue temptations, with a dash of creativity thrown in for good (or bad) measure. If we’re correct and you’re slightly corruptible, let us share a tiny gateway-drug sample. The first dose is easy and won’t confirm your addiction: Just begin trolling for-sale ads in the dangerous places we all frequent. If you decide you want a little tender now, and your lack of patience is offset by two wallets, you might hire a professional to build your dream dinghy…but we doubt you’re in that demographic. You could build your own from plans, but that’s also unlikely. The not-completely-insane alternative is to track down a free or cheap old thing that needs a ton of work, then ratchet up your courage for what is actually a do-able project that promises lifelong rewards: The endless pride that comes when you rescue and resuscitate a beautifully designed but needy classic; the money saved vs. buying any kind of new tender; the joy you’ll experience rowing a dinghy like this, and finally the heartwarming reception you’ll get from other boaters who rave about the gorgeous little skiff towed behind your small cruising boat.
If we haven’t yet driven you away, let’s get to it.
Traditional North American plank-on-frame dinghies were often planked in cedar—western red, northern white, atlantic white—but some were sheathed in planks of mahogany. Plank thicknesses were usually in the ½-inch range…rarely as skinny as 3/8” or thicker than 9/16.” If any candidate hulls need planks replaced, in whole or in part, you’ll find it’s a lot easier to deal with carvel (smooth) planked hulls, vs. lapstrake, since the laps on a lot of vintage lapstrake boats are fastened with small clenched boat nails, making the planks more difficult to easily pull apart, cut to exact shape of the originals, and replace.
Admit it: The idea of restoring a broken-down classic dinghy
appeals to a twisted corner of your brain…
The project we’d like to showcase today—pretty typical of classic dinghies from the 1930’s—is a 9-foot beauty of unknown heritage, planked in western red cedar, with mahogany stem, transom, knees, thwarts and white oak frames. The project was purchased for almost nothing, and we completed full restoration for a boatshop customer who wanted a classic tender to tow behind his equally classic motorboat.
(He and his wife were ecstatic with the finished boat…and I wish I could share “After” photos, but the digital camera I used for the dinghy was destroyed when I swamped a small, open sailing skiff in corrosive saltwater, right after finishing work on the tender.)
Our initial survey of the dinghy revealed that it needed “almost everything,” meaning, for starters, replacement of the original oak frames, since most were cracked, broken in places and/or rotten. The boat also needed new mahogany inwales, gunwales, thwarts, breasthook, knees, transom and transom framing. The cedar planks were in sound condition, along with the stem and keel, and by good fortune the failing frames were still holding the hull’s shape, so we didn’t have to deal with makeover of a sagging, warped or otherwise distorted hull.
So, while the to-do list was daunting, let’s break it down step-by-step, hoping we might convince you that jobs like this are merely a series of small, achievable steps. (Just keep one thing in mind: We are not restoring a Stradivarius. It’s a nice little boat, but it’s still a boat. And it’s wood, so if you make a mistake now and then, you get a do-over.)
After removing thwarts, inwales and gunwales, we chose to begin the dinghy’s restoration with transom replacement, since the ¾”-thick original mahogany transom had several issues: Many of the plank ends were split where additional wood screws had been added over decades of attempted repairs, and most critically, framing around the inside perimeter of the transom had pockets of rot that had spread into the transom itself. The whole mess had to go, but there were two pieces of good news: 1) Because many of the original plank screws already resembled loose teeth, we were able to get the entire transom out of the boat in one piece, using it for a pattern, and 2) By removing the transom we shaped a new one that could be fitted 1-1/2” farther forward, allowing new fasteners to go into fresh cedar, vs. into the old split plank ends.

When removing the original transom, we temporarily held the boat’s hull shape by wrapping it with a ratcheting strap that kept the stern area from doing the splits.
By tracing the transom shape onto new wood and capturing bevel angles at different points around the perimeter, we were able to cut a new mahogany transom that fit in place, along with beveled transom framing that offered more “meat” to strongly attach the new wood to the old planks. We bedded the transom and framing to the hull planks with 3M 5200 adhesive caulk, just to be sure the thing would never leak or come apart. (Final note on this subject: In the adjoining photos, you’ll see we added more crown to our new transom, vs. the original’s almost-flat transom lip. The added crown helps overall appearance.)
With the new, vastly stronger transom in place, we finished gutting the boat down to bare frames and planks, once again retaining the overall hull shape with a few ratcheting straps…just in case the hull wanted to spread once we’d pulled apart some important structural members. So, at this point we made an easy decision: Because the old frames were holding the hull shape, we decided to steam-bend new oak frames and fasten them in between each of the old frames, rather than directly replacing each weakened frame. This way, we could remove the troubled originals only after new, stronger sisters were doing the job.
Here’s how we did it. First, we found a source for “green” bending oak, meaning white oak (vs. red) that had not yet been air- or kiln-dried. It’s hard to say if you might have trouble locating bending oak where you live: Here in our Puget Sound area, we found some lumber yards in the Seattle-Tacoma area that stocked modest stacks of bending oak, and we were able to pick up some green-oak planks close to home, at Edensaw Woods, Ltd. in Port Townsend, WA.
You’ll want oak planks in 4/4 (Four-Quarter) dimensions, meaning they are nominally ¾” thick. (Please don’t ask why that makes sense; we don’t have space here for that discussion.) And ¾” thickness is fine, as long as you have a table saw and maybe also a thickness planer to rip the planks down to the width you want for each of the small frames. We wanted finished dimensions of ¾” wide by 5/8” thick for each frame, so it was easy to get there with oak planks that were sold at the lumberyard in widths of 7-1/2” to 9-1/2.” Side note: It’s critical that you mill the bending oak so that the grain of each frame is running parallel to the hull.
So, for length, you just need to be sure that each of your new frames will reach down, across and up the other side of the hull at each station. Our plan was to hold each frame in place using 7/8” x 8 bronze wood screws that would come in from the bottom via countersunk pilot holes, so in order to be ready for action, we used a thin and flexible batten—same width as the new frames—to mark exact position of each new frame by tracing sides of the batten with a fine-tipped permanent marker, holding the batten in place with small clamps at each sheerstrake while pushing down and in to hold the batten in position while drawing the outline. After removing the batten, we drilled tiny pilot holes through each plank from the inside out, sticking broken-in-half toothpicks through each of the holes so they were flush with the inside plank surface, but protruding from the outside like porcupine quills.
This next part requires help from two friends, since it’s ideally a three-person process. First you steam-bend a collection of frames, or simply boil them in a steel pipe that’s been capped off at one end. (We use a 200,000 btu propane crab cooker to heat the water-filled 6”-diameter pipe, propped at a slight angle with the cap-end down.) When the frames have been boiling or steaming for maybe 20-30 minutes, pull each one out quickly while wearing heavy gloves, press it down over your frame-position lines, and with the pliably soft frame pushed down solidly against all plank surfaces, clamp the frame firmly in place at each sheer plank. With one or two helpers making sure the plank remains in full contact with the planks, crawl under the hull, replacing each toothpick with the appropriate tapered countersink drill bit, installing at least one wood screw into each plank. By working from one sheerstrake down, across and up the far side of the hull, you’ll avoid any pooches, voids or other issues: Your new frames will add tremendous strength and stiffness to the old hull, now and far into the future.
While steam-bending and installing new frames might seem intimidating before you’ve done it, you’ll quickly find it’s more fun than any other step in the restoration process. It’s exciting, since you need to work quickly, getting each hot frame locked in place and screwed down before it cools and stiffens. But once you establish a rhythm, the reward is SO terrific…leading to high-five satisfaction at how much strength you’ve given to a weak and tired old hull.
Just one other note about the new frames—a little step that’ll help produce better results. After you’ve shaped each of the frames in the tablesaw and planer, be sure to chamfer each upper (inside) edge as shown in the accompanying illustration. Not a big radius, just something you can shave off each corner with a small hand plane, 80-grit sandpaper or a spokeshave. This will measurably reduce the number of split-outs or splintered edges you get when bending small frames into your boat. (It’s frustrating to bend a new frame in place and be halfway through screwing it down to have a split erupt. The chamfer helps to magically reduce the odds of such trouble.)

After you’re finished fastening in your nice new frames, you can carefully remove each of the old frames with a small prybar or other such weapon of choice. If the boat is really old, the original frames were likely fastened with small clench nails, each nail tip bent over the inside of frame members. If they’re still holding tightly, one trick is to erase the clenched tips with a handheld grinder before prying the plank away from the hull in that area. You can also surgically cut the old frame into smaller pieces using a Japanese backsaw with short, curved blade (adjoining photo, below).
Once you’ve extracted each old frame from the hull, some remnant pieces of old nail might be stuck in their original holes. Just drive them down and out of each hull plank with an appropriately skinny nail punch. And when all old frames are out, sand inside planks smooth, then fill nail holes from the inside using a sandable two-part epoxy filler like Interlux’s Watertight Epoxy Filler or Evercoat Lite Weight Filler, which is used by a lot of autobody shops. (Photos below.) These products cure in about 15 minutes and can then be sanded smooth. (Later, when you turn the hull upside down to refinish the outside planks, you’ll probably sand the filler again where it erupted through those old nail holes.)
So, with new frames in and old frames out, you can leave the overly-long new-frame ends jutting above each sheer plank until after finishing the next step, which is the cutting, fitting and installation of new inwales and gunwales, milled to about the same pattern (thickness, height) as the originals that came out prior to reframing. You can either screw the inwales/gunwales into the new frames, or better yet drill for and install copper rivets through the entire sandwich of gunwale, frame and inwale. For this project you’ll need a holding iron designed to keep the cupped roves in place as you hammer them onto protruding rivets.


After the inwales and gunwales are in place, you can use a fine-toothed Japanese backsaw (photo above right) to trim ends of each new frame off flush…then sand. If you were lucky enough to remove original thwarts and knees without total destruction, you can use them as patterns for a new stern seat, center thwart, maybe also a new, small forward thwart and knees that help hold the thwarts firmly in place. We came close to replicating the old stern seat and thwarts on the 9-foot skiff, but our new breasthook (stem knee) was created from scratch. The only real trick with knees is to capture the old bevel angles and transfer them to your new wood when shaping. Or, if you don’t have old knees for pattern-making, you need to deploy a bevel gauge carefully before cutting new knees on a bandsaw, with a handheld jigsaw or a Japanese backsaw.)
You’ll support each of the new seats/thwarts with full-length risers that are screwed into frames on each side at an elevation matching the originals (that were removed before you started reframing the boat).

After this, you may want to cut and fit traditional-style floorboards, removable for cleaning, to keep your feet out of bilge water when rowing. Of course, you’ll probably want to repaint the boat inside and out before installing the floorboards, which might want to be oiled or varnished.
Once inside elements are painted and/or varnished, you can flip the boat, do some caulking, fairing and sanding on the outside planks, then apply paint. Please consider a contrasting sheerstrake color, or varnished wood on the sheer plank…always a tasteful touch.
Then, full of well-deserved pride, you’re off to the launch ramp for your first applause from admirers. After that, out there by yourself on your local lake, river or saltwater bay, you will just about cry with happiness at how your gorgeous little classic glides across the water. Sandpapered fingers will grow new skin; the cuts will heal, and you’ll have years of joy towing your beauty to cruise destinations and savoring those late-afternoon or evening rows around the anchorage, trying to look nonchalant as other boaters drool. •SCA•
Excellent article, makes a challenging project seem very approachable! Thanks, Marty!
Two points:
1) the illustration referred to (" be sure to chamfer each upper (inside) edge as shown in the accompanying illustration") came across as a picture of many fuzzy, parallel lines and didn't show anything usable.
And 2) What Mr. Lewis said. Actually, when I was in grade school in the 1950s the arithmetic teacher used lumber sizing as a real life example. However, the pre-surfacing (rough cut) boards were actually 1/4" larger than the finished size which was the true dimension. So a 1 X 4 would go into the mill at 1 1/4 X 4 1/4 with the finished size being 1 X 4, not 3/4 X 3 3/4. I don't know when this changed. My folks had their house built in 1957 and sold it in 1965. The new owners want to do some remodeling but had to have lumber specially milled because what was available was smaller than what the house was built with.