
Building City Slicker 2.0: Chapter 2
After the Hull Is Done
Article series by Bill Mantis

(See Chapter 1 here.)
The Sail
I had settled on a balance lug for City Slicker 2.0’s rig with a square footage in the 70-75 sf range. By way of comparison, both the 14’ Sunfish and the 14’ Laser carry 76 sf of sail. I had hoped to fit a quadrilateral sail of that size on a yard and a boom no longer than 10’ in length, and to set it on a mast of the same length. I also decided the yard should describe a 45° angle to the yard, figuring this would strike a good balance between maximizing the sail area while keeping the center of effort relatively low. I discovered the desired size could be achieved if the foot and head of the sail were 10’, which meant my yard and boom would have to be a few inches longer than I had planned.
The running rigging for a small lug sail consists of only three lines: the halyard, the downhaul and the sheet. By convention, the halyard joins the yard at a point 1/3 of the yard’s length so that 2/3 falls aft of the mast. There appears to be no standard practice for where the downhaul attaches to the boom, but usually it is at a point between 1/5 and ¼ of the boom’s length. The downhaul’s point of attachment determines the sail’s “posture”. Further aft will pull the sail’s clew and peak down; its throat and tack up. Further forward and the reverse occurs. The more you move the downhaul forward on your boom, in other words, the “taller” your sail becomes. In technical terms, you’ve given your sail a higher aspect ratio. Which confers, in turn, a higher lift/drag ratio and better upwind performance. In theory, anyways, if not in actual practice.
In any case, I fastened two eye straps to my boom for the downhaul. One at about ¼ the boom’s length; one at 1/5 of its length. I calculated that by using the front eye strap for the downhaul—rather than the back one—the sail would rotate 8°. (See the “Sail Plan” diagram.) This gave me the option of sailing with a slightly taller or shorter sail and to determine if the options produced any noticeable difference in CS 2.0’s performance.
I made City Slicker’s first sail from a UV-stabilized, nylon-reinforced vinyl material called Griffolyn, which is available online. I used a pattern based on boat designer Jim Michalak’s instructions. That pattern is apparently no longer available, but there is one on a related website that gives even more detail.
I used the Griffolyn sail for one season, but since I had failed to reinforce its corners adequately, a couple of the grommets started to pull out. Fortunately, I was able to persuade my wife to sew me a new sail. We bought a sail kit from Sailrite. They sell complete sail kits for many common boat designs, and they will sell you a kit for a unique design, but they charge extra for the service. My wife had nothing but praise for the Sailrite kit and the instruction manual that came with it. She has refused, nevertheless, to sew another sail for me until I provide her with a full-sized sail loft.
Or if you’re looking for a ready-made sail to meet your specific requirements, you can order one from Really Simple Sails. Located in the Philippines, RSS is a sail making business run by lugsail guru Michael Storer. If you’re unfamiliar with lugsails and are interested in learning how they operate, Storer’s website offers several videos on the topic.
The Mast and Mast Step
I made the mast from a 10’ 1 x 6 ripped in half at 45°. Initially I considered the possibility of simply epoxying the two halves together with their angled surfaces tapering to a 90° trailing edge. This would have yielded a mast with a cross section measuring roughly 1-1/2” x 3”. On further thought, however, I wasn’t sure it would have sufficient strength. So, I created a sandwich of the two halves with 3/8” of cedar in between them. The result was a spar with a section measuring roughly 2-1/8” x 3”. I then rounded all of the corners to create a more aerodynamic shape.
I soon discovered that a 10’ mast would not give me enough headroom. If I were sitting on the side deck, I couldn’t duck low enough to avoid the boom’s swing. So I spliced another 10” of length onto the bottom of my mast.
For the mast step I assembled another sandwich: short lengths of 2 x 2 sandwiched between two slices of half-inch plywood, with a rectangular square cut out of the top slice, as illustrated in the “Mast” diagram.

The Boom and the Yard
Both spars were made from cedar decking stock, ripped to 1-1/4” widths then laminated to yield a cross section measuring 1-1/4” x 2”. All corners were rounded.
I have found that all my spars—mast, boom, yard—are all heavier and more robust than they need to be. I should have spent more time planing and shaping than I did.
Rigging Hardware
The hardware for handling the halyard, sheet and downhaul consists of three ferrules, two deck blocks, four cleats, a few eye straps and screw eyes, and one device called a “rope tightener” which could probably be described as a combination of carabiner and clam cleat.

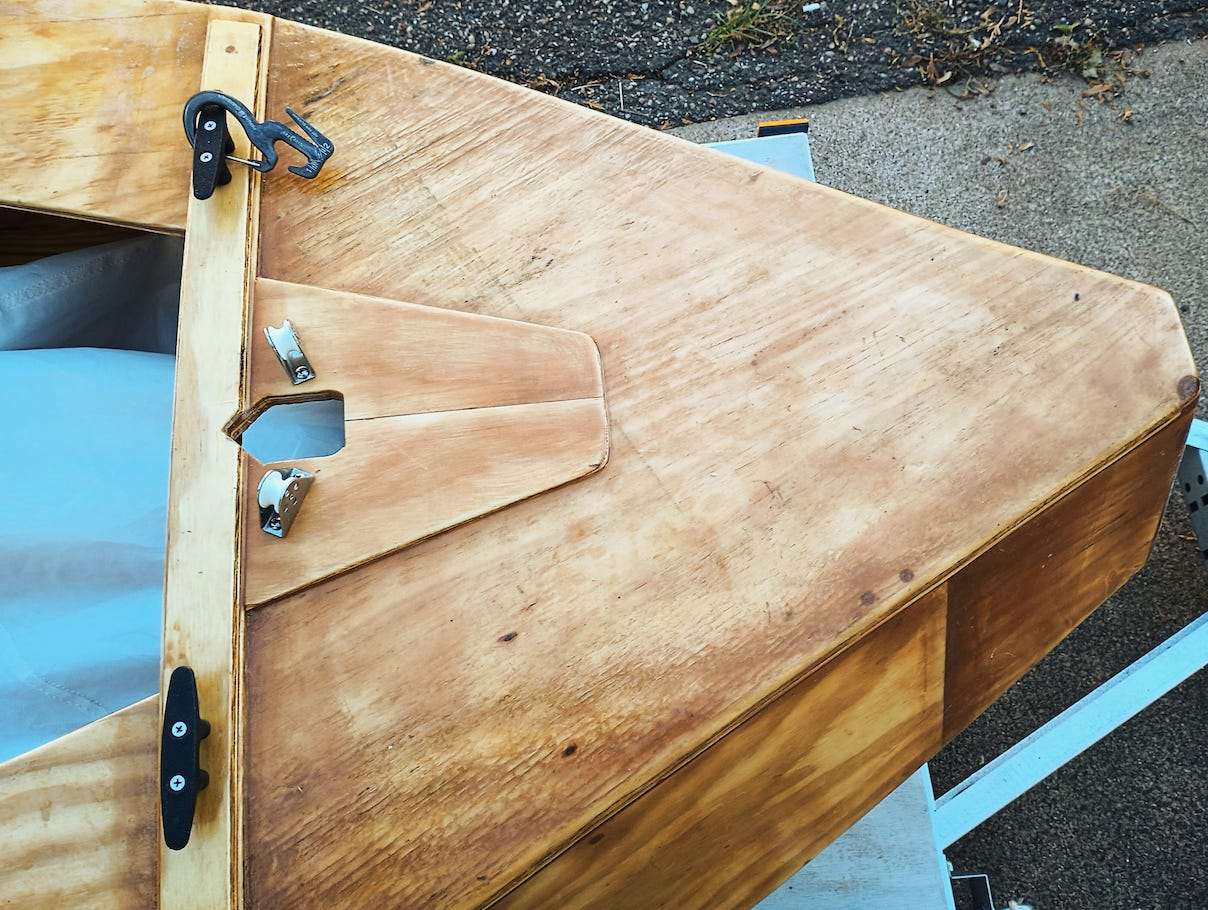
Most sailboats carry a sheave or two at their masthead over which their halyards pass. While sheaves are not terribly expensive, incorporating them into the masthead involves a bit of fussing: measuring, carving, cutting, gluing, etc. I avoided the fussing by screwing two ferrules to the masthead on surfaces I had filed to 45° to horizontal. (See the “Masthead Hardware” photo.) While it’s likely two ferrules create slightly more friction than a sheave when the sail is being raised, for a lug rig it really doesn’t matter, because it’s the tension on the downhaul that determines the set of your sail. If you can’t haul your yard quite as high as you would like it to go, in other words, you need only tighten up your downhaul to compensate.
Two cleats and two blocks are mounted on the foredeck for handling the halyard and downhaul; one block and one cleat assigned to each line. If you refer to the “Foredeck Hardware” photo, you’ll notice that this hardware is mounted in a bilaterally symmetrical pattern, allowing you to choose which block/cleat pair you want to assign to handle your halyard and which pair will handle the downhaul. In making this choice, you’re necessarily deciding on which side of your mast your boom and yard will lie: port or starboard. Why would a skipper care about this option? If you always take off from a mooring buoy, you won’t care. But whenever you take off from a dock, you will. Taking off from a dock, you’ll want your boat to be downwind of the dock, and you’ll want your boom and yard to be downwind of the mast. That way you can step aboard your boat without having to step over its sail, and you can raise the sail without fear of the sail or sheet getting tangled by a dock post. Another, less obvious advantage to this rigging arrangement: once the downhaul and halyard are secured, there is no danger whatsoever of the mast popping out of the mast step.

A couple caveats before proceeding. 1) I have been using a rope tightener to secure the downhaul, and I’m not sure it’s a good solution. Sometimes it seems to lose its grip on the line, plus the line shows signs of chafing. 2) Maintaining tension on the downhaul is critical to keeping the lugsail’s luff taut and straight. A straight luff, in turn, is critical to a sailboat’s performance upwind. Since my downhaul configuration offers no mechanical advantage, my boat’s weatherliness might be less than ideal.
The sheet arrangement, on the other hand, provides a 2 to 1 mechanical advantage. One end is tied to an eye strap fastened to the top of the rudder. The other end passes through a ferrule mounted on the boom and then to the skipper’s hand. I have also screwed cleats to the brackets that support the side decks. If gripping the sheet gets tiring, I pass the sheet around one of those cleats to lessen the force I need to exert to maintain the sail’s trim. One of these days, I may get around to replacing the ferrule with a block, but it’s not a priority.
Leeboards and Leeboard Cases
Each leeboard was cut from a piece of half-inch plywood measuring 12.5” x 26.5” to create an 8”-wide panel that angles aft at 15°. In theory, a daggerboard with a vertical leading edge works more effectively at preventing leeway than one whose leading edge is angled aft. Unfortunately, a board with a vertical leading edge is likely to get hung up in weeds, occasionally bringing your boat to a full stop.
I’ve been using a bungee cord—passed around the leeboard and hooked to the inboard edge of the side deck—to keep a board raised when its services are not needed. This strategy works but not very well, since two hands are sometimes required to make the adjustment. I plan to remedy the problem by cutting a notch in the leeboard’s trailing edge at the so that the raised board can sit on the back edge of its case. (See the “Leeboard and Case” diagram.)

I fabricated the wedge-shaped leeboard cases from half-inch plywood and a few scraps of dimensional lumber. (See the “Leeboard and Case” diagram again.) Perhaps the most time-consuming part of the case-construction process was calculating the dimensions the wedge would have to take to ensure the slots for the leeboards would be parallel to the boat’s centerline. From my drawings, I deduced the acute angle of the wedge would need to be 14°. Then, by consulting the “tangent” column of trig functions table, I found the front leg of the wedge would need to be almost exactly 25% the length of its outboard leg. (Actually 24.933%, if you want to be compulsive about accuracy.) I assembled the pieces to form a slightly oversized wedge, then applied a belt sander to the inboard surfaces until the desired size was achieved.
Watch for Chapter 3 in a couple of weeks where I will discuss what I’ve learned in sailing City Slicker 2.0 and what I would change were I to build her again. •SCA•

In the spirit of Bolger and Payson.
RP
When it comes to small dinghy sailing, Hugh Horton comes to mind. I have images of his West Fla gatherings and all the small fully battened tan bark sails - they look easy and efficient! Then my mind wonders to all I have learned here - you sell said sails here (Duckworks) in more than one size. I've scrutinized various dinghy layouts, like the one Dave McCulloch was building (Mower X?), Hugh's own design and the Scout Sailing Dinghy. I dwell on these images/articles because, one of them I would like to build for my grandsons to start out on after there appetite is wet with overnights on my Ilur? I'm spoiled by the freeboard on my Ilur and would love to see more freeboard on the Scout? All that to say I'm all about the modern fully battened, reefable sails - love the simplicity!